By setting the solid pattern, the child line can have a pattern with alternating solid parts and non-solid parts. For detailed description of solid patterns of child lines, please refer to: the Solid Pattern of Child Lines section of Composition of 2D Line Symbols. The content below describes how to draw the solid pattern of a child line in the Line Symbol Editor.
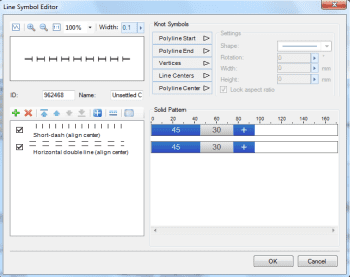
The area shown below is the solid pattern setting area. Every item in this area is a solid pattern designer, and each of them corresponds to a child line in the child list. In the figure below, the solid pattern designer to the right of each selected child line is for setting the solid pattern of the corresponding line.
The figure below shows a solid pattern designer. When you create a new child line, a default solid pattern will be assigned to the line. Then you can add a new solid or non-solid part through the Add button in the solid pattern designer. A default solid or non-solid part has a default length.
Add Solid/Non-solid Parts
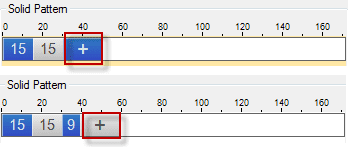
The blue Add or grey Add button in the solid pattern designer can be used to add a new solid part or non-solid part. The blue Add button adds a solid part; and the grey Add button adds a non-solid part.
How to add solid and non-solid parts:
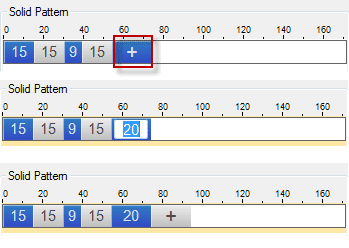
- Double click the blue Add or the grey Add button on the solid pattern designer;
- Then an editable area appears in this button. This area is where the length of the solid or non-solid part is input. The default value is 20, and the unit is 0.1 mm. Once you have input the value, press the Enter key to complete the adding of the solid or non-solid part.
Set Lengths for Solid/Non-solid Parts
For existing solid or non-solid parts, you can reset the lengths. There are two methods to modify the length of a solid or non-solid part.
Method 1: Input a Value
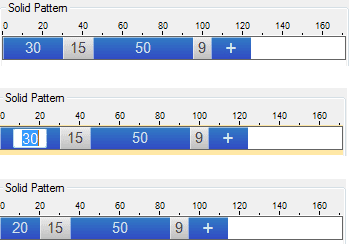
- Double click on the solid/non-solid part whose length is to be changed;
- Then the value area in the solid/non-solid part changes to an editable status. Once you have input the new length, press the Enter key to complete the editing of the solid/non-solid part.
Method 2: Drag
- Select the solid/non-solid part whose length is to be edited;
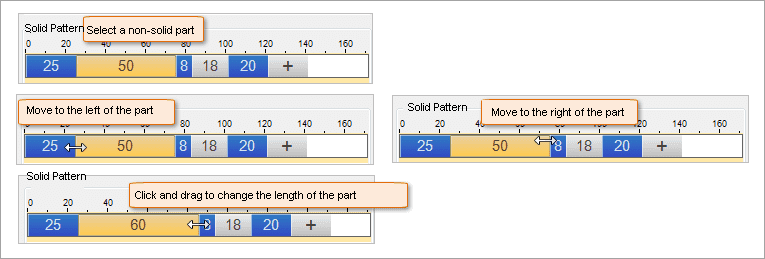
- Move the cursor to the left or right boarder of the selected solid/non-solid part, and the cursor changes to a double arrow, as shown in the figure below;
- Once the cursor has changed to a double arrow, hold down the left mouse button and drag the mouse toward left or right to adjust the length of the selected solid/non-solid part. Release the left mouse button when the length reaches a satisfying level.
An indicator is provided above the solid pattern setting area to help you set the length of a solid/non-solid pattern.
Delete Solid/Non-solid Parts
- Select the solid/non-solid part to be deleted;
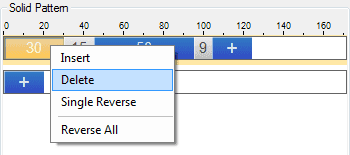
- Right click on the selected solid/non-solid part and select Delete on the context menu, or directly press the Delete key;
- The selected solid/non-solid part is deleted, and in the meantime a dialog box pops up asking you whether to process the solid/non-solid parts after the deleted one. If you click on Yes, the solid/non-solid parts after the deleted one will be changed, i.e., a reverse operation is applied to these parts (the solid parts are changed to non-solid parts, and vice versa); if you click on No, the solid/non-solid parts after the deleted one will not be changed.
Insert Solid/Non-solid Parts
In the solid pattern designer, a new solid/non-solid part can be inserted among the existing parts.
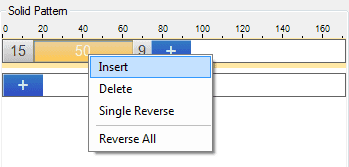
- Right click on the any solid/non-solid part and insert a new solid/non-solid part before the current part;
- Select Insert on the right-click menu to insert a new solid/non-solid part. If the selected part is a solid part, the new inserted part is a solid part, and vice versa;
- Once the inserting is completed, a dialog box pops up asking you whether to process the solid/non-solid parts after the inserted one. If you click on Yes, the solid/non-solid parts after the inserted one will be changed, i.e., a reverse operation will be applied to these parts (the solid parts will be changed to non-solid parts, and vice versa); if you click on No, the solid/non-solid parts after the inserted one will not be changed.
Reverse Solid and Non-solid
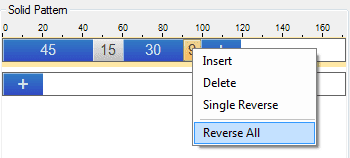
Reversing the solid and non-solid parts is to change the original solid patterns to non-solid patterns, and change the original non-solid patterns to solid patterns. The reverse operation can be applied to a selected solid/non- solid part, or to all the solid/non-solid parts in the solid pattern designer.
Single Reverse
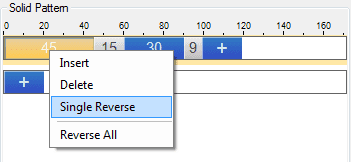
- Right click on the solid/non-solid part to be reversed;
- Select Single Reverse on the context menu to complete the operation. If a solid part is selected, a reverse operation will make it a non-solid part, and vice versa.
You can also right click on the corresponding buttons and select Single Reverse to change the attribute of the solid/non-solid part to be added.
Reverse All
- In the solid pattern designer, right click on any solid or non-solid part
- Select Reverse All on the context menu to complete the operation. All the solid parts in the solid pattern designer are changed to non-solid parts, and vice versa.
