UI for the Marker Symbol Editor
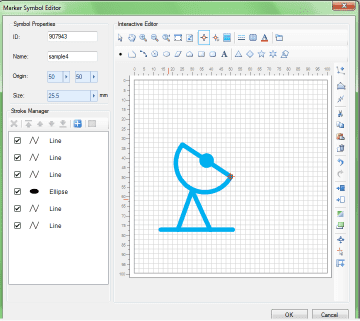
The figure below shows the interface of the Marker Symbol Editor:
- Symbol Properties: The Symbol Properties area is for setting or editing the properties of a marker symbol including the symbol ID, the symbol name, the symbol origin, and the default symbol size.
- Stroke Manager: This area is for managing the strokes constituting the marker symbol. A marker symbol is composed of point, line, and/or region geometric objects which are called strokes. Functions in the Stroke Manager include: deleting and adding strokes, moving the order of strokes, and setting stroke properties.
- Editing Area: The editing area is for drawing marker symbols. Geometric objects constituting a marker symbol are all drawn here. This area provides a ruler and background grid to facilitate accurate symbol drawing.
- Horizontal/Vertical Toolbars: Most of the symbol editing functions provided in the Marker Symbol Editor are placed in these toolbars. The functions include: browsing functions, functions for drawing geometric objects, stroke editing functions, and functions for setting the operating environment of the editor.
Below introduces certain functions in the Marker Symbol Library Selector. For other functions, please refer to other sections of this document.
Browsing Operations in the Editing Area
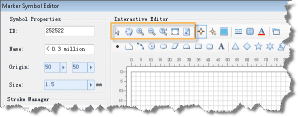
In the Marker Symbol Editor, the buttons in the toolbar (shown in the figure below) are for browsing in the editing area. Below are the detailed descriptions of the functional buttons.
- Select : Click the Select button. The operation status of the editing area will change to the status for selecting objects, i.e., strokes of the marker symbol.
- Pan : Click the Select button. The operation status of the editing area will change to the panning status. You can move the view of the editing area and perform the panning operation by holding down the left mouse button and dragging the mouse in the editing area.
- Zoom In/Zoom Out : Click the Zoom In/Zoom out button. The operation status of the editing area changes to the status for magnifying/shrinking the marker symbol. Click in the editing area under this status to perform a zooming operation.
- Zoom Free : Click the Zoom Free button. The operating status of the editing area will change to the free zooming status, i.e., the status for zooming on the marker symbol freely. Now you can perform the free zooming operation by holding down the left mouse button while dragging the mouse in the up-down direction in the editing area.
- Full Extent : To display the symbol with a ratio of 1:1 in the editing area.
- Refresh : Refreshing the view in the editing area.


