You can extend a marker symbol library through creating marker symbols. You are allowed to create both 2D and 3D marker symbols. 2D marker symbols are used to render points in maps, while 3D marker symbols are used to render points in not only maps, but also scenes. Below are the steps for creating marker symbols.
Create a 2D Marker Symbol
- In the Marker Symbol Selector, specify the group where you want to place the new marker symbol.
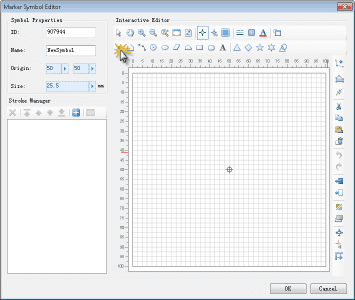
- click Edit (E) > Create Symbol > Create 2D Marker Symbol to open the Marker Symbol Editor where you can create marker symbols.
Here you must specify the symbol ID and symbol name. Meanwhile, you need to keep at least one stroke in the stroke manager. Otherwise, you will fail if you click OK to create a new symbol and add it to the symbol pane of the selected symbol group.
- Symbol properties you must specify include the symbol ID and the symbol name.
- ID: The symbol ID which uniquely identifies a symbol in the symbol library. Different symbols in the same symbol library cannot have the same symbol ID.
- Name: The display name of the symbol in the symbol library. Different symbols in the same symbol library can have identical symbol names.
- Origin: The position of the origin of the marker symbol in the drawing panel. The origin of a marker symbol is also its anchor point, which is on the point the coordinates of the rendered point object.
- Size: The default size of the marker symbol. If set to 0 in the Marker Symbol Selector , the default size will be employed. The default size of a marker symbol can be from 0 to 25.5 mm.
- In the drawing panel, draw graphics composing a marker symbol. Here we take a point as an example.
Click the Point button, then click at any where in the drawing panel to draw a point.
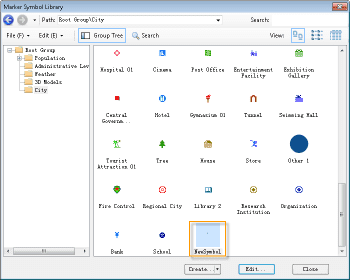
- After setting the properties of the point stroke, you can click OK to add the new marker symbol into the symbol pane.
The new marker symbol can be further edited. To do so, select it, click Edit at the bottom of the Marker Symbol Editor dialog box.
To save the new marker symbol to the symbol library, you still need to:
- Save the workspace if the currently open marker symbol library is associated with a workspace.
- Export the currently open marker symbol library as a file. The exported marker symbol library file will have the new marker symbol included. Afterwards, you can open the exported marker symbol library file to access the marker symbol.
Create a 3D Marker Symbol
- In the Marker Symbol Selector, specify the group where you want to place the new marker symbol.
- click Edit (E) > Create Symbol > Create 3D Marker Symbol to open the Marker Symbol Editor where you can create marker symbols.
- In the 3D Marker Symbol Editor that displays, you can set model for the symbol and display styles. Click Set Model to display the Open dialog box, in which you can select a model file, either in .sgm or .3ds format, and open it.
The process for creating a 3D marker symbol is as follows: firstly, you need to create 3D model in either .sgm or .3ds format; then add the 3D model into a marker symbol library through the Create 3D Marker Symbol command.
Note: The size of the .3ds model file you import cannot exceed 60 KB.
- After opening the selected 3D model, you can preview it in the 3D Marker Symbol Editor. In addition, you can set the properties for the symbol and adjust the display styles to satisfy your needs.
Here you must specify the symbol ID and symbol name. Otherwise, you will fail if you click OK to create a new symbol and add it to the symbol pane of the selected symbol group.
- ID: The symbol ID which uniquely identifies a symbol in the symbol library. Different symbols in the same symbol library cannot have the same symbol ID.
- Name: The display name of the symbol in the symbol library. Different symbols in the same symbol library can have identical symbol names.
- Scale: How many times you want to stretch the model in the X, Y, and Z direction. You can directly type a value in the box or move the slide bar that will show up by clicking the right arrow.
- Scale: How many times you want to stretch the model in the X, Y, and Z direction. You can directly type a value in the box or move the slide bar that will show up by clicking the right arrow.
- Snapshot Settings: Capture a snapshot for the model in the Preview area. The function of Snapshot Setting is that:
The thumbnail displayed in the symbol pane for the 3D marker symbol is the snapshot set here.
When rendering points in maps with a 3D marker symbol, the snapshot will be used.
- After settings in the Marker Symbol Editor, the 3D marker symbol will be added to the symbol pane when you click OK.
The Preview area supports rich mouse and keyboard operations for previewing 3D models from different angles and directions. For more information about preview operations in the Preview area, please refer to the introduction about operations in the Preview area in UI for the Line Symbol Editor.

