There are two cases in which stroke styles may be set for a marker symbol: one
is setting stroke styles for a drawn marker symbol; the other is pre-setting
the stroke styles for a marker symbol to be drawn.
The setting of the stroke style for a marker symbol is accomplished through a corresponding dialog box. Since there are point, line, region, and text strokes, the content of the stroke style setting dialog box is different too. Thus there are three dialog boxes provided: Line Style, Fill Style, and Text Style.
Properties Dialog for Strokes
- In the Stroke Manager area in the Marker Symbol Editor, select a stroke in the stroke list (or multiple strokes for batch setting), and then click the Properties button in the toolbar of Stroke Manager, or right click and then select Properties on the context menu. The Properties dialog box pops up. This dialog box is where the style of a drawn stroke is set. The content of the dialog box is different for different stroke types.
- In the editing area in the Marker Symbol Editor, select a stroke (or multiple strokes for batch setting), and then right click and select Properties on the context menu. The Properties dialog box pops up. This dialog box is where the style of a drawn stroke is set. The content of the dialog box is different for different stroke types.
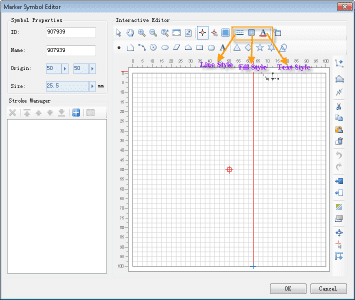
- In the Marker Symbol Editor, the buttons in the toolbar (shown in the figure below) can bring out the stroke style setting dialog box for the corresponding type. The styles of line, region, or text strokes to be drawn can be set in the corresponding dialog box.
Properties of Polygon Strokes
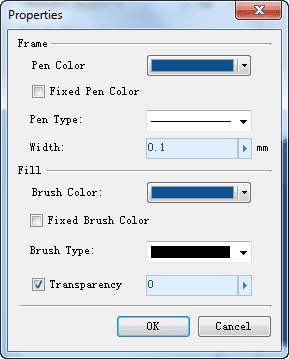
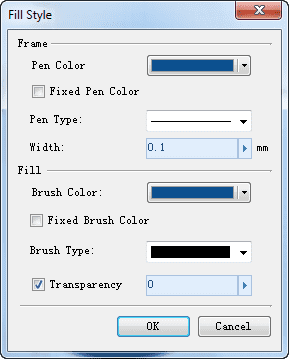
The style of an existing region stroke is set in the Properties dialog box as shown in the left figure below; the style of a region stroke to be drawn is set in the Fill Style dialog box as shown in the right figure below. The contents of the two dialog boxes are exactly the same, and so are the setting methods, which are described below.
The Frame area is for setting the boarder style of a region object. In addition, when setting the style of a stroke to be drawn, the boarder style will have an effect on the line stroke style, meaning that the boarder style also applies to the line style. Similarly, modifying the line style changes the border style for a region stroke too.
- Pen Color: Set the line color here.
- Fixed Pen Color: If this check box is checked, the line color will be fixed. That is to say, when symbolizing a map, the fixed color of the marker symbol’s lines cannot be changed through the Marker Symbol Selector; otherwise, the color can be modified through the Marker Symbol Selector when symbolizing a map.
- Pen Type: Set the line type here.
- Width: Set the line width here. Units: Millimeters.
The Fill area is for setting the fill style of a region object.
- Brush Color: Set the fill color here.
- Fixed Brush Color: If this check box is checked, the fill color will be fixed. That is to say, when symbolizing a map, the fixed color of the marker symbol’s fill areas cannot be changed through the Marker Symbol Selector; otherwise, the color can be modified through the Marker Symbol Selector when symbolizing a map.
- Brush Type: Set the fill style here.
- Transparency: Set the transparency effect of the fill here. The number ranges from 0 to100, with 0 indicating that it is completely opaque and 100 indicating it is completely transparent. It can be set by directly inputting a value, or by clicking the arrow on the right and adjusting the pop-out slide bar, or by clicking the Zoom In/Zoom Out button.
You can set the gradient style for region pen, and the gradient use double colors gradient. The start color is specified by “Brush Color” and the end color is specified by “Gradient background color”. The start color can be controlled by whether to fix the color. But once the end color is specified, it can’t be changed when apply the symbols.
- If you want to set the gradient styles, you should select a “Type”. The default is no gradient. So it needs to select any gradient mode. Here it provides line, radiation, cone and square four types.
- The gradient background color.
- The gradient offset is used to set the offset percentage that the gradient fill center relates to the center of fill region.
- The gradient angle is used to specify the color gradient direction.
About the settings of region pen fill style is similar to the settings of region objects in map, See “Gradient Fill” section of Set Fill Symbol Style.
Properties of Line Strokes
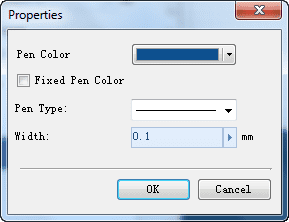
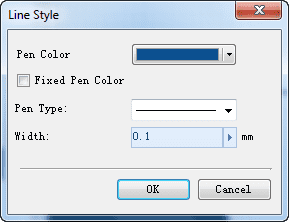
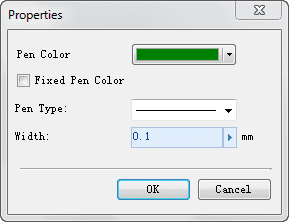
The style of an existing line stroke is set in the Properties dialog box shown in the left figure below; the style of a line stroke to be drawn is set in the Line Style dialog box shown in the right figure below. The contents of the two dialog boxes are exactly the same, and so are the setting methods, which are described below.
When setting the style of a stroke to be drawn, the line style will have an effect on the boarder style of a region stroke, meaning that the line style also applies to the boarder style of a region stroke. Similarly, modifying the border style for a region stroke changes the line style too.
- Pen Color: Set the line color here.
- Fixed Pen Color: If this check box is checked, the line color will be fixed. That is to say, when symbolizing a map, the fixed color of the marker symbol’s lines cannot be changed through the Marker Symbol Selector; otherwise, the color can be modified through the Marker Symbol Selector when symbolizing a map.
- Pen Type: Set the line type here.
- Width: Set the line width here. Units: Millimeters.
Properties of Point Strokes
Regarding point strokes, only the style of a drawn point stroke can be modified in the Marker Symbol Editor, but not the style of a point stroke to be drawn. Select the point stroke whose style is to be modified, and open the Properties dialog box which is the same as that for setting line stroke styles. The dialog box is shown below.
- Pen Color: Set the point color here.
- Fixed Pen Color: If this check box is checked, the point color will be fixed. That is to say, when symbolizing a map, the fixed color of the marker symbol’s points cannot be changed through the Marker Symbol Selector; otherwise, the color can be modified through the Marker Symbol Selector when symbolizing a map.
- Width: Set the point size here. Units: Millimeters.
Properties of Text Strokes
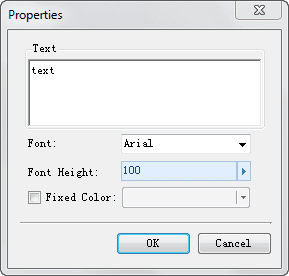
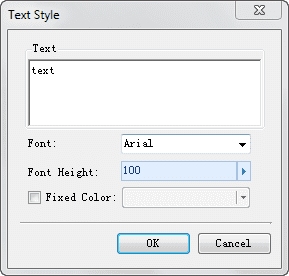
The style of an existing text stroke is set in the Properties dialog box shown in the left figure below; the style of a text stroke to be drawn is set in the Text Style dialog box shown in the right figure below. The contents of the two dialog boxes are exactly the same, and so are the setting methods, which are described below.
- Text: Set the text content here. Note that when setting the style of an existing text stroke in the Properties dialog box, the text can be edited, but when pre-setting the style of a text stroke to be drawn in the Text Style dialog box, the text content cannot be edited.
- Font: Select a font here from the drop-down list on the right to set the text font for the stroke.
- Font Height: The height of the text. It can be set by inputting a number in the box on the right, or by adjusting by the step of 1 with the up and down arrows next to the box. The height of the text refers to the distance between the top and the bottom of the text stroke. Using the height to set the text size can avoid the error in font size caused by different map scales.
- Fixed Color: If this check box is checked, the color of the text will be fixed. That is to say, when symbolizing a map, the fixed color of the marker symbol’s text cannot be changed through the Marker Symbol Selector; otherwise, the color can be modified through the Marker Symbol Selector when symbolizing a map.
