The unit of the fill symbol is the child fill. A fill symbol is composed of one or multiple child fills. Therefore, you are allowed to modify the fill symbol by editing the child fills in the Fill Symbol Editor. There are two types of child fills: image fills and symbol fills. Below shows how the fill symbol is composed of child fills.
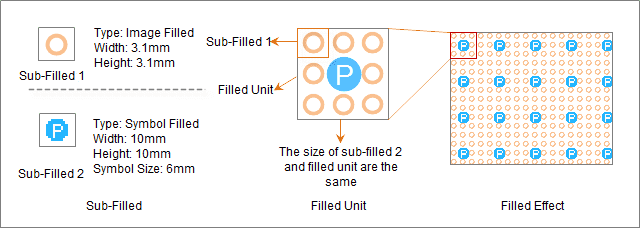
Below shows a fill symbol that is composed of two child fill: child fill 1 of the symbol fill type and child fill 2 of the image fill type. The image is specified for child fill 2 and the marker symbol is specified for child fill 1. Besides, the symbol styles, the fill width and fill height of the child fills are specified.
Child Fill Type and Size
Child Fill Type
There are two types of child fills: image fills and symbol fills. After adding a child fill in the Fill Symbol Editor, you can change the child fill type.
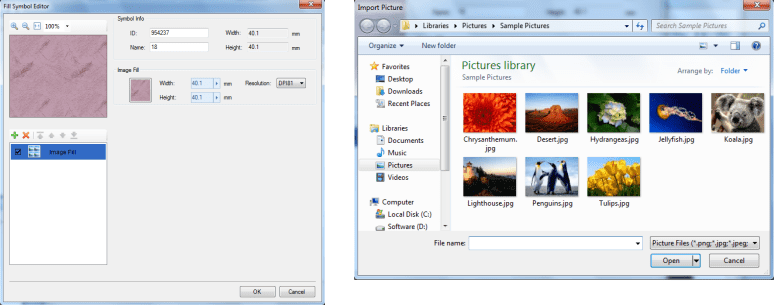
Image Fill: Specify an image and set the width, height, and resolution to control the fill effects.
Symbol Fill: Specify a marker symbol and set the fill pattern and the styles for the marker symbol to control the fill effects.
Child Fill Size
The size of the child fill is determined by the width and height of the child fill.
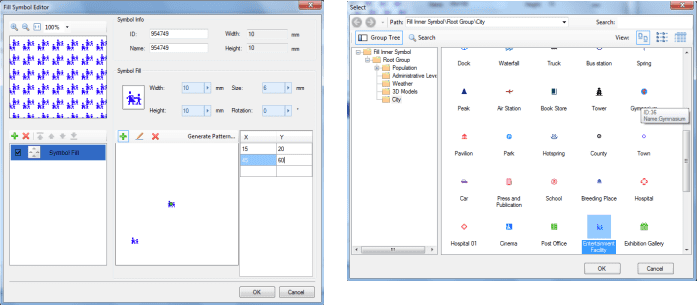
The child fill setting area to the right will have the parameters that need to be set for the specific type of child fill if the child fill type is selected in the child fill list. In the child fill setting area, you can select a symbol or import an image and then change the styles for the child style. About how to set for child fills, please refer to Setting Child Fill Styles.
If a single child fill cannot satisfy your needs, you can use multiple child fills to compose a fill symbol. Below is the introduction to how to compose a symbol fill using multiple child symbols.
Fill pattern of the fill symbol
In the Fill Symbol Editor, all child fills overlap to compose a fill symbol, that is a fill unit. While applying the fill symbol to the fill region, note that:
Fill Unit
In the Fill Symbol Editor, the fill unit is the overlap of all child fills.
Fill Unit Size: The rectangular region determined by the fill width and fill height of the fill unit. It can only be got using the method below:
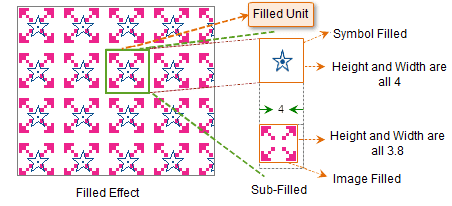
You can set the fill width and fill height for each child fill in the child fill setting area and the greatest width and height of the child fill determine the rectangular region, that is, the unit size. Below is the illustration for how to determine the fill unit size of a fill symbol. The fill unit size of the fill symbol is 4. About fill width and fill height, please refer to Setting Child Fill Styles.
Fill Pattern of the Fill Symbol
- Fill Pattern of the Fill Symbol in the Fill Unit
The child fill is filled in the fill unit from the top left and the number of child fills in a fill unit is determined by the type and size of the child fill. You can understand the fill pattern with the two situations below:
- If the fill width and fill height of the child fill are equal to the width and height of fill unit, the child fill will be drawn only once in the fill unit.
- If the rectangle composed by the fill width and fill height of the child fill is smaller than the fill unit, the child symbol will be drawn only once in the fill unit from the top left. However, you can specify how many times you want the child symbol appear and where to appear in the fill unit through the distribution pattern. About more details, please refer to the Distribution Pattern section of this page.
- Fill pattern of the fill symbol on the map
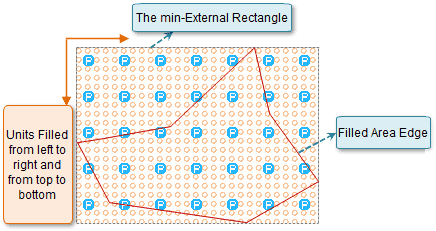
While the fill symbol is employed to the fill region, the minimum bounding box of the fill region will be got first, then the fill unit will be drawn in the fill region from the left to right, from the top to bottom. On the map, only the fill contents within the fill region will be displayed. The part between the fill region and the bounding box of the fill region will not display. Below shows how the fill unit is filled in the fill region.
Distribution Pattern
You are allowed to set the distribution pattern for the child fill of the symbol fill type. The distribution pattern is the pattern of how the symbols is distributed in the fill unit.
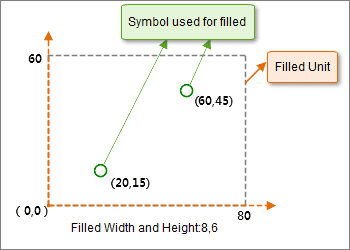
You can add a set of positions, that is, a set of coordinates, in the fill unit to specify the distribution pattern. As shown below, a coordinate system is constructed, with the fill width being the x axis and the fill height being the y axis. The maximum values for axis x and axis y axis are fill width * 10 and fill height * 10. Note: The coordinates here only refer to the positions of the symbols and have no actual meaning.
Below is the three commonly used fill patterns:
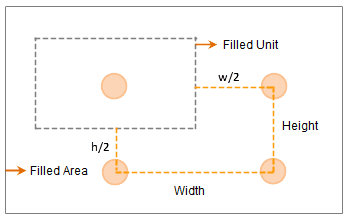
- Rectangle
In a fill unit, the symbol is drawn only once at the center. The fill unit, together with the ones on right, bottom right, and bottom, construct a rectangle. The width and height of the rectangle is the fill width and fill height of the symbol fill.
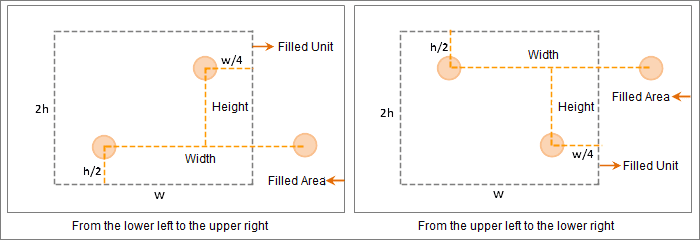
- Base and altitude
In a fill unit, the symbol is drawn twice once. The fill unit, together with the left symbol of the fill unit on the right, construct a triangle. This mode needs to specify the base and altitude of the triangle. There are two types according to how the symbols are drawn: from bottom left to top right and from top left to bottom right. The altitude of the triangle is half of the height of the symbol fill and the base of the triangle is the of the width of the symbol fill.
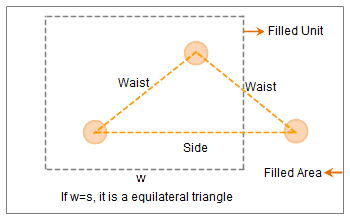
- Base and leg
The base and leg pattern is similar to the base and altitude pattern. The only difference is that the former one needs to specify the leg of the triangle, not the altitude. The base of the triangle is the width of the fill symbol. If the base and leg are equal, the triangle composed is a regular triangle.

