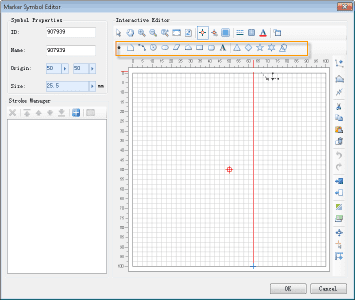
To draw a marker symbol, the geometric elements, i.e., the geometric objects/strokes, constituting the marker symbol are drawn in the editing area. A stroke can be of the point, line, region, or text type.
When drawing objects in the marker symbol editing area, the drawing must be within the valid bounds. The parts exceeding the valid bounds will be discarded.
To draw strokes for a marker symbol, the functions in the toolbar shown below are used to draw geometric objects. Every geometric object corresponds to a stroke.
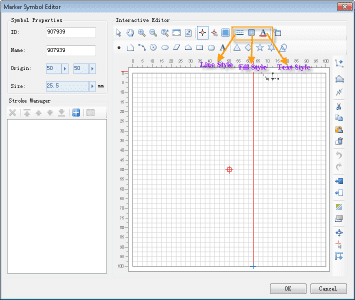
Before drawing a geometric object using the corresponding button provided in the toolbar, the style of the object to be drawn can be set through the Line Style, Fill Style, or Text Style button in the toolbar.
How to Draw Strokes
Draw a point
- Click the Point button;
- In the editing area, click at the target position to draw a point object. If another point object is to be drawn, repeat the steps.
Draw a line
- Click the Line button;
- In the editing area, click at the target positions to draw the control points of a polyline. A polyline object is then formed by connecting these control points. Right click to complete the drawing.
In addition, polyline control points can also be specified by directly click at proper positions. A polyline can also be accurately drawn through the parametric drawing function, with polar coordinates as the parameters. In this case, the length and the bearing of the line segment being drawn are input to complete the drawing, and the Tab key is used to switch between the two parameters.
If another polyline object is to be drawn, repeat the above steps.
Draw an arc.
- Click the Arc button;
- In the editing area, click at the target positions to identify the three control points of an arc. An arc object is then completed. If another arc object is to be drawn, repeat the steps.
Draw a circle.
- Click the Circle button;
- In the editing area, click at the target position to determine the circle center;
- Move the mouse and click at a proper position to complete the circle drawing. The distance between the position of the click and the circle center is the radius. Additionally, you can also input a value in the box to specify the radius. If another circle object is to be drawn, repeat the steps.
Draw an ellipse.
- Click the Ellipse button;
- In the editing area, click at target positions to identify two control points for drawing an ellipse. The two control points are the endpoints of the diagonal line of the minimum bounding box of the ellipse. If another ellipse is to be drawn, repeat the steps.
Draw a parallelogram.
- Click the Parallelogram button;
- In the editing area, click at the target positions to identify two control points which constitutes one side of the parallelogram;
- Move the mouse and click at another two target positions to determine the second side of the parallelogram, i.e., the adjacent side of the first one. The parallelogram is then completed. If another parallelogram is to be drawn, repeat the steps.
Draw a polygon.
- Click the Polygon button;
- In the editing area, click at the target positions to draw the control points of the polygon. A polygon is then formed by connecting these control points. Right click to complete the drawing.
In addition, polygon control points can also be specified by directly click at proper positions. A polygon can also be accurately drawn through the parametric drawing function, with polar coordinates as the parameters. In this case, the length and the bearing of the polygon side being drawn are input to complete the drawing, and the Tab key is used to switch between the two parameters.
If another polygon object is to be drawn, repeat the above steps.
Draw a rectangle
- Click the Rectangle button;
- In the editing area, click at the target positions to identify two control points that serve as endpoints of the diagonal line of the rectangle. A rectangle object is then completed. If another rectangle object is to be drawn, repeat the steps.
Draw a round rectangle.
- Click the Round Rectangle button;
- In the editing area, click at the target positions to determine the endpoints of the diagonal line of the minimum bounding box of the round rectangle;
- Move the mouse and click at proper positions to determine the round parts of the round rectangle. The round rectangle is then completed. If another round rectangle is to be drawn, repeat the steps.
Draw a text object.
- Click the Text button;
- In the editing area, click at the target position to bring out the Set Text dialog box;
- In the Set Text dialog box, input the text for the text object. The font, size, and color of the text can be set at the same time. Once the setting is completed, click the OK button to complete the drawing. If another text object is to be drawn, repeat the steps.
Draw a regular triangle.
- Click the Regular Triangle button;
- The drawing of a regular triangle is completed through drawing an auxiliary circle which serves as the circumscribed circle of the regular triangle. In the editing area, click at the target position to determine the center of the circumscribed circle;
- Move the mouse and click at proper positions to determine the radius of the circumscribed circle and the rotation angle of the regular triangle. The regular triangle is then completed. If another regular triangle is to be drawn, repeat the steps.
Draw a square.
- Click the Square button;
- The drawing of a square is completed through drawing an auxiliary circle which serves as the circumscribed circle of the square. In the editing area, click at the target position to determine the center of the circumscribed circle;
- Move the mouse and click at proper positions to determine the radius of the circumscribed circle and the rotation angle of the square. The square is then completed, and is in fact a closed line object. If another square is to be drawn, repeat the steps.
Draw a pentagram.
- Click the Pentagram button;
- The drawing of pentagram is completed through drawing an auxiliary circle which serves as the circumscribed circle of the pentagram. In the editing area, click at the target position to determine the center of the circumscribed circle;
- Move the mouse and click at proper positions to determine the radius of the circumscribed circle and the rotation angle of the pentagram. The pentagram is then completed, and is in fact a closed line object. If another pentagram is to be drawn, repeat the steps.
Draw a hexagram.
- Click the Hexagram button;
- The drawing of hexagram is completed through drawing an auxiliary circle which serves as the circumscribed circle of the hexagram. In the editing area, click at the target position to determine the center of the circumscribed circle;
-
Move the mouse and click at proper positions to determine the radius of the circumscribed circle and the rotation angle of the hexagram. The hexagram is then completed, and is in fact a closed line object. If another hexagram is to be drawn, repeat the steps.
Draw a regular polygon object according to given parameters:
The drawing of a regular polygon is completed through combining parametric drawing and mouse drawing.
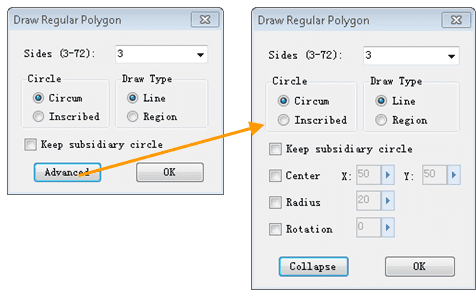
- Click the Other Regular Polygons button. The Draw Regular Polygon dialog box pops up, as shown below;
- Number of Sides: To set the number of sides of the polygon to be drawn.
- Auxiliary Circle Position: The drawing of a regular polygon is completed through drawing an auxiliary circle. This parameter determines whether the auxiliary circle is the circumscribed circle or the inscribed circle of the polygon.
- Drawing Type: To set whether the drawn regular polygon is a region object or a line object.
- Keep Auxiliary Circle: To set whether to keep the drawn auxiliary circle.
- Center: If this option is checked, a number is used to specify the center location of the auxiliary circle; otherwise the center is determined by a mouse click.
- Radius: If this option is checked, a number is used to specify the radius of the auxiliary circle; otherwise the radius is determined by a mouse click.
- Rotation: If this option is checked, a number is used to specify the rotation angle of the regular polygon; otherwise the rotation angle is determined by a mouse click.
- If all of the drawing parameters are set in the Draw Regular Polygon dialog box, click the OK button to get the drawing result. Otherwise, in the editing area, click at the target positions and complete drawing a regular polygon using the mouse (the parameters that are not set in the Draw Regular Polygon dialog box are determined by clicking the mouse). If another regular polygon object is to be drawn, repeat the above steps.


