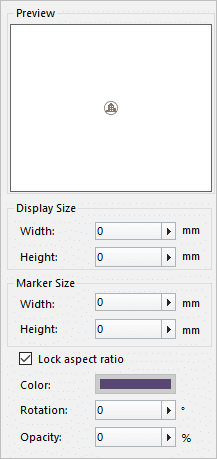
In the Symbol Style Setting area in the Marker Symbol Selector, the style of a
marker symbol can be set, including the size, color, rotation, and other
effects.
First, select a marker symbol from the symbol list. The style set in the Symbol Style Setting area will be applied to this selected marker symbol.
The following content describes what symbol styles can be set in this area and how to set them.
Marker Size
Marker Size and Display Size
When making a marker symbol, the valid bounds of the editing area correspond to the valid bounds of the resulted marker symbol, as shown in the figure below. In real applications, the display size of a marker symbol on a map is determined by setting the size of the marker symbol. There are two types of sizes for marker symbols: marker size and display size::
- The display size of a marker symbol is the size of the minimum bounding box that contains all the geometric objects of the marker symbol.
- The marker size refers to the size of the valid bounds of the marker symbol.
- When creating a marker symbol in the editing area, the ratio of the height/width of the minimum bounding box containing all the drawn geometric objects (those located within the valid bounds) to the height/width of the valid bounds of the editing area equals the ratio of the height/width the display size to the height/width of the marker size. This means that once the marker size of the symbol is set, the display size of the symbol can be calculated based on the ratio, and vice versa.
- When creating a marker symbol in the editing area, the relative position between the minimum bounding box containing all the drawn geometric objects (those located within the valid bounds) and the valid bounds of the editing area determines the relative position between the minimum bounding box and the valid bounds of the symbol. This means that the relative position between the object content and the valid bounds of the symbol does not change when the symbol size changes.
If the minimum bounding box containing all the geometric objects of the marker symbol overlaps with the valid bounds of the symbol, the marker size equals to the display size. In most cases, the creator and the user of a symbol are not the same person, and the user does not know the ratio of the height/width of the minimum bounding box containing all the symbols to that of the valid bounds. In this case, the user can directly control the display size of the symbol by setting it.
When setting the symbol style, suppose the marker size of the marker symbol in the above figure is set to 50. It is known that the ratio of the height of the valid bounds to that of the minimum bounding box containing all the geometric objects is 5:3, and so is the ratio of the width of the former to that of the latter. In this case, the display size of the symbol can be calculated and the result is 30; if the display size of the symbol is set to 60, the marker size can be calculated and the result is 100.
- Marker Size
The Width and Height boxes under Marker Size are for setting the width and height of the marker size of the symbol respectively. Units: 0.1 Millimeters. You can directly type a value in the box or move the slide bar that will show up by clicking the right arrow.
If need to hide the point symbol, set the “Size” or “Display” as -1.
- Display Size
The Width and Height boxes under Display Size are for setting the width and height of the display size of the symbol respectively. Units: 0.1 Millimeters. You can directly type a value in the box or move the slide bar that will show up by clicking the right arrow.
- Lock aspect ratio
If the Lock aspect ratio check box is checked, when setting the marker size and display size of a symbol, the height will be automatically adjusted to a proper value according to the aspect ratio of the symbol once the width is set, so that the aspect ratio is maintained; similarly, the width will be automatically adjusted once the height is set. If this check box is not checked, the height and width of the symbol can be set independently without being restricted by the aspect ratio.
Rotation
Rotation: The rotation angle of a symbol is set here. Units: Degrees. You can directly type a value in the box or move the slide bar that will show up by clicking the right arrow.
Marker Color
Marker Color : The display color of the marker is set here. Click the drop-down button on the right. The color panel pops up for you to select or specify the marker color. If the selected symbol is a raster symbol, its color cannot be set; if the selected symbol is a vector symbol, and some of its strokes are assigned fixed colors when they were made, the color set here only applies to the strokes whose colors were not fixed during creation, and those with fixed colors will stay the same.
Marker Effects
Transparency: The transparency of the symbol is set here. This option is only applicable to raster symbols. The value ranges from 0 to 100, with 0 indicating it is completely opaque, and 100 indicating it is completely transparent. You can directly type a value in the box or move the slide bar that will show up by clicking the right arrow.
