A fill symbol may contain two types of child fills: image fills and symbol fills. A desirable fill symbol can be created by setting the styles of its child fills.
The options in the Fill Symbol Editor for setting the styles of different types of child fills are different. The style setting for a child fill is described in details below. The setting for an image fill and that for a symbol fill are described separately.
Set for Image Fill
In the Fill Symbol Editor, when an image fill is selected in the child fill list or multiple image fills are selected by combining the Ctrl key or the Shift key, the options for setting the style(s) of the image fill(s) will be displayed in the Symbol Style Setting area on the right of the Fill Symbol Editor, as shown in the figure below. The content includes: selecting an image, and setting the image resolution, the width, and the height of the image fill.
The functions for setting styles of image fills are described below.
- Select Image: Specify the image for the image child fill here. Click the button and select an image for filling the symbol in the pop-up Import Picture dialog box. Currently supported image file formats include: *.png, *.jpg, *.jpeg, and *.bmp. When an image has been assigned to an image fill, the Select Image button will show the thumbnail of the selected image.
- Width: Set the width of the image fill here.
- Height: Set the height of the image fill here.
- Resolution: Set the resolution of the image here.
Set for Symbol Fill
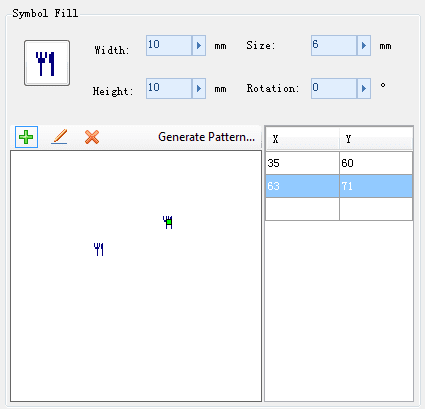
In the Fill Symbol Editor, when a symbol fill is selected in the child fill list or multiple symbol fills are selected by combining the Ctrl key or the Shift key, the options for setting the style(s) of the symbol fill(s) will be displayed in the Symbol Style Setting area on the right of the Fill Symbol Editor, as shown in the figure below. The content includes: selecting a symbol, setting the foreground color and background color, and setting the width and height, the symbol size, and the rotation angle.
The functions for setting styles of symbol fills are described below.
- Select: Specify the symbol for the symbol child fill here. Click the button and select a marker symbol for making the child fill in the pop-up Select dialog box. The symbol can be in the vector format or the raster format. When a symbol has been assigned to a symbol fill, the Select button will show the thumbnail of the selected symbol.
- Width: Set the width of the symbol fill here. Units: Millimeters (mm).
- Height: Set the height of the symbol fill here. Units: Millimeters (mm).
- Size: Set the display size of the selected marker symbol here. Units: Millimeters (mm).
- Rotation: Set the rotation angle of the selected marker symbol here. The input value should be between 0 and 360 degrees.
- Symbol Distribution Pattern: The symbol distribution pattern is the distribution pattern of the adopted symbols within a symbol fill. A pattern is generated by adding a series of symbol locations in the distribution pattern drawing area. For detailed description of symbol distribution patterns, please see the corresponding content in Composition of Fill Symbols.
Click the Add button in the symbol distribution pattern toolbar. The cursor will change to a pin. Now click in the distribution pattern generation area or directly input X and Y coordinates in the coordinate list on the right to add a symbol location. In the meantime, the filling effect can be previewed in the preview area in the Fill Symbol Editor.
Click the editing button Edit in the symbol distribution pattern toolbar, and then click a symbol in the symbol pattern generation area to select the symbol, or hold down the Shift key while clicking to select multiple symbols. The corresponding coordinates in the coordinate list will be selected at the same time. Then the location(s) of the selected symbol(s) can be changed by dragging the symbol(s) with the mouse or editing the coordinates in the coordinate list on the right.
When one or more symbols are selected in the symbol distribution pattern generating area, the Delete button in the symbol distribution pattern toolbar will be available. Click this button to delete the selected symbol(s). A symbol can also be deleted by directly deleting the corresponding coordinates in the coordinate list.
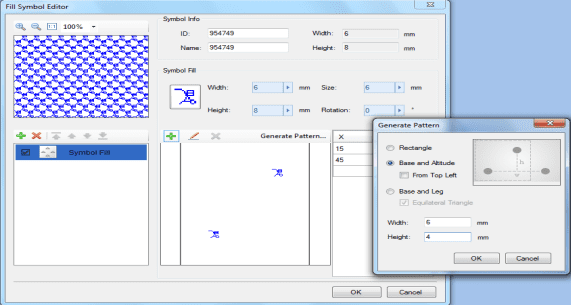
The Fill Symbol Editor provides a quick pattern generating function. As shown in the figure below, click the Generate Pattern button in the symbol distribution pattern toolbar. A Generate Pattern dialog box will pop up. Available options for setting the distribution pattern include: Rectangle, Base and altitude, and Base and leg. The width, height, base, and leg values can all be input as needed. In this way, the symbol distribution pattern of a symbol fill can be quickly and easily generated.


