Tutorial
Load Balancing Group
The load balancing provided by SuperMap iManager can compose a load balancing group of multiple GIS environments, improving the performance of GIS environment. The polling method, weighted polling method, IP Hash/weighted IP hash method, minimum connection method/Weighted minimum connection method are employed to bear load. The requests sent externally will be assigned to a GIS environment in the load balancing group based on the load balancing strategy, and the requested server responds independently to the customer’s request. This allows you to acquire important data in a fast way and solve the high concurrency problem. After you log into SuperMap iManager, in the iManager interface, click Load Balancing under Load Balancing to enter the Load Balancing Group Management page.
Add Load Balancing Groups
In order to compose a load balancing function group with some GIS environments, we need to add load balancers for these GIS environments and set up the parameters such as name, domain name, port, service access protocol and load balancing strategy for load Balancing group.
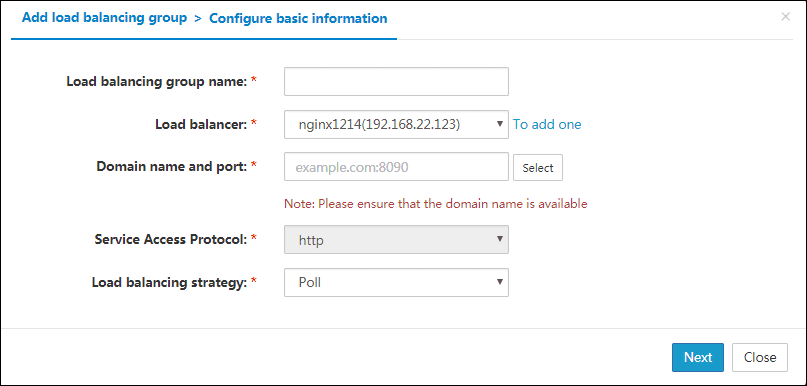
Under the Load Balancing Management page, click the Add Load Balancing Group button and the Add Load Balancing Group dialog box will pop up, as shown in the following figure:
You need to fill in the relevant parameters according to your actual needs:
- Load balancing group name (required): Set the name for the load balancing group, and the group name can be modified after the load balancing group is created.
- Load balancer (required): Select the load balancer for the load balancing group and the load balancer can be used by multiple load balancing groups. If you have not added a load balancer, you can click the button next to add a load balancer. For specific steps, please refer to Use iManager > General Load Balancing and HA Strategy > Load Balancers. If the HA Strategy has been turned on, the system built-in load balancer is selected here, or “default”. The load balancing group will employ the HA Strategy. To know how to turn on HA Strategy, please refer to Use iManager > General Load Balancing and HA Strategy > HA Strategy.
- Domain name and port (required): Please set the domain name and port required for the load balancing group, following the format “example.com:8090”, or you can select an existing domain name and port. If you do not specify the port, the default value 80 will be used. You can also select an existing domain name and port by clicking the Select button on the right. A dialog box will display to allow you to select the domain name and port according to the list. When you log on as an administrator, you can also delete unused domain names and ports in the dialog box. Service access protocol (required): Please select the service access protocol according to the access protocol of the GIS environment, which can be HTTP or HTTPS. Currently, only HTTP is supported.
- Load balancing strategy (required): Select an appropriate load balancing strategy for the load balancing group. The default weighted value is 1:1.
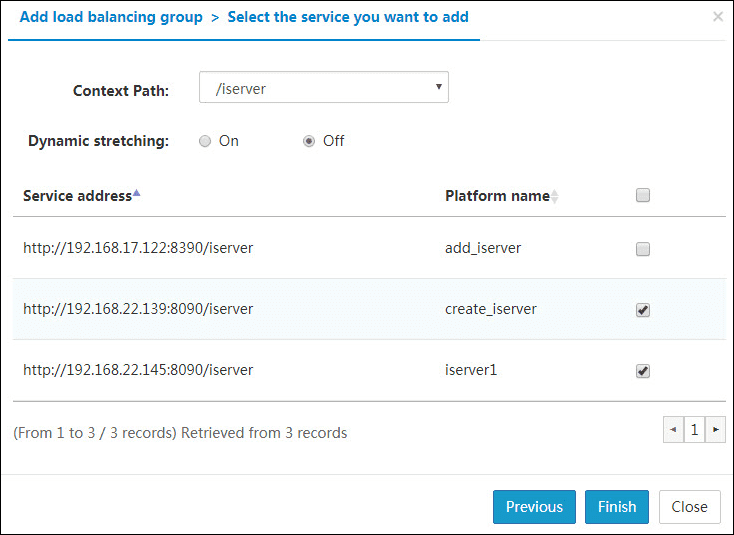
When finished, click Next to configure the following information.
- ContextPath: Here you need to select the ContextPath value, such as “/iserver”. After that, all GIS environments with the same ContextPath value will be listed.
- Dynamic scaling: Choose whether to turn on dynamic scaling. It is off by default.
When finished, click Finish to generate the load balancing group.
Remarks:
- If the domain name you fill out is not in your DNS server, the DNS administrator needs to add the domain name to the DNS server. We recommend that you fill in the IP address of the load balancer while specifying the domain name.
- When you select the existing domain name and port for the newly added load balancer, you can delete the domain names and ports in the list if you log on as an administrator. The specific operation is, click on the Delete button for the corresponding domain name.
Manage Load Balancing Groups
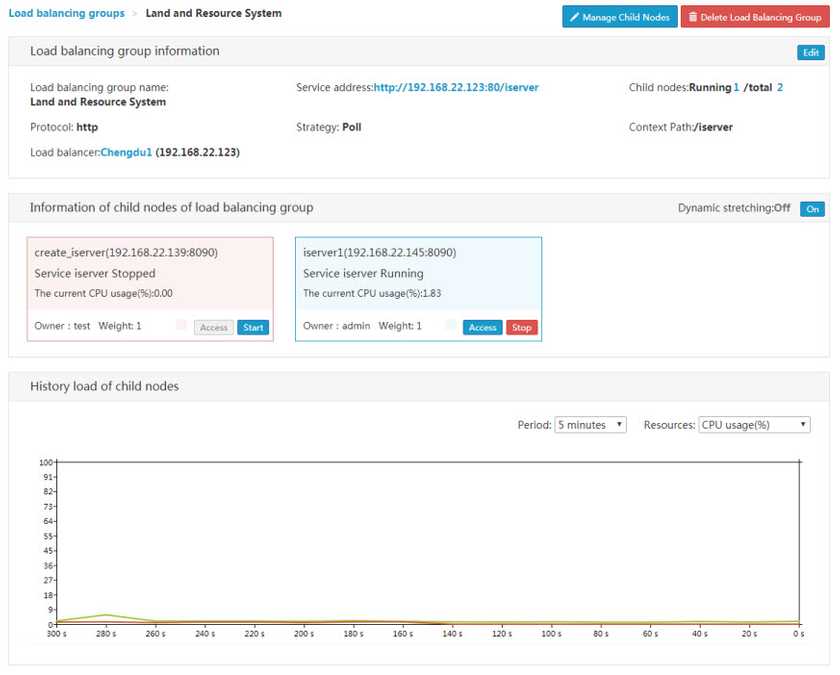
- Click the name of the load balancing group you want to manage, enter the details page of the load balancing group. You can view load balancing group information, worker node information, and the historical load of the worker nodes.
- The load balancing group information includes the name and service address of the load balancing group, the name and IP address of the load balancer, the protocol to access services, the load balancing strategy, the number and running situation of ContextPath and the worker nodes. Clicks on the Edit button in the upper right corner to edit the load balancing group name, protocol, strategy, and ContextPath. You can access the services of the load balancing group by clicking the access address below the name of the load balancing group.
- you can see the running state of the worker nodes on the page for worker node information of load balancing group, with blue indicating that the worker nodes are running, red indicating that the worker nodes are being stopped or has stopped. Clicks on the Access button below to access the services of the worker nodes directly. When the dynamic scaling is turned off, you can manage worker nodes by the stop and start buttons.
- You can select the display cycle and the display resource to visually view the load status of the worker nodes through a drop-down box.
Notes:
If you are using OpenStack and have set to use floating IP, you can bind a floating IP by accessing the Bind button after the address. If successful, the “unbind” button will appear. Please refer to Appendix > OpenStack Additional Configuration for details.

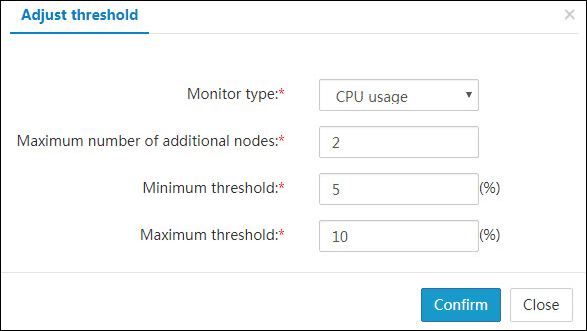
Dynamic scaling can be turned on via the Enable button after Dynamic Scaling. Click the Enable button to display the “Adjust Thresholds” dialog box, where the monitoring type can be CPU useage/memory useage/network IO. The maximum number of new nodes is the maximum number of nodes that can be automatically added to the system. The default value is 0. While adding new nodes, the system will create nodes with the template for the current GIS environment and the new nodes will be automatically added to the load group. Take CPU useage for example, [20, 80] indicates that when the average CPU useage of each worker node is higher than 80%, the load balancing group automatically starts the worker node that is in the stop status. When the average useage is still higher than 80% if the worker nodes have been started, new nodes will be automatically created if the maximum number of new nodes is greater than 0. New nodes will be automatically created until the average CPU useage is less than 80% or the number of new nodes reaches the number you specified. When less than 20%, new nodes will be removed preferentially if you have set the maximum number of new nodes and the system automatically added new nodes before. If it is still below 20%, the running worker nodes will be automatically stopped. Click Disable or Enable button to turn off and on the dynamic scaling function.
Managing Worker Nodes
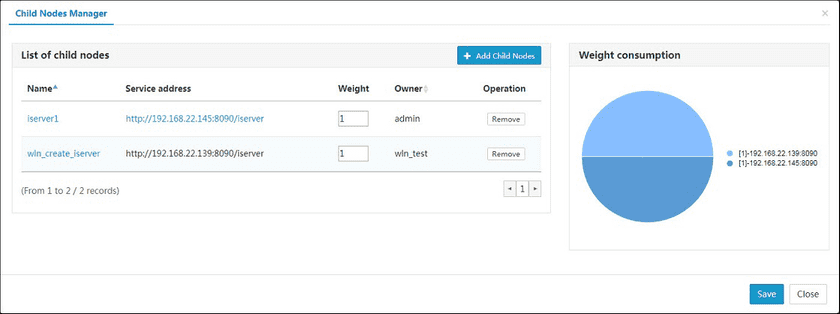
For load-balancing groups that have already been created, you can manage worker nodes, such as setting weights, removing worker nodes, and adding worker nodes You can open the Worker Node Manager dialog box by clicking Manage Worker Nodes in the upper-right corner.
In the process of using load balancing groups, you can modify the weight value according to requirement. After modification, the weight consumption pie chart on the right side will change accordingly.
You can also remove the load balancing group from unwanted worker nodes during useage, and you only need to click the Remove button in the Worker Node Manager dialog box.
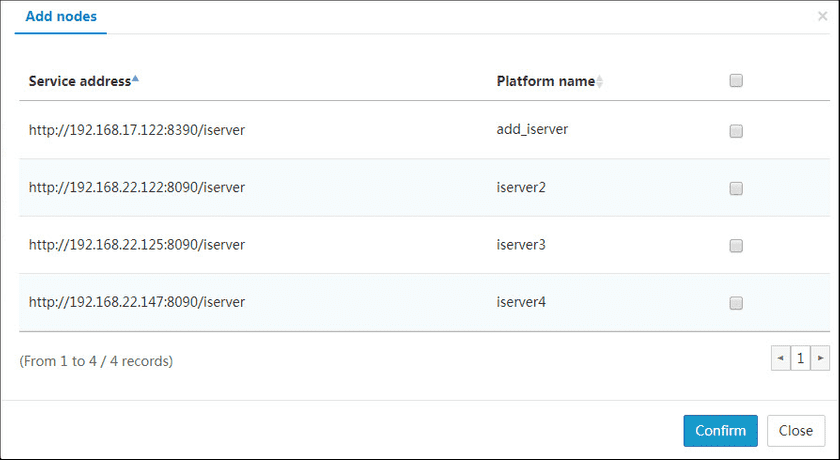
You can also add other services to the load balancing group. For the same service, it can be used by multiple load balancing groups. Steps for adding worker nodes are as follows:
- Click “Add Worker Nodes” to display the “Add Nodes” dialog box that lists all the GIS environments can be added. Only the worker nodes consistent with the “ContextPath” of the load Balancing group will display.
- Check the GIS environment you want to add, click “OK”, the “Add Nodes” dialog box will automatically close.
- Click the “Save” button, the system will automatically modify the background data to add the service to the load balancing group. When logged in as an administrator, you can add the GIS environment for all users you manage to the load balancing group you created.
Modify strategy
The load balancing strategy determines the load-sharing method of the GIS environment in the load Balancing group. For a load balancing group that you have created, you can select the appropriate strategy based on the pros and cons of each strategy. For details, please refer to the Use iManager > General Load Balancing and HA Strategy > Load Balancing Strategy. After modification, click Save.
Modify Protocol
This protocol refers to the access protocol for the services. Please make sure that it is consistent with the access protocol for each service in the service list. After modification, click Save.
Modify ContextPath
Please make sure that it is consistent with the ContextPath for each service in the service list. After modification, click Save.
