Tutorial
Load Balancers For Docker
The load balancer is supported by the Nginx software, which provides a guarantee for the load balancing function. Since the Docker container externally provides services by exposing ports, the load balancer provided by iManager 10i cannot create Nginx in Docker. You can only import Nginx outside of Docker container to serve as load balancer. Load balancers are added by managers and can be used by all users. After you log into SuperMap iManager, in the iManager interface, click Load Balancer under Load Balancing to enter the Load Balancer Management page.
Install Nginx
It is recommended that you install Nginx on the machine where Docker is (you can also install Nginx on any other machine, just make sure iManager can access the Nginx service). Here in this example, Nginx is installed on the machine where Docker is.
Here we take the Ubuntu system as an example, install with the following command: sudo apt-get install nginx, the default installation path is /etc/nginx.
Add Load Balancers
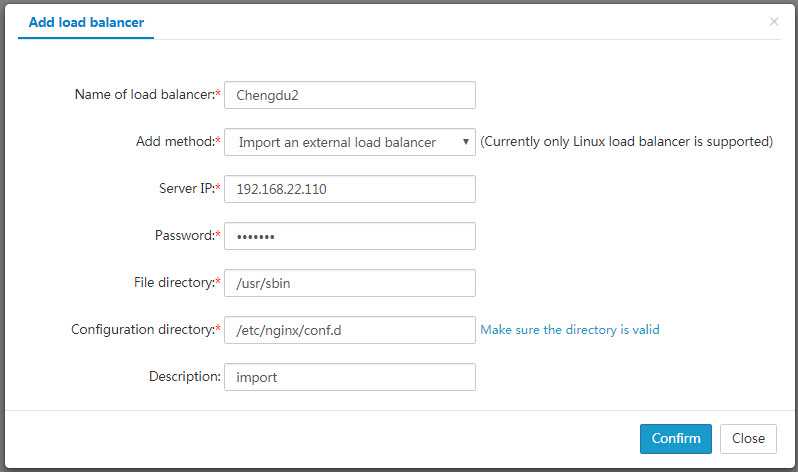
On the Load Balancer Management page, click Add Load Balancer, and the dialog box for adding the load balancer will pop up, and the default method in the dialog box is to import an external balancer.
- Load balancer name (required): Name the newly imported load balancer.
- Add method (required): For Docker, there is only one way, that is, Import an existing load balancer.
- Server IP (required): IP address of the machine where Nginx is. In this case, the Nginx is installed on the machine where Docker is located, so here input the IP (192.168.21.101).
- Password (required): This password is the login password of the root account for the host/virtual machine where the load balancer is imported. If there is no password, you can leave it blank. If there is a password, you must fill in correctly.
- Executable file directory (required): If Nginx is installed by default, the executable file directory is /usr/sbin; otherwise, you need to specify according to the real installation path. Be sure to fill in correctly. An error will cause you not be able to create the load balancing group relying on the load balancer.
- Configuration file directory (required): If Nginx is installed by default, the configuration file directory is /etc/nginx/confi.d. If you have modified the configuration file directory, please fill in the modified directory. Be sure to fill in correctly. An error will cause you not be able to access services of the load balancing group created relying on the load balancer.
- Description information (optional): Fill in the relevant descriptive information of the imported load balancer.
When finished, click OK to import the external load balancer. Please make sure that the server’s IP, password, executable file directory, and the configuration file directory are correct.
Notes:
The configuration information for the load balancing group is stored in the configuration file directory of Nginx, so you need to ensure that the primary configuration file contains the configuration file directory. Please refer to Appendix > FAQ Question 4 for more detials.
Check Load Balancers
You can view the basic information of the load balancer, such as the load balancer name, IP address, status, and supported operation types on the Load Balancer Management page.
For imported load balancers, there will be only one state on the Docker platform, that is, external server. Available operations include View and Delete. View allows you to check the details of the load balancer. Delete allows you delete the load balancer. You can view the details of the load balancer by clicking the View button or load balancer name. The load balancer IP address, operating system, load balancer executable file directory, load balancer configuration file directory, description information, and relevant information will be displayed on the details page of the load balancer.


