Tutorial
iManager For Bigdata Multi-machine Deployment Guide
Overview
In iManager, GIS Big Data Site deploy Docker,support multi-machine,some important concepts in the programe are as follows:
GIS image registry:GIS programe center, all the programe can be obtained here:
iManager:comprehensive GIS operational management center,can deploy and manage GIS Big Data Site by UI:
Docker resource pool:the place where GIS programe run on,offer resources like CPU ,memory and storage,etc
Logic diagram is as follows:
you can either deploy GIS image registry and imanager on a same machine or diferent machines .This document illustrate the deloyment by using two machines as example.
machineA(IP:192.168.17.224):deploy GIS image registry and iManager,as Swarm manager node at the sametime
machineB(IP:192.168.21.135):As Swarm worker node.
iManager deployment has the following steps:
- Install docker
- Start GIS image registry
- start iManager
- Deploy docker resource pool
- Configure docker resource pool
iManager Solution Deployment Has The Following Steps
Select appropriate offline-docker-*.tar.gz for Machine A and B according to the operating system.
Place the supermapdockerforubuntu16.04.tar.gz package in any directory on the machine.
Extract (modify the package name to actual name):
tar -zxf offline-docker-*.tar.gzGo find the readme.txt file in the extracted folder, follow the step to install:
Verify:check docker version,if you see the output like ’*_Docker version *.*.*’, it means Docker install successfully
docker -vNotes:
Both machine A and B need to install docker.
Start GIS image registry
Place the GIS image registry package supermap-imanager-*-*-*-registry-multi-node.tar.gz in any directory on the machine A.
Extract:
tar -zxf supermap-imanager-*-*-*-registry-multi-node.tar.gzEnter the extracted root directory:
cd supermap-imanager-docker-imagesInstall (“sudo” command is necessary):
sudo su
chmod +x ./startup.sh && ./startup.sh
Verify: Execute the following command,if there is no error,it start successfully.Where <ip> is IP of machine A where GIS image registry is installed
Notes: GIS image registry address is
<ip>:5000.Where<ip>is IP of machine A .here in the example:192.168.17.224:5000.
Start iManager
-
Extract
Place the
supermap-imanager-*-*-*-linux64-docker-multi-node.tar.gzpackage in any directory on the machine A,Unzip (modify the package name to the real package name):tar -zxf supermap-imanager-*-*-*-linux64-docker-multi-node.tar.gzEnter the extracted root directory:
cd supermap-imanager-docker -
Start/Stop iManager
Start iManager:
sudo su
sudo ./startup.sh --advertise-addr <native ip> --registry <GIS image registry ip>:5000
Perform the following command to stop iManager:
sudo ./shutdown.sh -
Access iManager services
http://{IP}:8390/imanagerWhere
{IP}is IP of machine A.
Deploy Docker Resource Pool
This document illustrate the deloyment by using the two machines which we used before ,machine A as the manager,machine B as worker.
Initialize swarm mode:Execute the command on machine A.Where <ip> is IP of machine A .
docker swarm init --listen-addr <ip>you will see the following output:
Join machine B into Swarm Mode as worker:Execute the command given by the previous step on machine B (the content of the red box).If you see the output like the following.Machine B join successfully:
Execute the command on Swarm Mode manager(machine A) to see Swarm Mode nodes list.
docker node lsIf you see the output like the following,resource pool deploy successfully
Notes:
Swarm Mode manager is:<ip>:2375.Where<ip>is IP of machine A .In the example is:192.168.17.224:2375
Configure Docker Resource Pool
-
Import Swarm Mode configuration
Logs on to iManager, the user can access the iManager ” GIS Big Data Site” page, click “Multi-machine” item on the ” GIS Big Data Site” page to enter the GIS Big Data Site multi-machine page, click “management node” to enter the following page to manage the node..
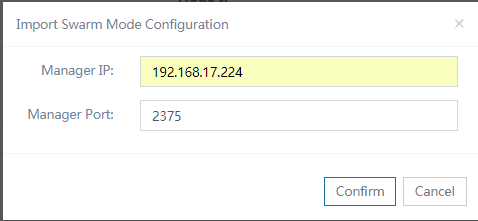
Click “Import Swarm Mode Configuration”.
Manager IP:Swarm Mode manager IP(machine A).
Manager port:The port of the Docker on manager (machine A) exposed to Master Node:2375.
After completing the above information, click sthe OK button and the page will show configuration of Swarm Mode node, as shown in the following figure:
-
Configurate Repository
Click “Repository” item on the “Manage Node” page to enter repository configuration page, as shown in the following figure:
You can click “Edit” button to modify the address of repository.

Repository Address: Enter the address of GIS image registry.
Create GIS Big Data Site(Multi-machine)
- You can click “Multi-machine” item on the “GIS Big Data Site” page to enter the GIS Big Data Site multi-machine page. Click “Create GIS Big Data Site”,fill in the correct information and click “Confirm” button
-
GIS Big Data Site contain multi-node,if you want confine the sub-node on some machine,perform the following steps:
- Define label on “System configuration”>“Docker multi-machine management”;
- Select Advanced Options on Create GIS Big Data Site (Multi-machine) page,set constraints value to “node.labels” ,and select the node label you define in previous step:
- Click “Confirm” button to create.


