


Feature Description
The map document migration feature is used to convert ArcGIS map documents (MXD) into SuperMap workspace (SMWU) format. It consists of two parts. One part is data migration. For details, please refer to Data Migration. The other part is map document migration, which mainly uses the iObjects Java component interface provided by SuperMap to create, write, and set objects such as layers, features, labels, and symbols in the MXD, thereby completing the conversion from ArcGIS MXD to SuperMap SMWU.
The map migration feature requires licensing for ArcMap related products.
Menu
- Data Migration tab ->ArcGISData Migration->Migrate MXD.
Parameter Description
- Source Dataset: Supports migrating multiple MXD files simultaneously. You can use the Add File or Add Folder button in the toolbar to select the MXD project files to be converted.
- Import Settings:
- Contains map: This checkbox is checked by default and cannot be changed.
- Containing data: This checkbox is checked by default, and the data in the MXD will be exported together. If data migration has already been performed, you can uncheck this checkbox.
- Import map-related data only: Used to specify whether to import only the data actually used in the map. This checkbox is unchecked by default. If checked, only data associated with the map (i.e., data used for mapping) will be imported; other data will not be imported.
- Containing data must be checked to enable this option.
- Supported source data types are FileGDB (*.gdb), ArcGIS Personal GeoDatabase files (*.mdb), and ShapeFile files (*.shp). Source data from SDE databases is supported starting from SuperMap iDesktopX 2025.
- Callout to CAD: To ensure that labels and text with leader lines display correctly after migration, you can check this option to convert them to a CAD dataset. This is unchecked by default.
- Contains layout: This checkbox is unchecked by default. If checked, the layout in the MXD will be imported. Starting from version SuperMap iDesktopX 2026, line spacing in layout text is supported for migration.
- Check data: Checks the data before migration to determine whether its data type, layer structure, etc., meet the migration conditions. After the check, a result info list will be output, and you can view errors in detail and handle problem data based on the provided solutions.
 Notes:
- If Import map-related data only is checked, only data associated with the map will be checked; otherwise, all data will be checked.
- If multiple MXD files are added, data inspection will not be performed.
- Generate Migration Report: If this checkbox is checked, a migration report (*.xlsx file) will be generated in the same directory as the result data after migration, showing the migration status. The report contains five sheets: Overview, Data, Map, Symbol, and Data Sampling. You can view the total number of successful migrations, information comparison before and after migration, and reasons for failed migrations in these tables.
Notes:
- If the source data is SDE data, and the Generate Migration Report option is checked during migration, data comparison for SDE is not supported in the report.
- License Validation: Data migration requires a license for the relevant ArcMap modules. The program provides a Check button to verify whether the selected license is valid. If the required license is missing from the computer, a prompt will appear: "ArcGIS license loading failed. Please check the license status." It is recommended to select Default. The Default license status is as follows:
- If the ArcMap version on the computer is 10.4, 10.6, 10.7, or 10.8, the Default option will use the ArcServer license for validation.
- If the ArcMap version on the computer is 10.2, 10.3, or 10.5, the Default option will use the Advanced license for validation.
- Charset: The default option is Automatic reading. The system will automatically read the character set of the source data file associated with the MXD. If you need to change it, you can select another Charset type from the drop-down list.
- Result Datasource: Sets the storage method for the result datasource after migration. Local UDBX and database datasource types are provided:
Notes:
If the MXD to be converted contains data from a PostGIS database, it can be read directly without separate migration.
- Text: By default, it is stored in a text-based datasource (UDBX). The program will create a new UDBX datasource in the result folder during migration to store the migrated data.
- Database: Supports storage in database datasources, including SQLPlus, PostgreSQL, KingBase, MySQL, HighGoDB, PostGIS, DMSpatial, and DMPlus. For details on creating a new database datasource, see New Datasource Page.
- Result Workspace:
- Path: Sets the export directory for the result data.
- File Name: Sets the file name of the migrated SuperMap workspace.
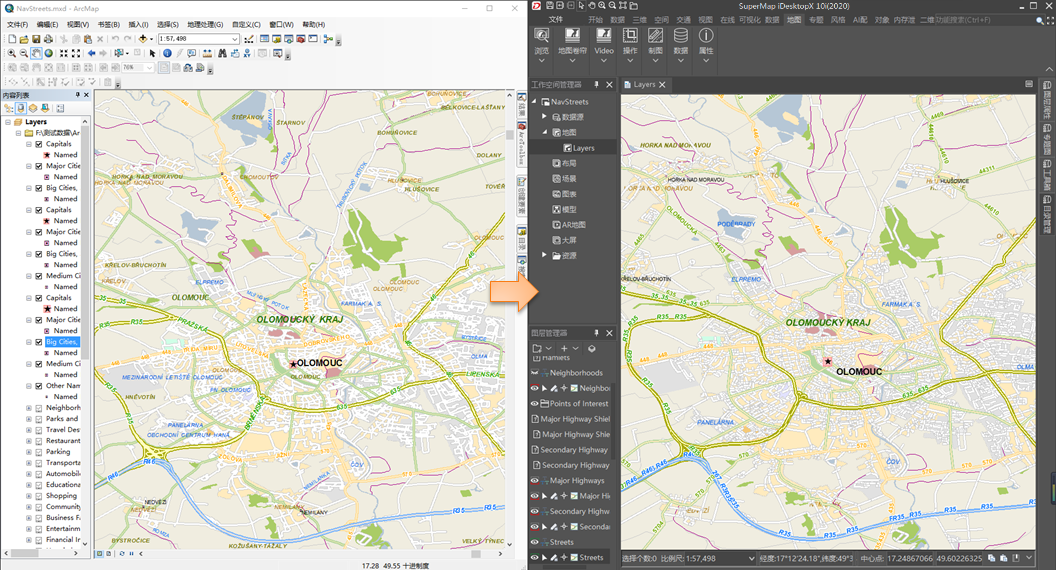
After the migration is complete, a pop-up will prompt whether to open the migrated workspace, and the path of the migration log file will be output in the Output window. You can view detailed migration information in this file. The image below shows the effect comparison before and after migration.
Related Topics
Raster Image Stretching Matching