


Feature Description
Calibrated Registration is used to correct static captured videos, suitable for footage taken from fixed camera positions. By adding control points, it links the spatial positions of registration datasets with reference data using x,y coordinate information, aligning the registration dataset's spatial position to match the reference data's spatial framework.
The video dataset for registration must use a projected coordinate system.
Feature Entry
- Video Maps Tab -> Video Registration Group -> Registration Mode
- Video Registration Tab -> Display Mode Group -> Registration Mode
Steps
- New Registration:
Locate Registration Mode through the two feature entries and click the button to open the reference map selection dialog. Select a dataset or map as reference, then click OK to create a new video calibration registration.
 Notes:
The coordinate system of the reference map selected in registration mode must match the video dataset.
- Rotation Angle: During filming, cameras may capture 360° surroundings, resulting in video orientations in video maps that differ from the default north-up orientation of reference maps. The rotation angle feature allows adjusting reference map angles to match the video perspective during registration.
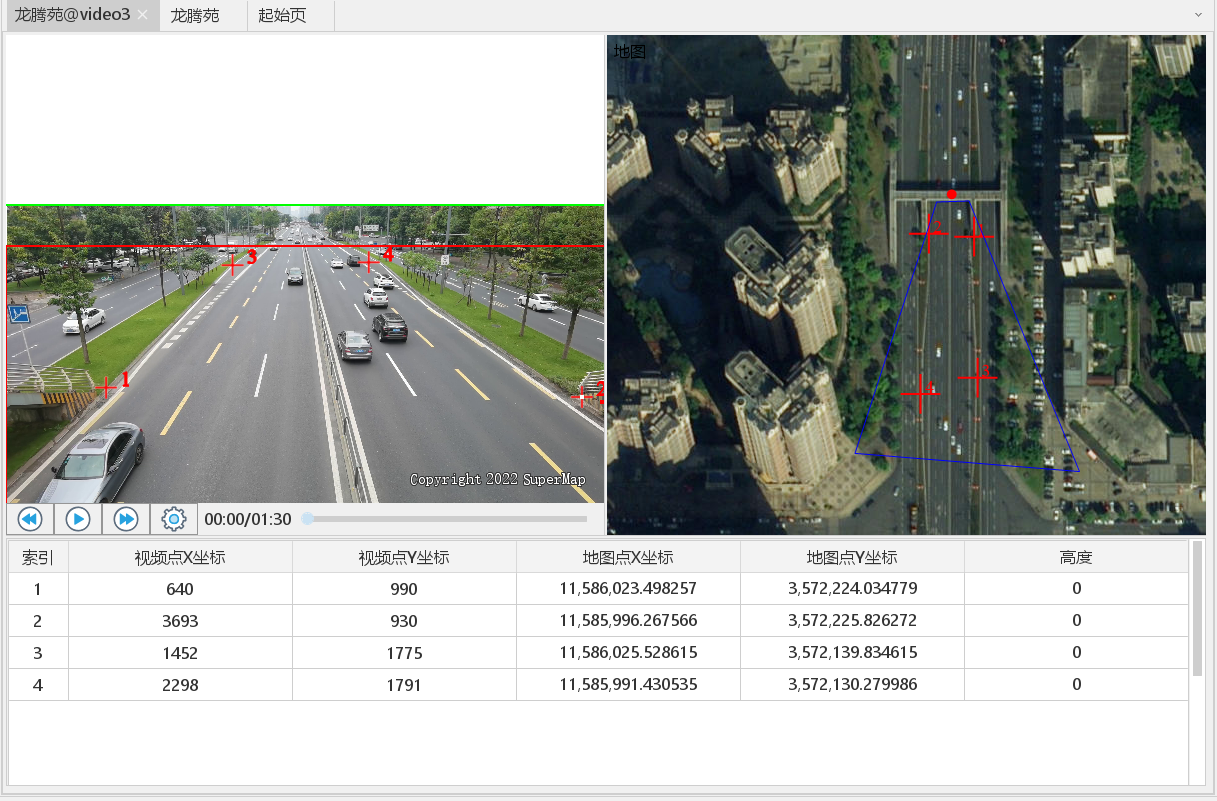
- Control Point Placement and Modification:
- Placement: Click Video Registration Tab -> Calibrated Registration Group -> Staking Points. Use mouse clicks to select control points in the video registration window, then select corresponding points in the reference map. Points can be selected in any order as long as homologous points are matched.
- Modification: To adjust reference map points, select the record in the point list below the window and click Modify in Calibrated Registration group. Right-click and select Delete to remove points.
Notes:For non-rotating videos, mark control points only at 0s. For rotating videos, add parameters at different timestamps in Video Layer Properties Panel, then mark control points for each angle/time.
-
Terrain Data: To improve accuracy, select DEM data in Terrain Data to automatically obtain elevation values during point placement.
Notes:- Control points should ideally form "trapezoidal" patterns in reference maps for higher accuracy. Elevation values may override this display without affecting results.
- For distant visible bounds with horizon lines, set Maximum X/Y in Video Valid Bounds of Video Layer Properties Panel to reduce video distortion and improve registration.
- Registration Parameters: Input known camera parameters before registration to enhance accuracy through parameter fitting. For details, see Registration Parameters.
- Perform Registration: After selecting control points, click Video Registration -> Calibrated Registration -> Perform Registration to execute.
- Save Registration Parameters: After registration, click Save Registration Parameters to store parameters in the video. The georeferenced video can then overlay maps with matching coordinate systems:
Related Topics
Camera Parameter Registration Example
Calibrated Registration Example
SuperMap UAV Survey Video Registration