


Velocity Analysis
Instructions for use
The velocity analysis function is used to monitor the movement speed of targets in real-time to detect issues such as speeding, parking, and road congestion. Using velocity analysis automatically enables object detection and target tracking.
Function Entry
- Video Analysis tab->Transport Analysis group->Measure SpeedAnalysis button.
- Video Analysis tab->Transport Analysis group->Velocity Analysis drop-down button->Velocity Analysis.
Operation Steps
- Video Analysis tab->Transport Analysis group->Velocity Analysis drop-down button->Speed Display Style button; In the pop-up Speed Display Style dialog, you can set the types participating in detection and the style of speed text, including font and font size.
- Click the Velocity Analysis function to open the velocity analysis panel;
- In the velocity analysis group of the velocity analysis panel, set the following parameters:
- Existence Time (seconds): Sets the existence time of the target. When the existence time is no less than the specified time, the target's speed can be detected.
- Maximum Speed: Sets the maximum speed for object detection. Speeds exceeding this are considered speeding, and speeding targets do not participate in detection. Unit: km/h.
- Minimum Speed: Sets the minimum speed for detection. Speeds below this do not participate in detection, and the target's speed is not displayed in the video window. Unit: km/h.
- Display Speed: Check this box to display the current speed above the vehicle.

- Output Speeding Records: Check this box to record speeding vehicle information in the Output Window, including vehicle ID, appearance time in the video, actual video capture time, and vehicle speed.
- Speeding Images: Check the box and select the storage path for speeding images. The system will capture images of speeding target vehicles based on the set maximum speed and output them to the storage path. Image format: .png.
- Parking: Check this box to identify vehicles with a speed of 0 in the video and display a parking prompt above them.
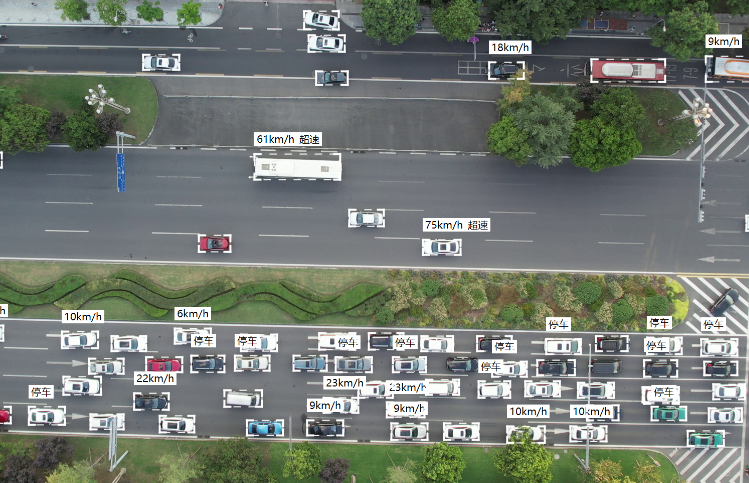
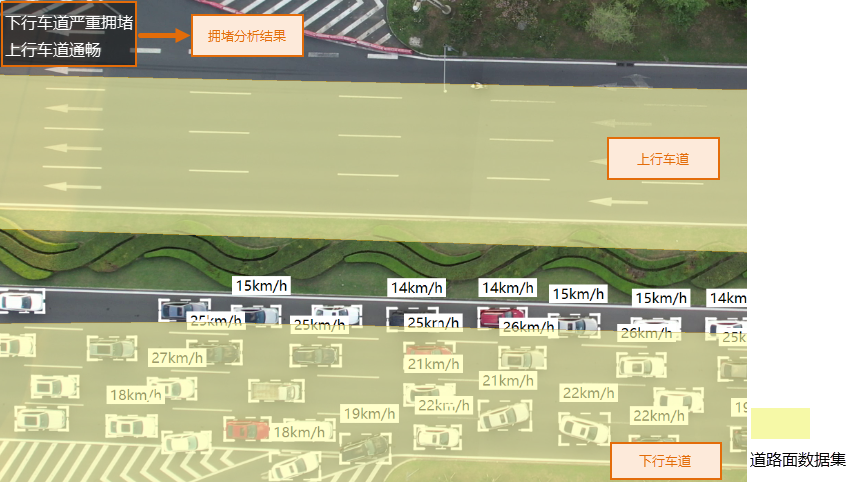
- Congestion: Check this box to identify road congestion in the video. Congestion status will display in the upper-left corner of the map.
- Road Type: When congestion is checked, select the road type for detection, including urban arterial roads, secondary roads, and highways/urban expressways.
- Congestion Road: After checking congestion, click the Congestion Road button to set the analysis object for outputting road congestion information.
- Analyze Region: Select the data source where the analysis region dataset is located;
- Road Alias: Road alias can be customized and entered to display congestion information in the upper-left corner of the map;
- Road Surface: Click the ... button to open the SQL Expression dialog and select each road surface object corresponding to the road alias in the dataset;
- Intersection Area Ratio: The intersection area ratio is the ratio of the area where the vehicle detection box intersects with the lane to the area of the vehicle detection box. It determines whether the detected vehicle belongs to the lane. If greater than the specified value, the vehicle belongs to this lane; otherwise, it does not.
 Note:
Note:- It is recommended to turn off auto skip frames, otherwise it may affect the accuracy of detection results.
Related Topics