Function Description
provides the ability to create multiple tasks on one or more machines to generate map tiles.
- Tasks on one machine: it means creating multiple tasks on one machine to generate map tiles.
- Tasks on several machine: it means creating multiple tasks on several machines to generate map tiles.
Key points of Map Tile(Multi-task)
When performing the feature in SuperMap iDesktop .NET, you should notice:
- Datasources are read-only : Since multiple tasks will access the same datasource at the same time, it only can be occupied by one task once. Hence, before performing the feature Map Tile(Multi-task), you must set your datasoure read-only and save your workspace.
- Divide tasks : Specify how many tasks you want. The program will generate a sci file first according to map scales, tile ranges, etc. Then, it will divide the sci file to several child sci files.
- A shared directory : A folder in the Working Directory will be created to save the father sci file and all child sic files. And then, you need to set the directory to be sharable, so that other machines can fetch tasks and save results conveniently.
- Perform tasks : Other machines need to access the host machine successfully to perform the feature. Therefore, you should check whether the connection between the host machine and other machines is open. For example, you can enter \\198.168.1.20(host IP).
The procedure of multitasking of map tile
divides the multitasking procedure into four steps: 1. New a task ; 2.Set parameters ; 3.Set parameters of multiple tasks ; 4.Run the feature.
Note: Every process in the procedure is an independent unit for resource allocation and dispatching. Each process will call a task to generate tiles.
Now, let’s generate tiles from the map China using the above two ways respectively.
Prepare Data
We should process data as the following ways before generating map tiles:
- If your datasource is UDB, you need to set it read-only. Right-click on your datasource and select Reopen as Read-only to open it in read-only mode. Then save your workspace. For UDBX datasources, you are not required to set them read-only.
- The program will check if your dataset has more than 2000 objects but no spatial index. And the system will give you a prompt to create a spatial index. Creating a spatial index on your data can improve efficiency a lot.
Multiple tasks on one machine
- New multiple tasks: Click Maps tab > Mapping gallery > Multi-task and select Create and Run New Tasks.
Note : If your data is saved at a remote server, you need to open data in the remote server. - Set related parameters: In the “Multi-task: Generate map tile” dialog box, you need to set a series of parameters. On detail description of each parameter, please consult ”Generate map tiles (single task)“.
Note : The working directory is the path of tiles tasks to be created which can be local or remote. - Click Next. A folder named as the tile name is created. It is the working directory.
-
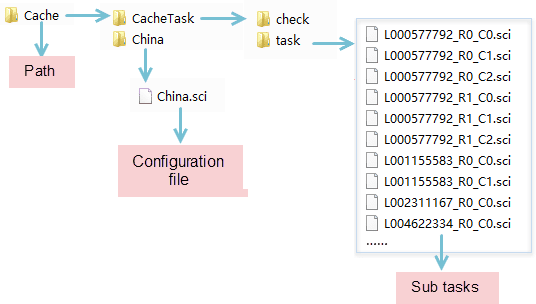
Working Directory : After dividing the task into several child tasks, a folder with the same name as the tile name like China is created for saving the tile configuration file (*.sci). After all, you can open the *.sci file directly to view the generated China map tiles. The other folder CacheTask generated in the same folder is composed of two subfolders check and task.
- check : stores check.udb and check.udd to check whether there are some blank tiles or empty files in the result.
- task : Stores all child tasks (*.sci).

Note : After dividing all tasks, the dialog box Generate Map Tiles by Multiple Tasks appears. You can set parameters to continue the operation. Or, you can close the dialog box and select another time or another machine to generate map tiles by clicking on Maps > Mapping gallery > Multi-task > Run Existing Tiles Tasks.
-
Set multi-task parameters : In the “Multi-task Generate Tiles” dialog box, specify the work space path, map name, the number of child tasks, and so on.
- Workspace Path : Specify the workspace where the map is located in. Note : You must ensure that the map in the workspace is consistent with the map for dividing the task, otherwise, the result cannot be browsed correctly. It is suggested that you divide the task again after updating your map and then generate tiles.
- Map Name : Specify the name of map which is for generating tiles.
- Task Number : Set the number of child tasks that is how many process will be opened in the local machine for generating tiles. The setting of process number depends on your machine configuration and the usage of processes. The number of processes can be adjusted at any time, if the process number you entered is more than the current number, click “Apply” and a new process will be opened; in contrary, a process which is running will be closed.
- Working Directory : Set the working directory the same as the work directory specified in the dialog box Multi-task: Set Map Tile Parameters. To generate tiles via multiple machines, you need to make the directory sharable, so that other machines can call the child tasks and write results in the directory.
- Perform the operation : After all, click Run to start the operation.
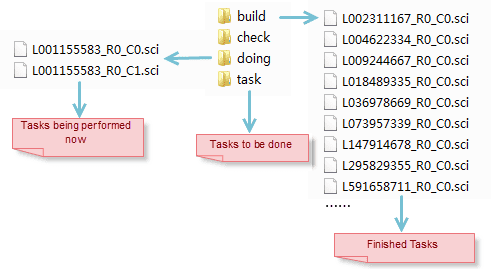
Then a folder named doing will be created in the CacheTask directory. The application will move sub-tasks obtained by processes from the folder task to the folder doing. Once finishing a sub-task, it will be moved to the folder build which is in the same folder as doing. For unsuccessful subtasks, the application will create a folder named failed to save them. If you stop the operation midway, which means there are *.sci files in the doing folder still, the application will move them to the folder task automatically for next operation.
After generating tiles, a dialog box appears to show you the total time consumed. The resulting tiles are stored in the folder tiles that is in the same folder as the sci file and are organized in different sub-folders as their scales. You can open the *.sci file to check all tiles.
Multiple tasks on multiple machines
- Divide the father task : First, complete the two steps “New Multi-task Generate Tiles” and “setting tile parameters” and then get the final directory Multi-task.
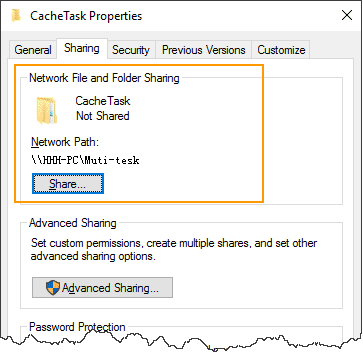
- Sharing settings : Set the directory “Multi-task” as a shared file and you must ensure that other machines can read and write the directory. You can set the privileges for other machines through the sharing settings in the file properties panel. Once a machine has accessed the directory successfully, it can be used for generating tiles normally.

-
Perform following operations to each machine involving in generationg tiles:
- Copy data and iDesktop to the machine, and then run iDesktop and open data. If the original data is saved at a remote serve, you can open it directly without copying.
- Check whether every machine can access the shared directory in the host machine successfully like entering \\198.168.1.20 (host ip).
- If the tile type is set as MongoDB, you need to verify whether each machine can connect the MongoDB database which will store result tiles.
- Start the program of multi-task generating tiles : Click Maps tab > Mapping gallery > Multi-task and select Run Existing Tiles Tasks.
- Set multi-task parameters : In the dialog box Generate Map Tiles by Multiple Tasks, specify the workspace path, map name, the number of child tasks, and so on. Among them, the working directory is the address of the shared directory. The application will call tasks accroding to the directory.
- According to the number of tasks, each machine will get child tasks from the Task folder in the shared directory, and the got child tasks will be moved from the task folder to the doing folder. And when it is finished, the child task will be moved to the same level build folder. For example, you have deployed three mahchines with the processes are: 6, 8, 10 respectively , and so there are 24 concurrent tasks for generating tiles at the same time, and after a sub task is finished, the corresponding process will continue to get a new task from the father task until all tasks are finished.
- After the tiles are generated successfully, a prompt dialog box with the result path and time consumed will appear. And the result tiles will be saved the folder of the same level of the father sci file. For MongoDB tiles, the tiles will be saved in a MongoDB database.
Related Topics
Generate Map Tiles (Single-task)

