Rotate object(s) in an editable layer.
Instructions
Pivot and Rotation Center
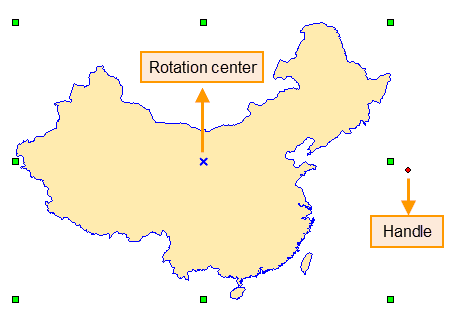
The pivot is the upper left corner of the geometric object bounding box, and the rotation center (X-shaped as shown below) is located inside the geometry object. When making geometric objects rotate, the pivot keeps still, and the geometric object is rotated around the rotation center at the angle you specified.
When multiple objects are selected, the pivot is the upper left corner of the common bounding box of these objects.
- SuperMap supports rotation operation for point layers, line layers, region layers, text layers, CAD layers and routing layers.
- During the rotation, you can make the object rotate to the target position by dragging or manually entering the rotation angle.
Basic Steps
Dragging rotation
- In an editable layer, select one or more objects.
- Place the cursor on the rotate handle, hold down the left mouse button, and move your mouse until the position you want then releasing the left mouse button.
Precise rotation
- Select one or more editable objects.
- Click the Object Operations tab Object Edit Gallery Object Operations group Rotation button to open the Rotation Settings dialog box.
- The dialog box shows the coordinates (X, Y) of the rotation centers. The default rotation center is the anchor on the upper left corner of the bounding box of the geometric object. You can reset the rotation center by modifying the (X, Y) coordinates.
- Entering a positive angle value rotates the objects counterclockwise, whereas entering a negative angle value rotates the objects clockwise.
- Click OK to rotate.

