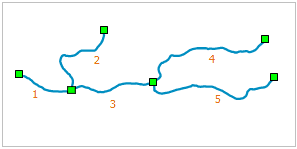
Snaps and connects a line segment object (A) and another line segment object (B) resulting in an object according to their drawing order. When vectorizing line objects, this function could connect the line objects at the snapped nodes to form a new line object, which speeds up the data vectorization. The line objects types could be different, such as polyline, arc, or rectangle.
The following figure shows a river, the auto connect line function can snap and connect line objects at the endpoints resulting in a new object.
Introduction
- Auto-Connect Line can be used for line layers and CAD layers.
- The Auto-Connect Line check box is available when there are editable line layers in the current map window.
- Auto-Connect Line supports both simple objects and compound objects.
Basic Steps
- Set your layer editable.
- Click Object Operations > Drawing group > Drawing Settings > Auto-Connect Line. You can also press Shift+J to activate this function. Click on this function again to disable it.
- Draw a line object (polyline, for example) in the map window.
- Enable the Snap function, snap a start point which can be the start or end node of an existing line to draw a line which can be of any type (multi-polyline, for example). For specific description on Snap , please refer to Enabling the Snappable Property.
- Right click to finish the drawing. iDesktop will connect the newly drawn object and the previous line object and keep its attributes.
- Repeat step 4 and 5 to connect more line objects.
Note
- The Auto-Connect Line function supports any line object, such as polyline, freehand line, and ellipse.
- Only can you connect the endpoint of a line. If you draw a line whose endpoint is a node of a line but not its endpoint, the program won’t connect them.
