


Create 2D Fill Symbol
By creating a new fill symbol, you can expand the fill symbol resources in the fill symbol library. This document details the basic process of creating a new fill symbol.
Feature Entry
- Styles menu -> Fill Style group -> Fill symbol dropdown -> More Symbols... -> Create 2D Fill button.
- Layer Manager -> Layer context menu -> Object Selection Style... -> Create 2D Fill button.
Steps
- Select a symbol group in the fill symbol library selector. The new symbol will be added to this group by default;
- Click the Create 2D Filling... button in the symbol library selector's toolbar to open the filling symbol editor;
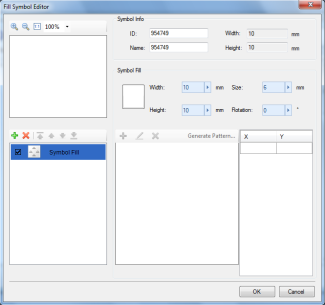
- Configure Symbol Information for the new fill. The default ID and name are automatically generated based on the selected symbol group. The symbol ID serves as a unique identifier in the library and cannot be modified. The symbol name is the display name in the library and can be customized;
- In the Symbol Layer Management Area, if multiple symbol layers exist, select one layer to configure its properties in the layer style settings area. Use the toolbar above to add, delete, or reorder symbol layers, and control layer visibility using the eye icon beside each layer;
- Configure layer type for the selected symbol layer. Four types are available: Symbol Filling, Linear Filling, Pure Filling, and Picture Fill.
- Symbol Filling: Uses point symbols for filling. Parameters include:
- Marker Style: Select marker symbols from the current marker symbol library or import external libraries via Symbol Library Management;
- Symbol Size: Default 6mm, unit consistent with marker size in symbol library;
- Rotation: Set marker rotation angle;
- Horizontal Spacing: Default 100 pixels between marker centers;
- Vertical Spacing: Default 100 pixels between marker centers;
- Offset X: Horizontal offset in pixels (default 0);
- Offset Y: Vertical offset in pixels (default 0);
- Linear Filling: Configures line symbol parameters:
- Line Type: Solid or dashed lines;
- Line Width: Default 1 pixel;
- Line Color: Color picker for line style;
- Rotation: Line pattern angle;
- Offset: Line offset in pixels;
- Line Spacing: Default 10 pixels between lines;
- Pure Filling: Single fill color with adjustable transparency;
- Picture Fill: Uses external images (*.png, *.jpg, *.jpeg, *.bmp). Parameters include:
- Image: Locate local image file;
- Fill Mode: Three options - Fit (proportional scaling with center crop), Stretch (image stretched to fill area), Original (tiled from top-left with crop);
- Horizontal Spacing: Displays horizontal distance between image centers (fixed to original width in Original mode);
- Vertical Spacing: Displays vertical distance between image centers (fixed to original height in Original mode);
- Symbol Filling: Uses point symbols for filling. Parameters include:
- Configure Contour Line for selected symbol layer: Check the Contour Line checkbox. Linear Style can be selected from current library or imported via Symbol Library Management. Contour line units are mm.
 Note:
Note:When contour line is enabled, the line style will remain NULL and cannot be modified during layer style configuration.
- Preview the new fill symbol in the preview area after configuring symbol layers and properties.
Notes:- Symbols in layers start drawing from the top-left corner of the preview area;
- Symbols are confined within rectangles defined by horizontal and vertical spacing, with centers aligned. Oversized markers may be partially clipped when spacing is insufficient;