


Enable Time For Data
Use the player to display temporal data that changes over time. Time properties must be enabled for the temporal data layer and time attributes need to be configured. Detailed settings are described below:
Operating Instructions
- After adding temporal data to the map, click the "Map" tab → "Browse" group → "Temporal Data" button to enter temporal display mode. The player will appear on the map as shown:

Figure: Layer Player - Click the "Settings" button on the right side of the playbar to open the "Play Settings" dialog, where you can configure Data Time and Layer Play duration.
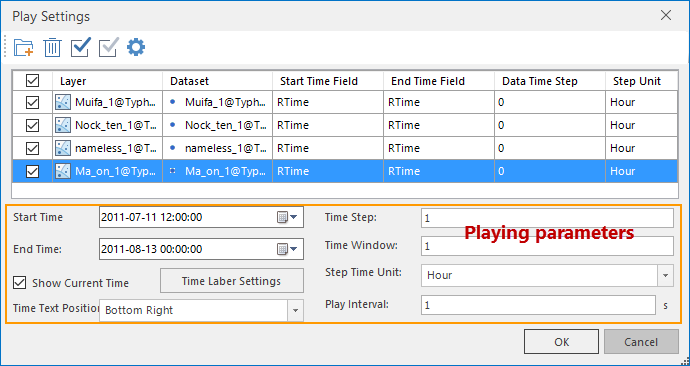
Image: Play Settings - Manage Layer List: First load the data layer, click the "Add" button, then select data in the pop-up "Select" dialog to add to the layer list. Multiple data layers can be added. Configure time attributes for each layer in the list area.
- Layer Activation Time: Each layer in the list has a checkbox. Checking it enables temporal activation for that layer. During playback, the layer will calculate participation parameters and display accordingly. Unchecked layers remain static and display final states throughout playback.
- Specify Time Fields: Temporal data may contain either:
- A single time field recording observation timestamps (assign to both Start and End Time Fields)
- Two separate fields for start and end times
Note: Specified time fields must be date-type. For non-date fields, refer to Time Field Processing.
- Data Time Step: Temporal data is typically collected at fixed intervals (hourly/daily etc.). This parameter specifies the temporal resolution. When multiple temporal layers with different steps exist, the player automatically uses the smallest step value.
- After configuring layer time properties, proceed to set playback parameters. See Playing Temporal Data for details.
Related:
