



When you need to add/edit ground control points to improve accuracy, you can use the Manage Ground Control Points function.
For ease of management, the program manages control points from different sources through two independent datasets:
- Collected Control Point Dataset: Used to manage control points collected in the field.
- Automatically Generated Control Points Dataset: Mainly used to store control points automatically generated by the Generate Ground Control Points function.
When opening the Manage Ground Control Points function, the Collected Control Point Dataset is managed by default. You can switch the dataset to be managed at any time through the Control Point Dataset drop-down menu in the management window.
For operations on adding, modifying, and deleting points, please refer to Point Editing. The toolbar of the Manage Ground Control Points attribute table integrates multiple functions, including filtering, searching, sorting (ascending/descending), importing field acquisition control points, exporting, deleting, mass deleting, and residual calculation. This article focuses on filtering, importing field acquisition control points, mass deleting, and residual calculation.
This function is only available when there is an original image in the workflow.
Function Entry
Satellite Image Processing tab -> Geometric Correction group -> Generate Ground Control Points drop-down menu -> Manage Ground Control Points.
Filter
Used to filter control points that meet the conditions in the attribute table. Three methods are provided as follows:
- Overview Map Range: The attribute table only displays tie point records shown in the overview map. When the overview map is closed, performing the filter operation will display all tie points by default.
- Match Image: Check one or more images, and the attribute table will display control points associated with the specified images.
- SQL Expressions: Filter control points that meet the conditions based on the entered expression.
Import Field Acquisition Control Point
In the remote sensing imagery production process, if the accuracy of the reference image is low and cannot meet project requirements, high-precision control points collected in the field can be imported to improve the accuracy of the result data. This method can effectively compensate for the deficiencies of the reference image, ensuring that the final results meet the required accuracy standards.
The main operation steps are as follows:
- In the Manage Ground Control Points window, click the Import Field Acquisition Control Point button on the toolbar, and the Collect Control Points dialog box will pop up.
- Set the following parameters in the dialog box:
- Control Point File: Select a *.txt, *.xls, or *.xlsx file that stores control point information locally. The order of the first four columns in the control point file must be "Serial Number", "Longitude", "Latitude", and "Elevation"; otherwise, the import result may not match the actual information.
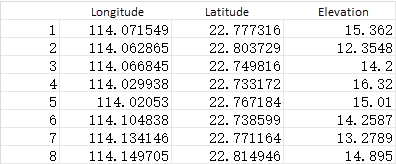
Figure: Control Point File - Source Coordinate System Settings: Set the coordinate system used when collecting control points to ensure that after transforming the coordinate system to the default coordinate system of the collected control point dataset, the longitude and latitude information of the control points remains highly accurate.
- X/Y Accuracy: The accuracy value of the collected control points in the X/Y (longitude/latitude) direction. The default value is 1, and the unit is m. The smaller the value, the greater the weight of the control point in the adjustment.
- Z Precision: The accuracy value of the collected control points in the Z (elevation) direction. The default value is 1, and the unit is m. The smaller the value, the greater the weight of the control point in the adjustment.
- List: After adding a control point file, the control point information in the file will be automatically read. You can control whether to import the detected control points into the collected control point dataset by checking the checkboxes on the left side of the list. By default, all are checked, meaning all detected control points will be imported.
- Control Point File: Select a *.txt, *.xls, or *.xlsx file that stores control point information locally. The order of the first four columns in the control point file must be "Serial Number", "Longitude", "Latitude", and "Elevation"; otherwise, the import result may not match the actual information.
- Click the OK button to complete the control point import, and the Edit dialog box will automatically pop up.
- Select the first record in the Manage Ground Control Points window, then select the Edit button in the Edit dialog box to move the point and confirm the image-space coordinates of the control point in the original image.
- Repeat the operation in step 4 to add image-space coordinates for all imported control points.
Mass Delete
Mass delete is used to delete all control points that meet the filter criteria. After clicking the Mass Delete button, the Mass Delete dialog box pops up, and the following content can be deleted:
- Delete Automatically Generated Control Points: When checked, all automatically generated control points will be deleted.
- Delete Points for the Specified Range of Residuals: When checked, all control points with residuals no less than the value entered in the right input box will be deleted.
- Delete the Checkpoint: When checked, all checkpoints in the attribute table will be deleted.
Residual Calculation
Provides real-time residual and manual residual calculation. The calculation results will be updated to the attribute table in real time.
- Correction Model Type: Provides Linear RPC Correction Model, Quadratic Polynomial RPC Correction Model, and Cubic Polynomial RPC Correction Model. The default selection is Linear RPC Correction Model.
- Linear RPC Correction Model: Suitable for cases with small internal distortion in the image. This model requires no less than 4 ground control points.
- Quadratic Polynomial RPC Correction Model: Suitable for cases with moderate internal distortion in the image. This model requires no less than 9 ground control points.
- Cubic Polynomial RPC Correction Model: Suitable for cases with large internal distortion in the image. This model requires no less than 16 ground control points.
- Real-Time Residual:
- Selected: The residual information of each control point will be calculated in real time based on the correction model type. If the number of control points is less than the required number for the correction model, automatic real-time residual calculation will not be performed.
- Not Selected (default): Real-time residual calculation is not performed.
- Manual Residual: Available when real-time residual is not selected. After clicking this button, the residual information of each control point will be calculated based on the correction model type. If the number of control points is less than the required number for the correction model, residual calculation will not be performed.
Related Topics
Generate Ground Control Points