


Instructions for Use
When editing spatial objects, the snapping function allows for quick and precise positioning to the edges or nodes of existing objects within the tolerance range, thereby improving editing efficiency and accuracy.
The snapping function is only enabled when the layer is editable. For settings on making a layer editable, please refer to Setting Common Layer Properties.
Snapping configuration is a global parameter and remains effective after restarting the software.
Supported starting from SuperMap ImageX Pro 2025 version.
Function Entry
Image Mosaic tab -> Map Editing group -> Snapping Settings.
Operation Instructions
- Click the Image Mosaic tab -> Map Editing group -> Snapping Settings button to open the Snapping Settings dialog box.
- In the Type section, you can configure the following:
- Enable or disable the corresponding snapping types: Check the box in the Enable column to activate a snapping type. To disable, simply uncheck it.
 Tip:
Tip:You can also enable or disable a specific snapping type by selecting it from the dropdown menu under Image Mosaic tab -> Map Editing group -> Snapping Settings (selected means enabled, deselected means disabled), without opening the Snapping Settings dialog box.
- Adjust snapping priority: After selecting a snapping type row, use the Move to Top, Move Up, Move Down, or Move to Bottom buttons on the right to adjust its priority. For example, as shown below, when the mouse is near both a node and an endpoint, if Point Snapping to Endpoints has higher priority than Point Snapping to Nodes, the mouse will snap to the endpoint.
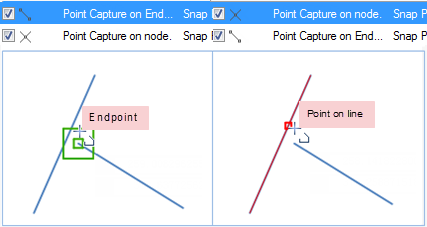
Figure: Snapping Priority - Default: If you have edited the default values through the above operations, click the Default button in the dialog to restore all settings.
- Enable or disable the corresponding snapping types: Check the box in the Enable column to activate a snapping type. To disable, simply uncheck it.
- In the Parameters section, parameters such as snapping tolerance and angle are provided to meet snapping needs in different scenarios. The descriptions of each parameter are as follows:
- Snapping Tolerance (Pixels): If the distance between the object to be snapped and the mouse is less than the specified tolerance value, the object will be snapped. The default value is 15, the unit is px, and the value range is [1,20].
- Fixed Angle (Degrees): If the angle between the line segment to be drawn and the already drawn line segment equals the specified angle value, and the Fixed Angle Between Lines snapping type is enabled, a prompt will be given. The default value is 90, the unit is °, and the value range is [0,360].
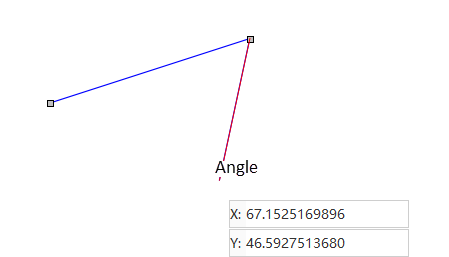
Figure: Snapping to a Fixed Angle (Fixed angle value is 60°) - Fixed Length (Map Unit): If the length of the line segment to be drawn equals the specified length value, and the Draw Line with Fixed Length snapping type is enabled, a prompt will be given. The default value is 1000, and the unit is the same as the map unit.
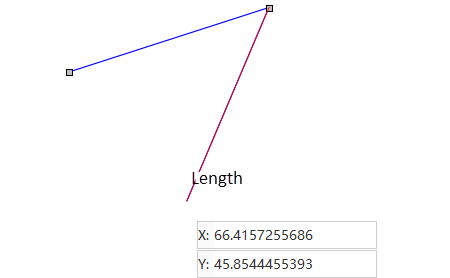
Figure: Snapping to a Fixed Length - Ignorable Line Length (Pixels): This is the minimum length for a line to be snappable. Lines shorter than this value will not be snapped to. The default value is 50, the unit is px, and the value range is [1,120).
- Add a node when point is snapped to the line: Check this option to automatically insert a node at the snapping point on the line when a point is snapped to it.
- Preview: A preview window for the parameters is provided on the right side of the dialog box. The red circle indicates the tolerance range.
- Default: If you have edited the default values through the above operations, click the Default button in the dialog to restore all settings.
- After completing the settings, click the OK button to use the snapping function when editing objects.
Related Topics