



Function Description
The Symbol Layer Drawing function is used to customize the draw order of symbols in a map, overriding the system default drawing rules. When a symbol has multiple symbol layers (e.g., a road symbol with a contour), this function can control the draw order of these individual symbol layers within the symbol. Currently, only normal line layers, line unique value thematic map layers, and line graduated color thematic map layers support this function.
This function is mainly applied to complex road network mapping scenarios, such as intersections, overpasses, underpasses, and other complex road display scenarios. By adjusting the draw order, gaps at the connection points of road line segments can be eliminated, achieving visual continuity and connectivity.
The following are the related terms for this function:
- Symbol class: The symbols used in a layer are called symbol classes.
- For a single-symbol layer, the symbol itself is one symbol class.
- In a unique value or graduated color thematic map, the symbols used for each thematic item are each a symbol class.
- After enabling this function, the draw order of symbols in the map is determined by the order in which the symbol classes are arranged.
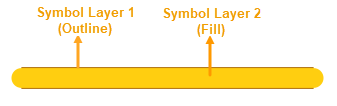
- Symbol layer: A symbol layer is a constituent unit within a symbol. As shown in the figure below, for a road symbol consisting of a "fill main color line" and an "outer contour line", each sub-line is an independent symbol layer.
Symbol layer drawing is divided into two interfaces: the Basic page and the Advanced page.
- Basic page: Used to reorder symbol classes and select the drawing method for each symbol class.
- Advanced page: Only used in complex cases where it is necessary to fine-tune the order of each symbol layer across symbol classes. The custom order in the Advanced page may not be representable in the Basic page. Switching back to the Basic page will reset to the default settings.
SuperMap iDesktopX 2026 version onwards supports this function.
Function Entry
- Layer Manager->Context menu->Layer Style->Symbol layer drawing.
Operation Steps
The following introduces how to use the related functions in the Basic page and the Advanced page.
Using the Basic page
- From the context menu of a line layer in the Layer Manager, enter the Layer Style panel's Symbol layer drawing interface. On the Basic page, check the Enable symbol layer painting checkbox to enable this function.
- At this point, the order of symbol classes in the Draw order list represents their drawing order from bottom to top. The symbol class at the bottom of the list is drawn first (displayed at the bottom), and the one at the top is drawn last (displayed at the top).
- Select and drag a symbol class in the Draw order list to readjust its draw order in the layer.
- Click the arrow in front of a symbol class to expand and view all its internal symbol layers. Alternatively, click the Expand all/Collapse all button at the top right corner of the panel to expand or collapse all symbol classes at once.
- After enabling symbol layer painting, the system assigns a default drawing method based on the symbol structure. If a symbol consists of only one symbol layer, the default drawing method is No connection. If a symbol consists of multiple symbol layers, the default drawing method is Join. You can manually adjust according to the following table.
Drawing Method Detailed Description Illustration Notes No connection The symbol is drawn independently, and all its internal symbol layers are drawn simultaneously, with no priority order. Suitable for simple symbols that do not require a connection effect.
In the figure on the right, both symbol classes are set to No connection.
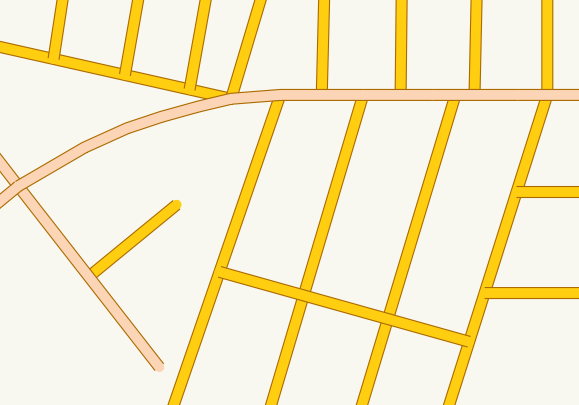
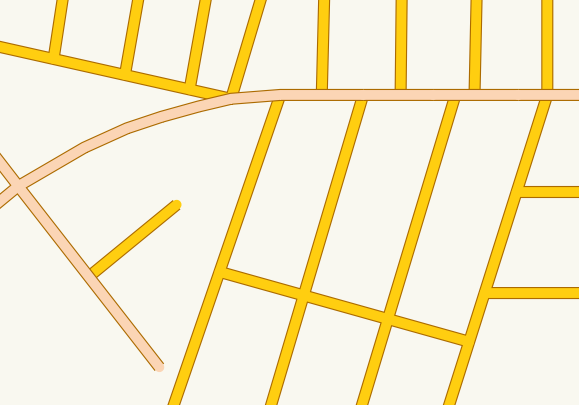
For a symbol with only one symbol layer, the drawing method only supports No connection. Join Multiple symbol layers within a symbol are drawn in a bottom-to-top layered order (the bottom layer is drawn first, then the upper layer). This ensures visual continuity of lines within the same symbol class (e.g., a certain level of road).
In the figure on the right, both symbol classes are set to Join.
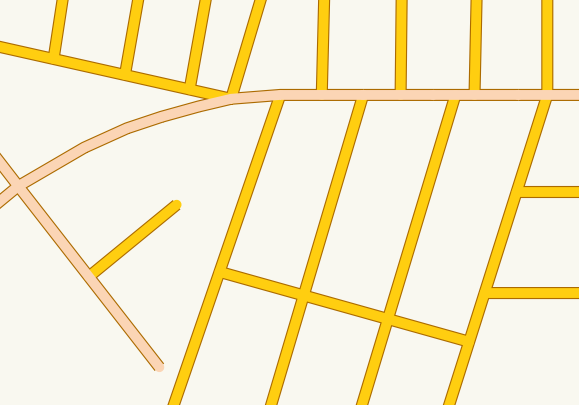
Join and merge This method is suitable for connected display across symbol classes. A symbol class set to Join and merge will be merged with the symbol class immediately above it in the draw order list for drawing. During drawing, the bottommost layers of these two classes are drawn together first, then their upper layers are drawn in sequence.
In the figure on the right, the symbol class at the lower position is set to Join and merge, and the one above is set to Join.
1. The topmost symbol class cannot use this method.
2. If the symbol class immediately above is set to No connection, this symbol class cannot use this method.
3. If a symbol class using this method is dragged below a symbol class set to No connection, its setting will automatically reset to Join. - Click the Reset button at the bottom right corner of the panel to return the drawing settings of all symbol classes to default.
Using the Advanced page
- Only used when it is necessary to rearrange the draw order of each symbol layer across symbol classes. The Advanced page organizes symbol layers into different drawing order Groups. All symbol layers within the same group are drawn simultaneously.
- The structure of Groups in the Advanced page is determined by the order of symbol classes in the Basic page and the drawing method set for each symbol class. First, sort by the order of symbol classes in the basic page, then superimpose sorting according to the drawing method set for each symbol class.
- No connection: All symbol layers are in one group and drawn simultaneously.
- Join: Each symbol layer of a symbol class is assigned to different groups in order and drawn separately.
- Join and merge: For multiple symbol classes involved in merging, their corresponding bottom symbol layers are placed in the same group and drawn simultaneously, while the upper layers are then assigned to different groups in order and drawn separately.
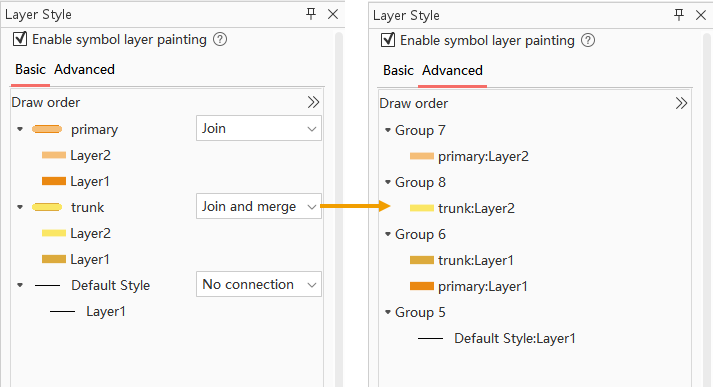
- You can drag an entire Group to adjust its order, or drag individual symbol layers between different Groups.
- If you adjust the draw order of symbol layers across symbol classes in the advanced page, or change the order of symbol layer drawing within a symbol class, it cannot be displayed on the Basic page.
At this point, if you switch the interface back to the Basic page, a prompt box will appear: "This order cannot be represented in the base page. Switching back to the base page will restore the default drawing settings. Continue with the switch?"
If you click Yes, the interface switches to the Basic page, and the drawing method reverts to default. If you click No, it stays on the Advanced page, and the drawing method remains unchanged.
- Right-click a symbol sub-layer and choose to Move to new group; the symbol layer will then be added to a new group at the bottom of the Draw order list.
 Notes:
- After enabling symbol layer drawing and making related settings, if you modify the marker style or make any changes to the thematic map properties, the symbol layer drawing will reset to the default state. It is recommended to configure symbol layer drawing last after completing all symbolization settings.
- When generating vector tiles, the symbol layer drawing configuration is invalid.
- When exporting the map to PDF, the symbol layer drawing configuration is invalid.
Related Topics