TIN dig
Instructions for use
A hole can be hollowed out on the TIN Terrain through the hole digging function, and then the Model is superimposed to form the effect of the Model and the Match Terrain.
Function entrance
- 3D Geographic Design Tab-> TIN Terrain Operation-> Dig
- Toolbox -> 3D Data -> TIN Process -> TIN dig
Operation steps
- Load Terrain Tiles (TINs) in the scene (Config File format is *.sct).
- Select the Terrain Tiles layer in Layer Manager, right-click "Jump to Layer", and hold down the mouse wheel in Scene to adjust the camera to a view that is easy to operate.
- On the 3D Geographic Design tab, click TIN Operation to pop up the TIN dig "panel, as shown in the following figure:

Figure: TIN dig "Dialog Box - Layer selection: Click the drop-down arrow of the TIN Terrain "combo box, and select the Layer of Object to be excavated.
- Hole face determination: Select Select Face or Sketch Face to determine the type of hole face. When you select Draw Faces, the toolbar provides three ways to draw facets: Rectangle, Polygon, and Import.
- Select Objects Area Dig Hole: Select one or more II and Region3D to dig holes. It is recommended that you select the face object before clicking the Select Objects Area Cut button.
- Rectangular hole digging: Click the "Rectangle" button with the left mouse button to draw the rectangular area to be dug on the TIN Terrain in the scene.
- Polygon Dig: Click the Polygon button to draw the polygonal area to be dug on the TIN Terrain in the scene.
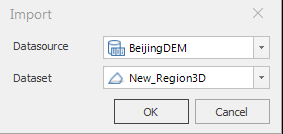
- Import Hollow Region: Click the "Import" button to pop up the following dialog box, and select the 2D/3D surface as the hole digging surface.

Figure: Import dialog box
- "Preview" check box: The "Preview" check box is checked by default to support real-time preview of the digging effect.
- Clip boundary elevation: Click the drop-down arrow of the Clip boundary elevation "combo box and select the Keep with source data" or Keep with clip polygon "constraint method. "Keep with source data" means that the boundary elevation value of the hole digging result is consistent with the original one and remains unchanged; "Keep with clip polygon" means that the boundary elevation value of the hole digging result is consistent with the boundary elevation value of the hole digging surface.
- Click the "OK" button to complete the operation. You can also use the "Recall" button to roll back to the History of the latest operation from the current time node. The effect diagram of hole digging is shown below: "

Figure: "TIN dig" Effect Picture
 Caution:
 - TIN Terrain digs the data of the default Outside the reserved area.
- When the Clip boundary elevation is set to Keep with source data ", the Z value of the excavation face has no effect. The software maintains a Historical Data record after a hole is dug
- in Terrain Tiles (TIN). Historical Data can be viewed and rolled back through the History option of the Terrain TilesContext Menu .


