


Feature Description
S-101 is the product specification for the new generation of Electronic Navigational Charts (ENC), developed by the International Hydrographic Organization (IHO). As part of the S-100 series of standards, S-101 specifies the format, symbols, and structure of ENC data, aiming to replace the S-57 standard and provide richer and more flexible data representation. S-101 enhances the visualization and functionality of electronic charts, making them more effective in modern navigation systems to support route planning, monitoring, and other navigational operations.
SuperMap iMaritimeEditor supports the creation of S-101 chart groups, allowing users to set metadata such as chart number, map range, producing agency, publication date, etc. Only one S-101 group can be created within a single data source, and all newly created or imported maps are uniformly managed within this group.
Function Entry
- Workspace Manager->Datasource context menu->New Dataset...->S-101 Chart Products...
Operation Steps
- In the Workspace Manager, right-click on a data source node and select New Dataset...->S-101 Chart Products... In the dialog box, set the following information:

Create Editable Chart Group: Step 1 - Datasource: Click the drop-down button on the right to select a data source for storing the chart dataset group.
- Feature Identifier Sequence: Assign an FIDN to the data group. When a feature object is created, the corresponding FOID is also created and assigned to the feature object. Click the drop-down button on the right to select a feature identifier sequence. If no signature sequence has been created before creating the editable chart group, click the
 button in the dialog box to Create Signature Sequence.
 - Feature Identifier Distinguishing Number: That is, FIDS, which is an important part of the Feature Object Identifier (FOID). Here, you can assign a feature identifier distinguishing number to the created chart dataset group. Set it to 1, with a valid range of 1 to 65534.
- After completing the parameters in the first step, click Next to set the layer bounds. In the Left, Bottom, Right, and Top text boxes, input the longitude and latitude of the top-left and bottom-right points of the range, e.g., input: Left: 120°, Bottom: 31.5°, Right: 120.5°, Top: 32°.

Create Editable Chart Group: Step 2 - After completing the range settings in the second step, click the Next button. In the pop-up dialog box, set the following parameters:
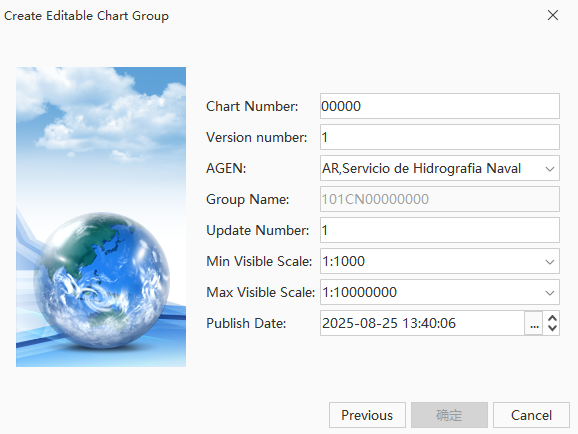
Create Editable Chart Group: Step 3 - Chart Number: This is one of the important components of the group name and can be set to any five ASCII characters, such as letters or numbers. Set the Chart Number to 00001 here.
- Version Number: When an S-101 file (000 file) is initially generated, the version number is set to 1. The version number increases by 1 with each new version. Set the Version Number to 1 here.
- AGEN: The agency that produces the chart data. For specific producing agency codes, refer to the IHO Producing Agency Code Table. For example, the agency code for the China Maritime Safety Administration is CN.
- Group Name: Used to display the filename of the S-101 file (000 file) corresponding to this chart.
- Update Number: The update number for a new S-101 file (000 file) is set to 1.
- Minimum Visible Scale: Set the minimum scale at which the data is suitable for display. Data is not suitable for display below this scale.
- Maximum Visible Scale: Set the maximum scale at which the data is suitable for display. Beyond this scale, the data will be considered "severely over-magnified" and no longer suitable for display.
- Publication Date: This date is the date when the data producer makes the data available. Click the drop-down button on the right and select the publication date from the date panel.
- After completing the parameters in the above three steps, click the OK button to complete the creation of an editable chart dataset group named S101. The group contains the necessary feature datasets for S-101 electronic chart meta-objects and supports the creation of new feature datasets. For details, please refer to the Create Feature Dataset documentation.
- In the context menu of the S101 group, select Add to New Map. In the pop-up Select Display Directory dialog box, select a display directory. The display directory defines the display rules and symbols for objects in the feature catalog, standardizing the visual representation of geographic data in the system. Four display directories are provided: S101_PC_1.1.1, S101_PC_1.2.3, S101_PC_1.5.0, and S101_PC_2.0.0.
 Note:
Note:Double-clicking the S101 group node can also open the data in the map. This method does not require selecting a display directory and defaults to using S101_PC_1.1.1.
- In the S-101 context menu, select Product Management to enter the product management interface. In the product management interface, you can see all maps managed by this S101 group. Here, you can perform various operations on the charts in the group, such as importing, exporting, deleting, and viewing properties:
- Import: Click the Import button to open the Import Nautical Chart Data dialog box. Select the S-101 (*.000) file to import from the local directory, click the Open button, set parameters such as data source and display directory in the pop-up Import S-101 Data dialog box, and then click the Import button to import it into the group.
- Export: Select a chart data in the product management list, then click the Export button to open the Export S-101 Data dialog box. Here, you can set the output path and the file type for export, supporting export as *.shp files and *.000 files.
- Properties: Click the Properties button in the context menu to open the properties panel, where you can view attributes and data information such as group name, feature datasets, dataset coordinate origin, and coordinate multiplication factor.
- Locate in Map Window: To quickly locate a specific data in the map, select the data in the product management list, then choose Locate in Map Window from the context menu, or simply double-click the chart. The data will be centered and displayed in the map.
- Delete: Select a data and click Delete in the context menu to remove it from the group.
Related Topics