


Application Background
When the area to be studied and analyzed is large, or the distribution of the target of interest is widespread, involving multiple raster data or multiple images, it is necessary to mosaic multiple raster data or image data. In SuperMap iDesktopX, you can perform grid/image mosaic through three methods: Raster Splice, Raster Append, and Raster Mosaic. The following raster dataset serves as an example.
Raster Splice
The raster splice function allows you to quickly combine multiple raster data to generate a new raster dataset; for detailed operational instructions, refer to Raster Splice. When performing raster splice, pay attention to the following key points:
- The coordinate systems of the input data to be spliced must be consistent;
- The pixel formats of the input data to be spliced must be consistent.
- If the input data to be spliced are image data, the number of bands must be consistent.
Raster Append
Raster append involves importing multiple raster data into an existing target raster dataset using the append mode during data import. First, you need to create an empty raster dataset that meets the conditions because raster data is read-only, and the extent, pixel format, and number of bands of the raster dataset are all read-only. Once created, they cannot be modified later, so before appending, you must create a target dataset that satisfies the conditions and specifies the range.
Step 1: New Raster Dataset
The append process does not change the data format, so the attributes of the created raster dataset must match those of the raster data to be imported; otherwise, the append will fail. Specific attribute parameters are described as follows:
- Dataset Bounds: The maximum extent of all raster data to be appended, with units the same as the coordinate system of the import data. For example, if importing multiple raster data for the entire Sichuan Province, you can use the provincial boundary as the dataset extent.
- Pixel Format: Same as the pixel format of the raster data to be imported.
- X/Y Resolution: The resolution of the target raster dataset can differ from that of the data to be imported: if the target dataset resolution is low and the imported raster data resolution is high, the resulting raster dataset resolution will match the target dataset as low resolution. If the target dataset resolution is high and the imported raster data resolution is low, the resulting raster dataset resolution will match the target dataset as high resolution.
- You can view the above data attributes by directly opening a raster data to be imported in a file data source and checking in the properties panel.
- After creating the empty dataset, building pyramids before raster append can improve efficiency.
- If there is already a target raster dataset that meets the extent and attribute parameters, there is no need to create a new raster dataset; proceed directly to step 2.
Step 2: Import multiple raster data into the created target raster dataset.
- Use the Data Import function to add the raster data to be appended to the list box.
- The appended dataset and target dataset must satisfy the following conditions:
- The raster to be imported must have the same coordinate system.
- Result Dataset: The result dataset should be the same as the target raster dataset created in the previous step.
- Dataset Type: The dataset type must be consistent.
- Import Mode: Set to "Append".
- Data Band Mode: The band mode of the append should match the original data band mode, either single multi-band, multi-band, or composite band.
Complete raster append through the above two steps.
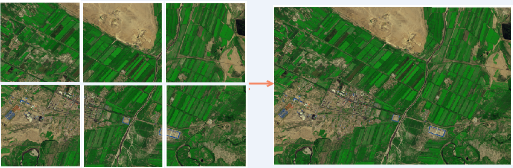 |
| Figure: Image Append |
Raster Mosaic
Raster mosaic operation can combine multiple raster datasets; mosaic processing requires first importing the raster to be mosaicked as datasets and then performing the mosaic. For detailed operational instructions, refer to Raster Mosaic. When performing raster data mosaic, pay attention to the following key points:
- The raster to be mosaicked must have the same coordinate system: Mosaic requires all raster datasets or image datasets to have the same coordinate system; otherwise, the mosaic result may be incorrect.
- Handling of overlapping areas: During mosaic, overlapping areas often occur between two or more raster data. In such cases, you need to specify how to handle the cell values in the overlapping areas. The program provides five methods for handling overlapping areas; users can choose an appropriate method based on actual needs.
- When the data to be mosaicked are raster datasets, you can specify no-data values and their tolerance; that is, if the cell values in the raster datasets participating in the mosaic fall within the bounds settings of no-data, these cells will be set as null in the result dataset.
- When the data to be mosaicked are image datasets, you can specify the background color and its tolerance. During raster mosaic operation, cells of this color are treated as background.
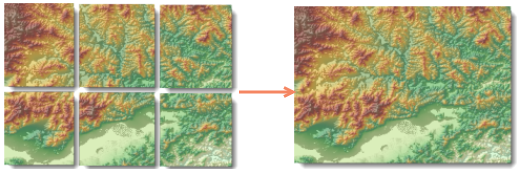
Figure: Raster Mosaic
Application Example
Select DEM raster data for 12 provinces in China, with a file size of 4.42 GB; combine the 12 raster data into one raster dataset using three methods: raster splice, raster append, and raster mosaic.
Raster splice time: 8 minutes 20 seconds;
Raster append time: The import time is the same as raster splice, but requires creating a dataset covering the extent of the data to be imported first;
Raster mosaic time: Raster import and mosaic together took 1 hour 42 minutes;
1. Mosaic Efficiency Comparison
- Raster splice: Directly add data files for quick batch splicing operations, with the highest data processing efficiency.
- Raster append: Import data in append mode, requiring pre-creation of a dataset covering the extent of the data to be imported; data append is achieved during import.
- Raster mosaic: First import data and then perform mosaic, which is time-consuming for large data volumes.
2. Handling of Overlapping Areas
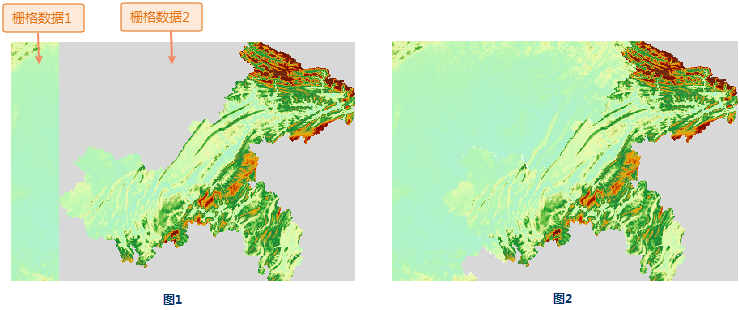 |
- Raster splice and raster append handle overlapping areas similarly. When overlapping areas exist between data, the default is that the latter data covers the former. Therefore, users need to adjust the data import order based on the actual data situation to avoid valid areas being covered by no-data areas. As shown in the figure below, when raster data 1 and raster data 2 are spliced, raster data 2 has no-data areas (gray areas) at the boundary. If raster dataset 2 is imported later, the result is as shown in Figure 1, where the valid area in spliced raster 1 is covered by the no-data area of raster 2. If raster 1 is imported later, the result is as shown in Figure 2.
- Raster mosaic: When datasets overlap, you can set the value assignment method for overlapping areas. The application provides five handling methods: same as first dataset, same as last dataset, max of all the datasets, min of all the datasets, and mean of all the datasets. Users can choose an appropriate method based on actual needs.
3. Raster mosaic allows setting the pixel format of the result dataset, which does not need to be consistent and can be changed as needed.
4. Raster mosaic allows setting the value for null data after mosaic, meaning that when cell values in the raster datasets participating in the mosaic fall within the bounds settings of no-data, these cells are set as null in the result dataset.
Based on the above analysis, the following conclusions are drawn:
- Raster splice: Directly add data files for splicing, with simple operation and highest efficiency.
- Raster import: Requires pre-creating a dataset covering the import extent, slightly more complex than raster splice, but the method of merging multiple raster data via append is more efficient compared to raster mosaic.
- Raster mosaic: Allows setting the handling method for overlapping areas, enabling better processing of overlaps between data.
You can choose the appropriate method for data mosaic based on the actual data situation and result data requirements.