Instructions for use
In the Fill Symbol Selector, you can view and select the style of the point symbol to be applied, and also adjust parameters such as color, transparency, and outline here.
As shown below, the Symbol Library window (Styles window) is currently loaded with the Fill Symbol Library.

Function Entries
- Workspace Manager->Resource Node ->FillMarker Symbol Library.
- Polygon Layer Style Panel ->Settings button.
- Styles tab -> Fill Style group -> FillSymbol dropdown ->More Symbols option.
Operation Steps
- Select Symbols: In the Fill Symbol Selector, select the desired symbols.
- Set Symbol Display Style:
The preview area in the Symbol Library window's Symbol Style Settings allows previewing the marker style set by the user.
In the Symbol Library window's Symbol Style Settings, you can set the style used for the selected symbols, including the following aspects:
Color: Set color.
- Foreground Color: Set the color of the symbols' fill content. Click the drop-down button on the right, and users can select the default color from the pop-up color panel or customize other colors.
- Background: Set the color of the symbols' non-fill content. Click the drop-down button on the right, and users can select the default color from the pop-up color panel or customize other colors.
- Transparent Background: After checking this checkbox, the non-fill content of the symbols will be set to transparent, and the Background setting will be invalid.
- Transparency: Sets the transparency effect of the fill symbol. Users can enter a value in the number display box on the right to set it; or click the increase and decrease buttons on the right side of the number display box to adjust transparency. The transparency value is an integer between 0 and 100, where 0 represents completely opaque and 100 represents completely transparent.
Outline: Set the outline for polygon layer settings.
- Line Style: Select the desired line symbol, or click the Custom button in the dropdown menu to choose from the pop-up Line Symbol Selector window.
- Line Color: Set the color of the line symbol. Click the drop-down button on the right, and users can select the default color from the pop-up color panel or customize other colors.
- Line Width: Set the thickness of the line. Users can enter a value in the number display box on the right to set it; or click the increase and decrease buttons on the right side of the number display box to adjust the line width.
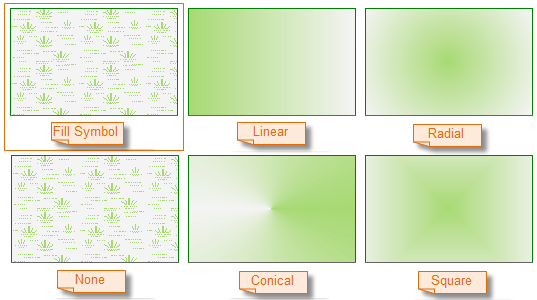
Gradient Fill: After checking this checkbox, gradient colors will be used as the fill content for the symbols. At this time, the fill content of the symbols will be colors, meaning the symbols selected by the user in step 1 are invalid. In gradient fill mode, Foreground Color and Background will be used as the two colors for the gradient, i.e., the gradient mode is a two-color gradient from foreground color to background color.
Set the gradient method. Includes the following five methods:
- No Gradient: Do not use gradient colors as the fill content for symbols; instead, use the fill content of the symbols selected in step 1.
- Linear: Gradient is linear.
- Radial: Gradient is radial, from the center to the surroundings.
- Conical: Gradient is conical.
- Square: Gradient is square.

Offset X: Set the offset X percentage of the gradient fill center point relative to the center point of the fill range. Users can enter a value in the number display box on the right to set it; or click the arrow on the right side of the number display box and use the pop-up slider to adjust the value.
Offset Y: Set the offset Y percentage of the gradient fill center point relative to the center point of the fill range. Users can enter a value in the number display box on the right to set it; or click the arrow on the right side of the number display box and use the pop-up slider to adjust the value.
Rotate: Set the rotation angle of the gradient fill. - After setting is complete, click the OK button in the Symbol Library window to apply the marker style parameters.
 Note:
Note:- When setting the style for vector tile layers, only 3D symbols are supported.
Related Topics
Point Symbol Style Settings (Map and Layout)
Point Symbol Style Settings (Scene)


