In this example, the Ground Model Data and Underground Pipelines data in the Bird's Nest area are used. By setting the roller shutter on the road layer, the Scene Browsing effect of the Ground Model and Underground Pipelines can be seen at the same time when flying along the designated route.
Data description:
The Bird's Nest area Model Data used in this example is to extract five layers of buildings, trees, water, ground and roads from the Model Dataest in the Sample Data OlympicGreen, and generate SCV cache, and directly load the generated Cache Data in the scene. And that Scene Brow sing efficiency is improve. The Underground Pipelines data used is a 3D Network Dataset created from 3D points and 3D lines. Three types of pipelines are used here: drainage, water supply and sewage.
Operation steps:
Step 1: New scene, in the generated SCVCache Data and Piple LineAdd to Current scene. To add a 3D cache to the current scene, see: Load 3D Cache
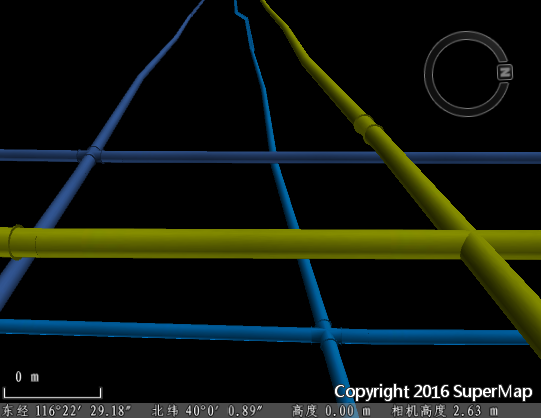
Step 2: Set the pipeline style. Take the drainage pipeline as an example, add the drainage pipeline Network Dataset to the 3D Scene, and select the network line sub-Dataset in the Layer Manager. On the Style Settings tab, in the Extrude Settings group, set the height mode to Absolute, the data from Underground, in the Line Style group, set the tube style, change the color to blue, and set the line weight to 1. For the network node sub-Dataset, set the altitude mode to "Absolute", and the data comes from "underground". Do the same for the other two pipelines Network Dataset. The water supply pipeline is also in blue style, and the sewage pipeline is in yellow style.
Step 3: Open underground mode and set Transparency Settings to 100%. Display Effects is shown in the figure below.
 |
| Figure: Setting effect of Underground Pipelines |
Step 4: Roll up the Layer Settings of the road. In the " Scene" tab, click to select " Scene Swipe", and in the pop-up dialog box, check the check box in front of the Road layer in the " Swipe Layer" to indicate the roller shutter for this Layer Settings. In Swipe Bounde Settings, set the horizontal area to 0, 100 and the vertical area to 0, 65, and the horizontal and vertical separators will not be displayed. Adjust the camera angle.
For details of the Swipe Bounde Settings, see " Swipe Bounde Settings" in Scene Swipe .
Step 5: Set up the Flying Route. The combination of Scene Swipe and Flying Route provides a better Scene Brow sing experience. For detailed settings of Flying Route, please refer to 3D flight simulation .
This example shows the effect of simultaneous browsing of ground and underground data in the same scene at the same camera height by setting the vertical shutter area of the road layer. Similarly, by setting the horizontal rolling area of the layer, you can achieve the historical change browsing effect in the time dimension, or other more custom Scene Browsing experience.


 Related topics