Publish Map Aplication Instance
This special document mainly introduces how to use to publish the local map data to the SuperMap online store through an example of map publishing, so as to realize resource sharing.
The main contents of the application example include preparing maps and scenes, making Flying Route, Generate Cache files, preparing pictures and publishing data. The following describes how to use the Publish Map function to publish Local Data based on the CBDCache. Smwu data in Sample Data and the Workspace in Use mode.
Operation steps
Step 1: Prepare the map and scene
- Start Application.
- Click the file button in the upper left corner of Application, and select Sample Data "in the pop-up menu to directly open CBD Scene Data (CBD Cache. Smwu) in the Workspace list on the right to open the data.
- The "2D map" in the map node and the "symbolic modeling" under the scene node are used as the map and scene to be published.
Step 2: Make Flying Route
- Double-click Symbolic Modeling under the scene node, Open Scene.
- Click the "New" button in the "Flying Route" group in the "Flying Management" tab, add a flying site in the scene, and make a Flying Route. Please refer to the Create a Flying Route for specific manufacturing steps.
- When you have finished making the Flying Route, click the Save button in the File Management "group of the Flying Management" tab to save the Flying Route as a Scene Flying Route. Fpf ".
Step 3 Generate Cache File
- Double-click Open Scene under the scene node.
- When there is no object selected in the Scene, right click the mouse in the Scene, and select the Generate Scene Cache "command in the pop-up Scene Context Menu.
- In the pop-up "Generate Scene Cache" dialog box
 , click the button and select All Data; Click the Drop-down Button on the right of "Cache Purpose" and select Cache Type. If you want to view the cache file in iMapReader, you need to select the corresponding "PVRTC" or "android series device" option; And click the Browse button on the right of Cache Path: to set the output Path Settings of SceneCache to the folder where the Workspace is located. "C: \ Program Files \ SuperMap \ \ SampleData \ 3D \ CBD". Click the Generate button to generate a SceneCache file called Overall Cache.
Step 4 Picture Preparation
- Add the Map Logo when publishing the map. The Picture File format can be *.png, *.jpg, *.jpeg, *.bmp.
- When publishing the plug-in scene Cache Data, in order to ensure the realistic effect of the scene, the map in the scene can be published together, that is, the map in the Texture folder is published as the plug-in picture.
Step 5 Publish Data
- Click the "Login" button in the "Account" group of the "Start" tab to log in to an existing account (online store or map account).
- Click the Publish Map button in the Tools tab Drafting & Publishing group to save the map, scene, and Workspace through the Save Prompt dialog box.
- Read the "Disclaimer" for the release of the map and check "Read and agree" and click the "Next" button.
- Check Workspace In Use in the Select Data dialog box, click Next, select 2D Map and Symbolic Modeling as the map and scene to be published, and click the button on the right
 of Flying Route ". Add the "scene Flying Route. Fpf" "made in the second step.
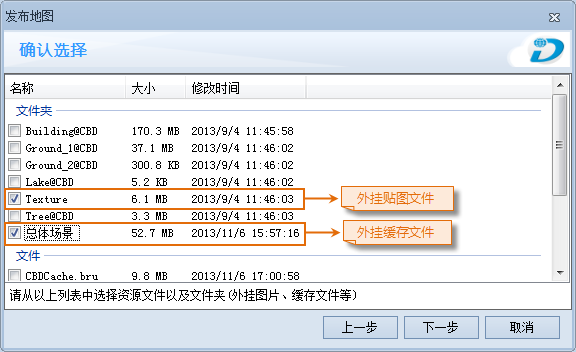
 - In the Confirm Selection "dialog, select the Overall Scene cache file and the Texture map as plug-in files.

Figure: Map Select dialog box - In the "Description" dialog box, click the picture on the left to add "Logo. PNG" "as the icon, enter the corresponding description in the title, introduction and Details text boxes respectively, and click the" Start "button to publish the data to the SuperMap online store. After the data is published successfully, there will be a prompt in the Output Window: "Published successfully, waiting for administrator's approval.".
 |
| Figure: Map Select dialog box |
 Precautions
- Users can log in to the account before publishing the map, or through the prompt window in the process of publishing the map. If the user only packs the data and does not publish it, he can not log in the account.
- If the user publishes the plug-in SceneCache file, it is recommended that the user publish the map used in this scene in the form of plug-in, because the generated SceneCache file does not contain the map file.
- If the published SceneCacheFile Type is PVRTC, it is only available in iPad; if the published SceneCacheFile Type is Android devices, it is only available in Android devices; If the published SceneCacheFile Type is DDS, it is only available in the PC machine.


