


Modifying The Grid Graduated Color Map
Feature Description
Users can modify various parameters of the grid graduated color map in the "Grid graduated color map" setting window to achieve a thematic map effect that better meets their needs. All parameters in the "Grid graduated color map" window will be reflected in real time in the corresponding thematic map layer of the current map, achieving a what-you-see-is-what-you-get effect.
Operation Steps
- Select a grid graduated color map layer in the layer manager, right-click and choose "Modify Thematic Map...", and the "Grid graduated color map" window will pop up, displaying the settings of the selected grid graduated color map.
- Thematic Map Layer: Displays the name of the current thematic map.
When creating a grid graduated color map based on a raster layer, the parameters displayed in the "Grid graduated color map" window are described as follows:
- Segmentation Method: The drop-down button on the right of the "Method:" item is used to set the segmentation method for each pixel value in the current grid graduated color map. Users can select an appropriate segmentation method from the drop-down list of this item. The grid graduated color map does not support the standard deviation interval and quantile interval segmentation methods.
- Equal Interval: Divides the values into equal intervals based on the maximum and minimum pixel values, according to the user-specified "Number of segments". In equidistant intervals, each segment has the same length.
- Square Root Interval: Performs equidistant segmentation on the square roots of all pixel values. First, take the square root of all pixel values, perform equidistant segmentation, get the breakpoints of the processed data, and then square these breakpoint values to obtain the corresponding pixel value breakpoints, thus obtaining the segmentation scheme for all pixel values.
- Logarithmic Interval: Essentially the same as the square root interval method, except that the square root method takes the square root of all pixel values, while the logarithmic interval method takes the logarithm of the pixel values, i.e., performs equidistant segmentation on the base-10 logarithm of the pixel values. First, perform equidistant segmentation on the logarithm of all pixel values to get the processed breakpoints, then use base 10 to raise these breakpoint values as powers to get the corresponding pixel value breakpoints, thus obtaining the segmentation scheme.
- Custom Interval: Users specify the length of each segment, i.e., "Single segment length", for segmentation. The "Number of segments" is calculated by the application system based on the specified interval distance and the maximum and minimum pixel values, and users cannot control it.
- Segments: The "Number of segments:" numeric display box is used to display and set the number of segments for pixel value segmentation in the current grid graduated color map, i.e., the number of range segments.
- Single Segment Length: The "Interval:" numeric display box is used to display and set the interval distance for segmentation in the current grid graduated color map, i.e., the length of each range segment. This setting is only valid when the segmentation method is custom interval.
- Segment Title Format: The drop-down button on the right of the "Label format:" item is used to specify the format for expressing the range of each range segment. Two main formats are provided, which can be selected and set via the combo box on the right.
- Color Scheme: The "Color scheme:" combo box is used to display and set the color style of each range segment in the current grid graduated color map.
- Special Value Setting: Allows users to set the display effects of raster cells with certain specific values.
- Special Value: Click the "Pick" button to pick a pixel value from the grid graduated color map layer in the map and set it as a special value, or directly enter a value in the numeric box as a special value.
- Special Value Style: The label is used to set the display color of the specified grid value. Click the drop-down button on the right of the "Special value style:" label, and select a color from the color panel that pops up. The cells with that raster value will then be displayed in the specified color.
- Special Value Transparent Display: The checkbox is used to set whether the specified grid value is displayed transparently. Check this checkbox to set the cells with the specified grid value to be transparent; if unchecked, the specified grid value will still be displayed in the specified color.
- Segment Title: The Segment Title text box is used to display and set the title of the current grid graduated color map. Users can directly enter or modify the title content.
- Merge or Split Range Segments: The list at the bottom of the tab displays all range segments of the current grid graduated color map. Users can merge or split range segments as needed.
- The merge button is used to merge multiple selected consecutive range segments into one range segment. The value range of the merged segment is the union of the value ranges of all merged segments. If no or only one range segment is selected, or if the selected multiple range segments are not consecutive, the button is disabled.
- The split button is used to split a selected range segment into two new range segments.
- Visibility Settings: The visibility/hidden icons in the toolbar and in each item of the range segment list can be used to control whether the cells corresponding to the range segments are visible.
- The visibility/hidden icon button in the toolbar can control the visibility of cells corresponding to all selected range segments in the range segment list.
- The visibility/hidden icon in each range segment item can control the visibility of cells corresponding to that range segment.
- Color Settings for Each Range Segment: Users can click the style icon on the toolbar or the raster cell style icon in each range segment item in the range segment list, and then set the color of cells corresponding to all selected range segments in the current grid graduated color map in the "Color" panel. In the "Color" panel, users can directly select a color from the predefined color table, or click the "Other colors..." button at the bottom of the panel to edit and obtain the desired color in the "Color" dialog box.
- Segment Value: The "Segment value" numeric display box under the toolbar displays the value of each range segment breakpoint (the endpoint of the segment) (as shown in the figure above). Each numeric display box corresponds to a breakpoint. The value of the breakpoint can be changed through the numeric display box, and the changed result will be reflected in real time on the current graduated color thematic map layer.
- Title: The "Title" column in the range segment list is used to display and modify the title corresponding to each range segment. Users can directly edit and modify it in the cell.
- All parameters in the "Grid graduated color map" window will be reflected in real time in the corresponding thematic map layer of the current map, achieving a what-you-see-is-what-you-get effect. Users can also uncheck the "Enable instant refresh" checkbox at the bottom of the dialog box to disable real-time refresh. If the "Enable instant refresh" checkbox is not checked, after users finish setting all parameters, they can click the "Apply" button at the bottom of the dialog box to apply the parameters to the current thematic map.
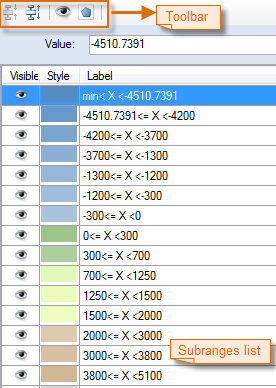
Figure: "Properties" tab of the "Grid graduated color map" window
Notes
- The grid graduated color maps created and modified by users can be saved as templates for application in thematic map creation of other layers. For saving as a thematic map template, refer to: Save to the thematic map template library.
- When creating a thematic map using the template method, users can directly select a saved template from the drop-down menu of the "Template" drop-down button and apply it to the creation of other thematic maps.