


Point Symbol Style Settings (Map and Layout)
Feature Description
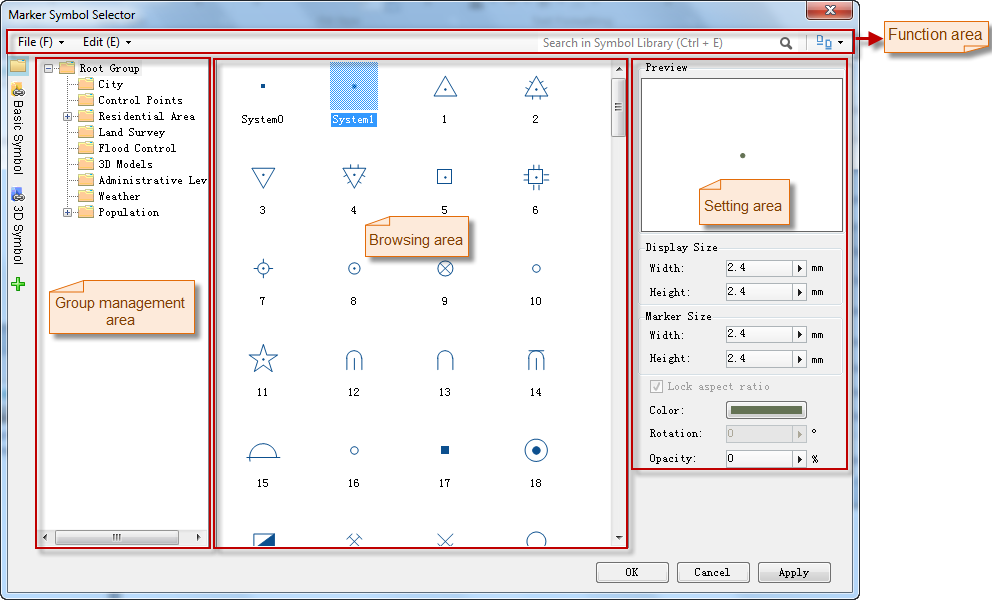
In the marker symbol selector, you can view and select the style of point symbols to apply, and also adjust parameters such as symbol size, color, and transparency here.
As shown in the figure below, the symbol library window currently loads the marker symbol library. In the symbol style settings area, the Preview section previews the marker style you have set. Symbol Type displays the type of the selected symbol.
Function Entrances
- Workspace Manager->Resource node->Marker Symbol Library.
- Point Layer Style Panel->Settings button.
- Styles tab -> Point Style group -> Point Symbol drop-down list->More Symbols option.
Operation Steps
In the symbol library window, within the symbol style settings area, you can set the style of the selected point symbol. Below is how to set point symbols through the symbol library window:
- Select Point Symbol: In the marker symbol selector, select the desired symbol.
- Set Symbol Display Style:
- Width: Sets the width of the point symbol. You can enter a value in the numeric display box to the right; or click the arrow on the right side of the box and use the pop-up slider to adjust the width. Unit: 0.1mm.
- Height: Sets the height of the point symbol. You can enter a value in the numeric display box to the right; or click the arrow on the right side of the box and use the pop-up slider to adjust the height. Unit: 0.1mm.
- Use Original Size: Check this box to use the default width and height of 6.0mm for the marker size, which cannot be modified.
- Use Original Symbol Color: Check this box to use the symbol's initial color by default, which cannot be changed. This checkbox is only available for SVG symbols.
- Lock Aspect Ratio: This checkbox sets whether to fix the ratio of symbol width to height when changing the symbol width or height. By default, this checkbox is checked. If checked, regardless of which parameter is set, the other will change accordingly.
 Note:
Note: - This setting is not available for system symbols, meaning the aspect ratio of system symbols is fixed.
- Symbol Color: Sets the color of the point symbol. Click the drop-down button on the right, and you can select a default color or customize another color from the pop-up color panel.
- Rotation: Sets the rotation angle value of the point symbol. You can enter a value in the numeric display box to the right; or click the arrow on the right side of the box and use the pop-up slider to adjust the angle. Press Enter or when the text box loses focus to apply the angle setting.
- A positive rotation angle rotates counterclockwise; otherwise, clockwise.
- The numerical precision for the point symbol rotation angle is 1, in degrees.
- Transparency: Sets the transparency effect of the point symbol. You can enter a value in the numeric display box to the right; or click the increase/decrease buttons on the right side of the box to adjust transparency. Transparency values range from 0 to 100, where 0 is fully opaque and 100 is fully transparent.
- After completing the settings, click the OK button in the symbol library window to apply the symbol settings.
Note:- When setting the style for a point layer, if the point symbol used is a TrueType font, setting unequal width and height for the marker size is not supported, meaning the aspect ratio is always 1:1. If unequal width and height are set, the system automatically sets both to the specified height value.
Related Topics
Point Symbol Style Settings (Scene)