


Path analysis is one of the commonly used Network Analysis functions. In real life, we often need to find out the Shortest Path between two points. The solution of this problem is of great significance to traffic, fire protection, information transmission and disaster relief. In the process of transportation, we need to find the path with the least transportation cost; in the process of rescue and disaster relief, we need to find the path with the shortest time.
Path analysis is actually to find a path on a specified network, and make it pass through several specified routing points in turn, and make its cost minimum, including Shortest Path with minimum distance cost and Traveling Salesman Problem (TSP) Analysis with minimum time cost.
Optimal Path Analysis
Optimal Path Analysis refers to the path with the least resistance between two points in the network. If Optimal Path Analysis is performed on multiple nodes, the nodes must be visited in the order of selection. Minimum resistance has many meanings, such as the shortest time, the lowest cost, the best road condition and the least toll stations based on single factor consideration, or the best road condition and the least toll stations based on comprehensive consideration of multiple factors.
If Shortest Path is a single-factor special case of Optimal Path Analysis, then Min Distance is considered to be optimal.
Operating instructions
- Before proceeding with Network Analysis, the Network Analysis environment needs to be set up. On the Traffic Analysis tab, in the Road Network Analysis group, select the Environment Settings check box to display the Environment Settings Dock Bars. Set Network Analysis parameters in this window, such as weight field, node/Edge ID Field, etc. For an introduction to the Environment Settings window, see Network AnalysisEn vironment Settings window Page.
- On the Traffic Analysis tab, in the Road Network Analysis group, click the Galley Drop-down Button and select the Optimal Path Analysis item from the drop-down box. Create an instance of Optimal Path Analysis. For an introduction to instance windows, see Introduction to Instance Management window Pages.
- Click in the current Network Data layer to select the site location to add. There are two ways to add a site. One is to click the mouse in the Network Data layer to complete the addition of the site; One is to import the point object of Point Dataset as a site by importing. For details, please refer to the description on the Add site page.
- In the same way, it can be added as the obstacle point of the path Analysis Settings. Barrier point management can be found on the barrier point management page.
- Click The Parameter Settings "button in the Network Analysis Instance Management window to pop up the Optimal Path Analysis Settings" dialog box. Set the parameters of Analyst Result.
- Save node information: Select whether to save all node information passed by Analyst Result. If the check box is selected, save the node information as Point Dataset and give it a name. The Dataset is saved to the Datasource where the Network Dataset resides. The node information records the node ID (NodeID) and the ID (RouteID) of the Result Route where the node is located.
- Save arc segment information: Select whether to save the information of all arc segments passed by the path analysis. If you select the check box, save the arc segment information as a Line Dataset and give it a name. The Dataset will be saved in the Datasource where the Network Dataset is located. The arc segment information records the ID (EdgeID) of the arc segment through which the Result Route passes.
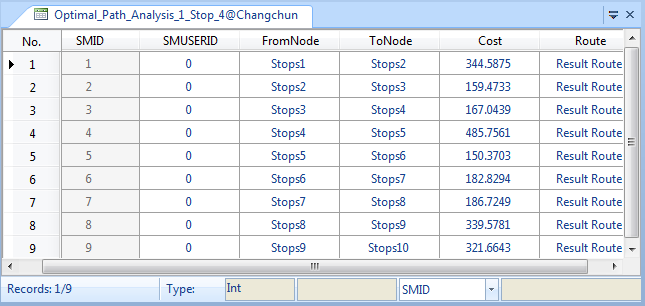
- Site Statistic Infomation: Select whether to save the Site Statistic Infomation. If the checkbox is selected, save the Site Statistic Infomation as a Tabular Dataset and give it a name. The Dataset will hold some Statistic Infomation of the analysis site, including the starting site, ending site, cost, route name, and so on.
As shown in the following figure, it is a Statistic Infomation attribute table of a site. The order in which the Analyst Result passed through each site and the cost used are recorded in the table. The fields FromNode and ToNdoe represent the start site and the end site, the Cost field represents the cost between adjacent sites, and the Route field represents the name of the route generated by the analysis.
- Enable Path Guide
Select whether to generate Driving Guidance during analysis. Driving Guidance records the path information in the Transportation Analysis result. A Driving Guidance object corresponds to a driving route from the start point to the end point. When the Enable Path Guide "checkbox is checked, it indicates the path information of the Output Analysis Results in the Driving Guidance window. For an introduction to Driving Guidance, see the Driving Guidance page.
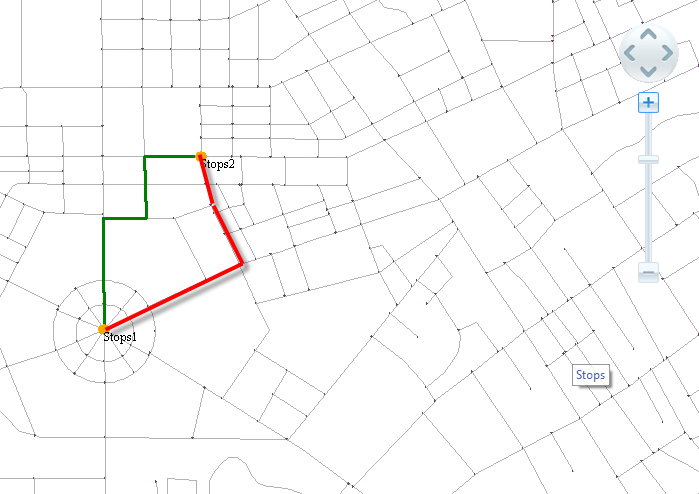
- Least Edges
Whether to query the path according to Least Edges during analysis. Since a small number of arcs does not mean that the length of the arcs is short, the result of the query may not be Shortest Path during path analysis. As shown in the figure below, there are two paths connecting Site 1 and Site 2, where the red path (4 segments) has fewer arcs than blue path (8 segments). When the Least Edges "check box is selected, the red path is the result of the query; otherwise, the blue path is the result.
- When all Parameter Settings are complete, click the Execute button in the Road Network Analysis group on the Traffic Analysis tab or click the Execute button on the Instance Management "window. Perform the Optimal Path Analysis operation according to the set parameters. After the
The execution completed, the Analyst Result will be automatically displayed Add to Current Map, and the Output Window will prompt: "Optimal Path Analysis succeeded.".
Note: Application will perform Optimal Path Analysis in the order of each site in the Network Analysis Instance Management window.
 Precautions
- For the Stop Info added to the site directory tree, you can Export as Point dataset it to facilitate the use of similar Network Analysis in the future.
- Stations must be located on network arcs and network nodes, or in areas within set tolerances. You can set the Node Tolerance in the Analysis Environment "window to change the appropriate tolerance size.
- If you need to modify the site location, you can select the site to be moved through the Move Site button, and drag it to the appropriate location.
- If obstructing points are set in a Network Analysis layer, the obstructing point information is displayed in the Network Analysis management window, and the obstructing points can be managed in this window. Refer to the Barrier point management for instructions on how to add obstacle points.
- Application supports simultaneous management of multiple Network Analysis instances. Click the "Network Analysis" "button again, and select" Optimal Path Analysis "" in the pop-up menu to create a new Optimal Path Analysis. In the Instance Management "window, use the drop-down boxes to toggle between Network Analysis types. If an analysis instance is no longer needed, click Delete Instance "to delete the current instance, and the Application will automatically switch to the next analysis instance for display.