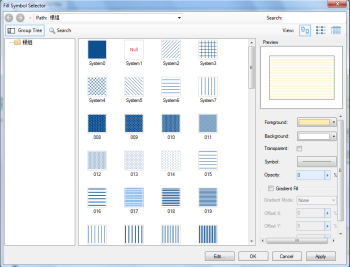
In the Symbol Style Setting area in the Fill Symbol Selector, the style of a fill symbol can be set.
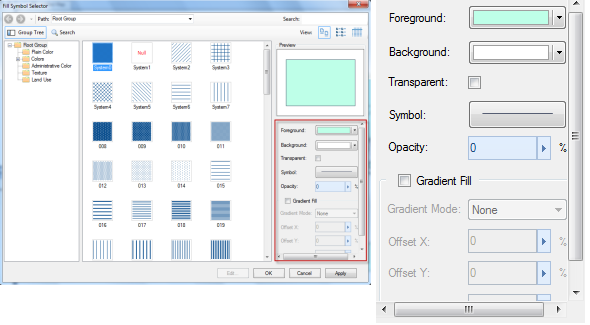 |
| Style Setting Area |
Style Setting for Boundary Lines
Setting the styles for the boundary lines is similar to setting the styles for line objects. In the Style Setting area, click the button to the right of the Symbol label to display the Line Symbol Selector. Set the boundary line styles and click OK to finish.
About how to set line styles in the Line Symbol Selector, please refer to Setting Line Styles.
Style Settings for Fill Regions
As to style settings for fill regions, there are two situations:
- Gradient Fill not employed: You can select any of the fill symbol from the list to symbolize the regions.
- Gradient Fill employed: The symbols in the list cannot be selected to symbolize the regions. You can only specify a color gradient to render the regions.
The two situations are introduced below.
1. Gradient Fill not Employed
If Gradient Fill is not checked, the gradient fill is not employed. In this situation, you are allowed to select any of the symbols from the list to symbolize regions.
Firstly, select a symbol in the list, then set styles in the Style Setting area, as shown below.
 |
- Setting Fill Symbol Colors
The colors include foreground and background colors. The foreground color of the fill symbol is the color of the geometry that compose the fill symbol. The background color is the color of the canvas.
To set the Foreground color for a fill symbol, click the color button to display the color panel, then you can either click Pick to pick a color from your screen, directly select a color from the color panel, or click More Colors... for custom settings.
To set the Background color for a fill symbol, click the color button to display the color panel, then you can either click Pick to pick a color from your screen, directly select a color from the color panel, or click More Colors... for custom settings. This item is only active if the Transparent check box is not checked.
If the Transparent check box is checked, the background will be transparently displayed, therefore, the setting for the background would be useless.
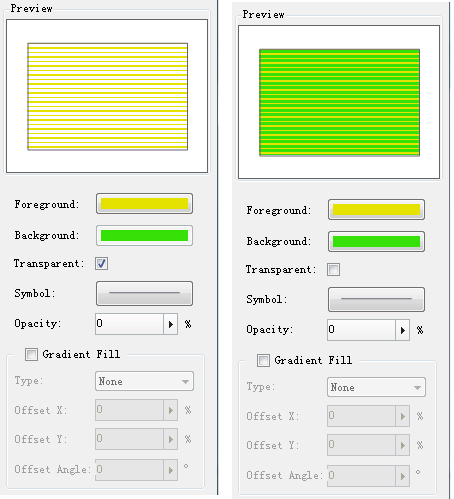
- Transparency:
The transparency of the fill symbol. The transparency is between 0 and 100, with 0 being fully opaque and 100 being fully transparent. You can directly type a value in the box or move the slide bar that will show up by clicking the right arrow.
2. Gradient Fill Employed
The Gradient Fill is employed if the Gradient Fill check box is checked and the Gradient Mode is not set to None. If Gradient Fill is employed, the symbols in the list cannot be selected to symbolize the regions. You can only specify a color gradient to render the regions.
A color gradient is the gradient from one color, the starting color, to the other color, the ending color.
- Set Gradient Colors:
The Foreground color is the starting color. To set the starting color, click the color button to the right of the Foreground label to display the color panel, then you can either click Pick to pick a color from your screen, directly select a color from the color panel, or click More Colors... for custom settings.
The Background color is the ending color. To set the ending color, click the color button to the right of the Background label to display the color panel, then you can either click Pick to pick a color from your screen, directly select a color from the color panel, or click More Colors... for custom settings. This item is only active if the Transparent check box is not checked.
If the Transparent check box is checked, the ending color will be transparent with no color.
- Gradient Mode:
The mode of the gradient fill. 4 modes are provided. Below is the illustration for the four gradient modes.
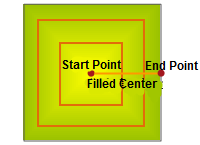
Square gradient.
As shown in the figure, from the start point to the end point of the gradient fill, the colors of the squares centered at the start point gradually change from the start color to the end color as the lengths of the sides increase.
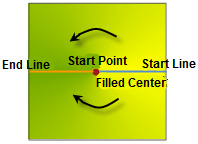
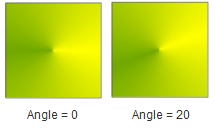
Conical gradient.
In a conical gradient, gradient will be performed both anticlockwise and clockwise, and the color changes along two directions all from the starting color to the ending color. The intersection of the starting generatrix and the ending generatrix is the center of the gradient fill. The starting generatrix and the ending generatrix are on the same line and the intersection angle is 180 degrees.
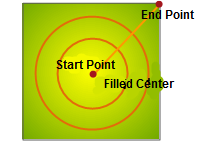
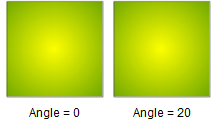
Radial
As shown in the figure, from the origin point to the end point of the gradient fill, the colors of the circles centered at the origin point of the fill gradually changes from the start color to the end color as the circle radius increases. The color is not changed in the same circle. Colors in different circles are different gradually.
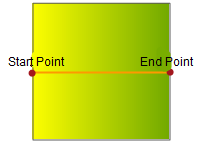
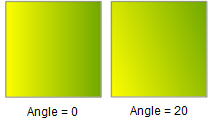
Linear
Color in linear gradient fill starts with one color and ends with another color. Colors that position the line vertically have the same color.
- Parameters for Gradient Fill:
Offset X: The percentage of the gradient center to the fill center in the horizontal direction. You can directly type a value in the box or move the slide bar that will show up by clicking the right arrow.
Offset Y: The percentage of the gradient center to the fill center in the vertical direction. You can directly type a value in the box or move the slide bar that will show up by clicking the right arrow.
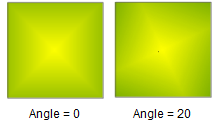
Gradient Angle: The rotation angle of the fill. This parameter applies to linear gradient, square gradient, conical gradient. You can directly type a value in the box or move the slide bar that will show up by clicking the right arrow. Below is the comparison between 20 degrees and 0 degrees.
- Transparency:
The transparency of the fill symbol. The transparency is between 0 and 100, with 0 being fully opaque and 100 being fully transparent. You can directly type a value in the box or move the slide bar that will show up by clicking the right arrow.