Creating 3D Vector Caches
 Introduction
Create 3D caches for vector datasets to optimize the browsing effects.
Basic Steps
- Select Create Scene Cache in the dataset right-click menu.
- The Create Scene Cache dialog box display to add vector datasets and set vector cache parameters. The default selected dataset has been added to the list. If you need to add additional vector datasets, click
 to display the Select dialog box. All datasources in the current workspace are listed in the left pane. In the right pane is the datasets in the datasource highlighted in the left pane. Filter, find and select datasets with commands provided on the toolbar.
 - Click OK to go back to the Create Scene Cache dialog box and all the selected datasets are added to the list for cache creation.
- The data list:
- Data: The dataset to create vector cache.
- Datasource: The datasource where the dataset is located.
- Cache Type: The type of the 3D cache. When creating 3D caches for vector datasets, the Cache Type is displayed as Vector. All supported cache types for the data item is listed in the Cache Type drop-down list for you to choose.
- Tile Type: There are two tiling types for scene cache: Plane and global. If the dataset is in planar coordinate system, the tiling type can only be set to plane. If the dataset is in geographic coordinate system, the tiling type can be set to plane or global.
- Set parameters for creating vector caches.
- Cache Name: The root directory of the cache.
- Cache Path: The network or local path to save the tiles.
- Storage Type: The Compact and Original storage types are provided. The Compact storage type compress and encrypt the data when caching, while the Original type keeps the original information.
- Encoding Type: It supports LZW encoding type. Please refer to Dataset Encoding Compression Type for more information.
- Password: The password needed to be input for loading the cache.
- Confirm: Enter the password again for confirmation. You must type exactly the same password twice. Otherwise, the cache creation will fail and return the error message: Unmatched password! Please input again!
- Set the Cache Extent. You can set the Cache Extent with the methods below.
- Checking the Default box to employ the default cache extent. The default extent is displayed in the Top, Bottom, Left and Right text boxes indicating the bounds.
- Do not check the Default Bounds check box, the user can customize the range. There are two ways, one is by selecting the range of datasets, take the range of selected datasets; the other is directly input range value in the top, left, right and bottom four text box.
- Vector parameter setting:
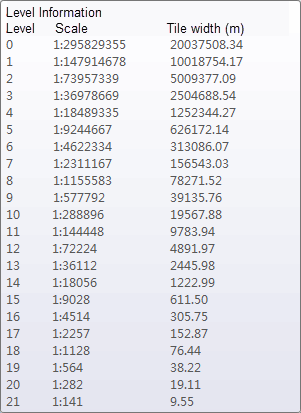
- Tile Length: Set the side length of the vector cache, with the unit being meters. If the tile side lengths are different, the corresponding scales are different. When you move your mouse to the question mark at the end, you can see information, as shown below:
- Field Information: Set field information in the original dataset that needs to be saved in the model cache result. Click Set to display the Field Information dialog box, allowing users to select required fields. If fields are not set, no fields will be saved in the result.
- Tile Length: Set the side length of the vector cache, with the unit being meters. If the tile side lengths are different, the corresponding scales are different. When you move your mouse to the question mark at the end, you can see information, as shown below:
- Click OK to create vector cache. Different vector caches are stored in different folders. The files with the .scv and .dat extensions are the cache configuration file and cache index file respectively.
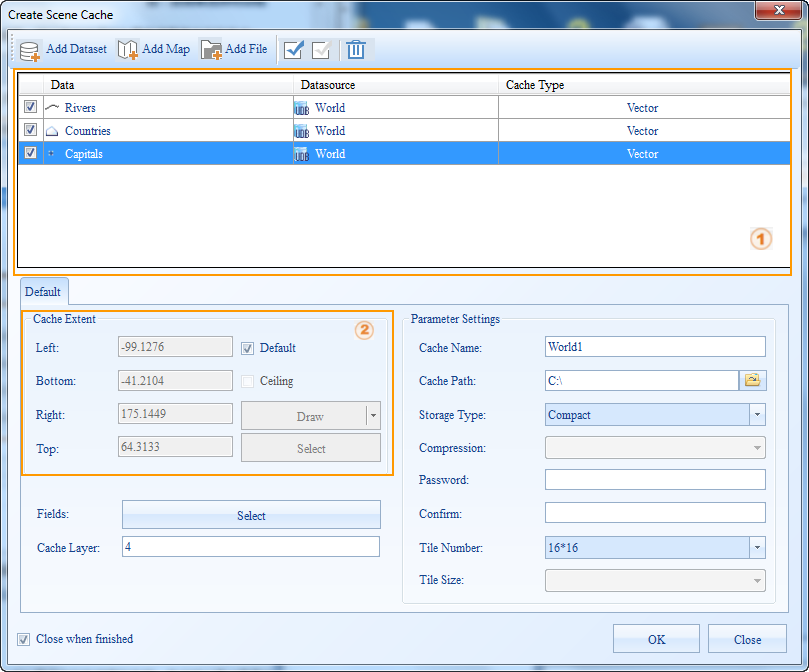 |
| Figure: The Create Scene Cache dialog box |
Remarks
An introduction to the global profile rule can be found in the caching directory for other level building basics.
 Note
Note
- The description of the cache parameters only describes the parameters associated with this type of cache.
- Please notice that:
You can specify the cache extent by directly typing values in the Top, Bottom, Left and Right text boxes.