As the basemap or background of the dashboard, the scene components is the main part of the dashboard. Therefore, you can give priority to adding scene or map components when making dashboards. Click 'Components' in the left sidebar, select components you want to add under the 'Scene' category, and add them to the dashboard by dragging and dropping:
Scene component
The scene component is mainly used for the display of the 3D scene. The setting items of the scene component are as follows:
Select Scene
Select the added Scene component and click on the 'Select Scene' button in the right sidebar to select a scene. The MapDashboard supports adding the following types of the scene:
- Public scenes: Scenes resources with viewable or above permissions in iPortal, support retrieval based on key characters
- My scenes: Scenes resources of yourself, support retrieval based on key characters
Switch Basemap
Select the added Scene component and click on the 'Select Map' button in the right sidebar to select a scene. The MapDashboard supports adding the following types of the basemap:
- Internet basemaps: it supports to integrate Tianditu as the scene basemap, and it need to be configured with corresponding keys.
Set Properties
- Coordinates: the coordinates of the scene center point, including the longitude, latitude and height. You can adjust scene to the appropriate position by dragging the scene, scrolling the scene by holding down the mouse wheel, and changing the scene coordinates.
- Longitude: The longitude of the scene center
- Latitude: The latitude of the scene center
- Height: The height of the scene center from the ground
- Orientation: the azimuth Angle of the scene, including heading, roll and pitch angle. You can adjust scene to the appropriate orientation by scrolling the scene when holding down the mouse wheel, and changing the scene coordinates.
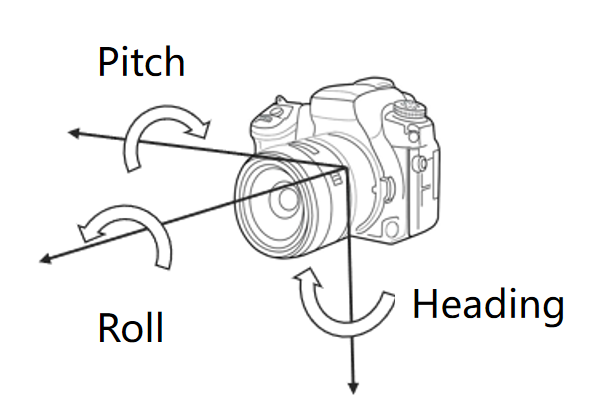
- Heading: The Angle formed by the current rotation of the viewpoint around the roll axis
- Roll: The Angle formed by the current rotation of the viewpoint around the yaw axis
- Pitch: The Angle formed by the current viewpoint rotating around the pitch axis
- About to MasterPage: Turn on the toggle, the coordinates and orientation of the current scene will be consistent with the corresponding scene in the MasterPage. This operation will only be effective in the current page.
- Scan: Add dynamic scan effect of the scene, support setting scan mode, scan center point, scan period, scan speed, and other parameters of scene scan
- Add Sub-components: The scene component provides sub-component for assisting scene display and interactive operations. You can open the sub-component folding menu and selectively enable it through the
 or
or  icon next to the sub-component name. It supports modifying the display position within the scene component, font color, background color, and whether to collapse by default for sub-components.
 - Layer List: For scenes with multiple layers, you can control the visibility of each layer, zoom to the layer, adjust layer order through the layer list component, and whether to display attributes.
- Measure: It supports measure distance, height, and area within the scene. you can select measurement modes, including Spatial Measurement, Ground Measurement, CGCS2000, XIAN80, WGS84, and Planar Projection. Vertex snapping can be enabled simultaneously to improve measurement accuracy.
- Size: Set the width and height of the scene in pixels. You can also change the scene size by clicking and dragging the anchor points around the scene component
Display scene in Multiple views
MapDashboard supports display different views of the scene in different pages. By configuring the center point, level, azimuth and other states of the scene individually in the pages, the scene will animate to the state of the current page when switching the page.
Operation methods: Select the scene component in the page, then in the right hand property panel, you can adjust the coordinates, orientation of the scene, etc. to set the perspective of the scene in the current page. You can also turn on the 'About to MasterPage' toggle, and the view of the scene in the current page will be consistent with the MasterPage.
Interactive display of map/scene
MapDashboard support the integrated display of 2D maps and 3D scenes. When you rotate, pan, or zoom the map, the 3D scene will correspondingly update its position or perspective to maintain consistent location with the map. Similarly, when you rotate, pan, or zoom the 3D scene, the 2D map will also update its display range accordingly to reflect the location changes in the 3D scene, achieving real-time interaction and complementary advantages between the 2D map and the 3D scene.
Operating methods:
- In the interaction tab of the map component, select trigger 'Bounds Change', select the 3D scene that needs to be linked as the target , choose 'Zoom to Scene' as the target operation, and click 'OK' to finish. The scene range will change accordingly with the map range.
- In the interaction tab of the scene component, select trigger 'Bounds Change'. Select the map from step 1 as the target, choose 'Zoom to Map' as the target operation, and click 'OK' to finish. The map range will change accordingly with the scene range.
Additionally, maps can be linked with other maps, and scenes can be linked with other scenes through below methods, enabling position-linked display between different maps or different scenes.