Install Keycloak
The Keycloak official website download address is https://www.keycloak.org/downloads. And for installation requirements, refer to its official documentation. Here we take win64 as an example to install Keycloak.
Download keycloak-4.0.0.Final.zip, extract the file, double-click the standalone.bat in keycloak-4.0.0.Final/bin directory, then you can start Keycloak service.
The Keycloak's local access address is http://localhost:8080/auth/, click on the “Administration Console” on the page, and create the Keycloak administrator account, which is used to configure in Keycloak, manage users , roles, etc.
You can also specify the IP and port on the command line to start Keycloak service as following:
In the keycloak-4.0.0.Final/bin directory, execute the following DOS command:
standalone.bat -Djboss.socket.binding.port-offset=100 -Djboss.bind.address=192.168.112.172
- -Djboss.socket.binding.port-offset: Set the port offset, 100 means the port is the default port number plus 100, so here the Keycloak port number is changed to 8180
- -Djboss.bind.address: Set the IP address of the machine where Keycloak is located
Note: If you download and install a higher version of keycloak, after the download is complete, unzip the file and in the keycloak-x.x.x/bin directory, execute the following DOS command to start Keycloak.
kc.bat start-dev
Configure Keycloak to link with SuperMap iServer/iPortal/iEdge
-
Low version Keycloak
Access http://localhost:8080/auth/, click "Administration Console" to enter the Keycloak login page, input the administrator account to log in to Keycloak service. Keycloak defaults to use English, it also supports other languages, you can follow the steps below to enable Internationalization function.
Click "Realm Settings" in the left navigation bar, and select the "Themes" tab on the right panel of the page. Select "keycloak" for the "Login Theme", "Account Theme", "Admin Console Theme" , and "Email Theme" items. Turn on "Internationalization Enabled" button, the "Supported Locales" will list all the supported languages. On the "Default Locale", you can set the default language for Keycloak service, finally click the "Save" button. After logged out, on the login page, you can select one language to log in to Keycloak.
Take English version as an example, now you need to do the following configuration.
- Add a realm
Keycloak's default realm is Master, you can use the default Master domain, or you can add a new domain. Move the mouse to the left corner drop down menu that is titled with "Master", click "Add realm", enter the realm name, for example: ispeco, then click the "Create " button to enter the newly created ispeco realm page, then perform the following configuration. Note the resources between the realms (including users, roles, clients, etc.) are isolated from each other.
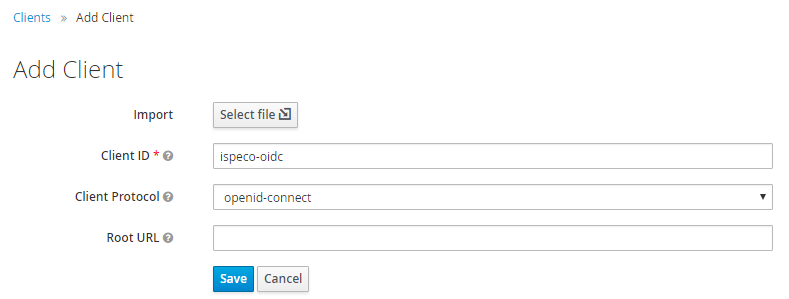
- Create a client
In the left navigation bar, select "Clients", then click the "Create" button on the right side of the page to add a client:
- "Client ID": Enter "Client ID", such as: ispeco-oidc. Note this "client ID" is the same as the "Client ID" of the "Keycloak login configuration" in SuperMap iServer/iPortal/iEdge.
- "Client Protocol": Select the default "openid-connect".
- Click the "Save" button to enter the client configuration details page, select the "Settings" tab, continue to configure as shown below:
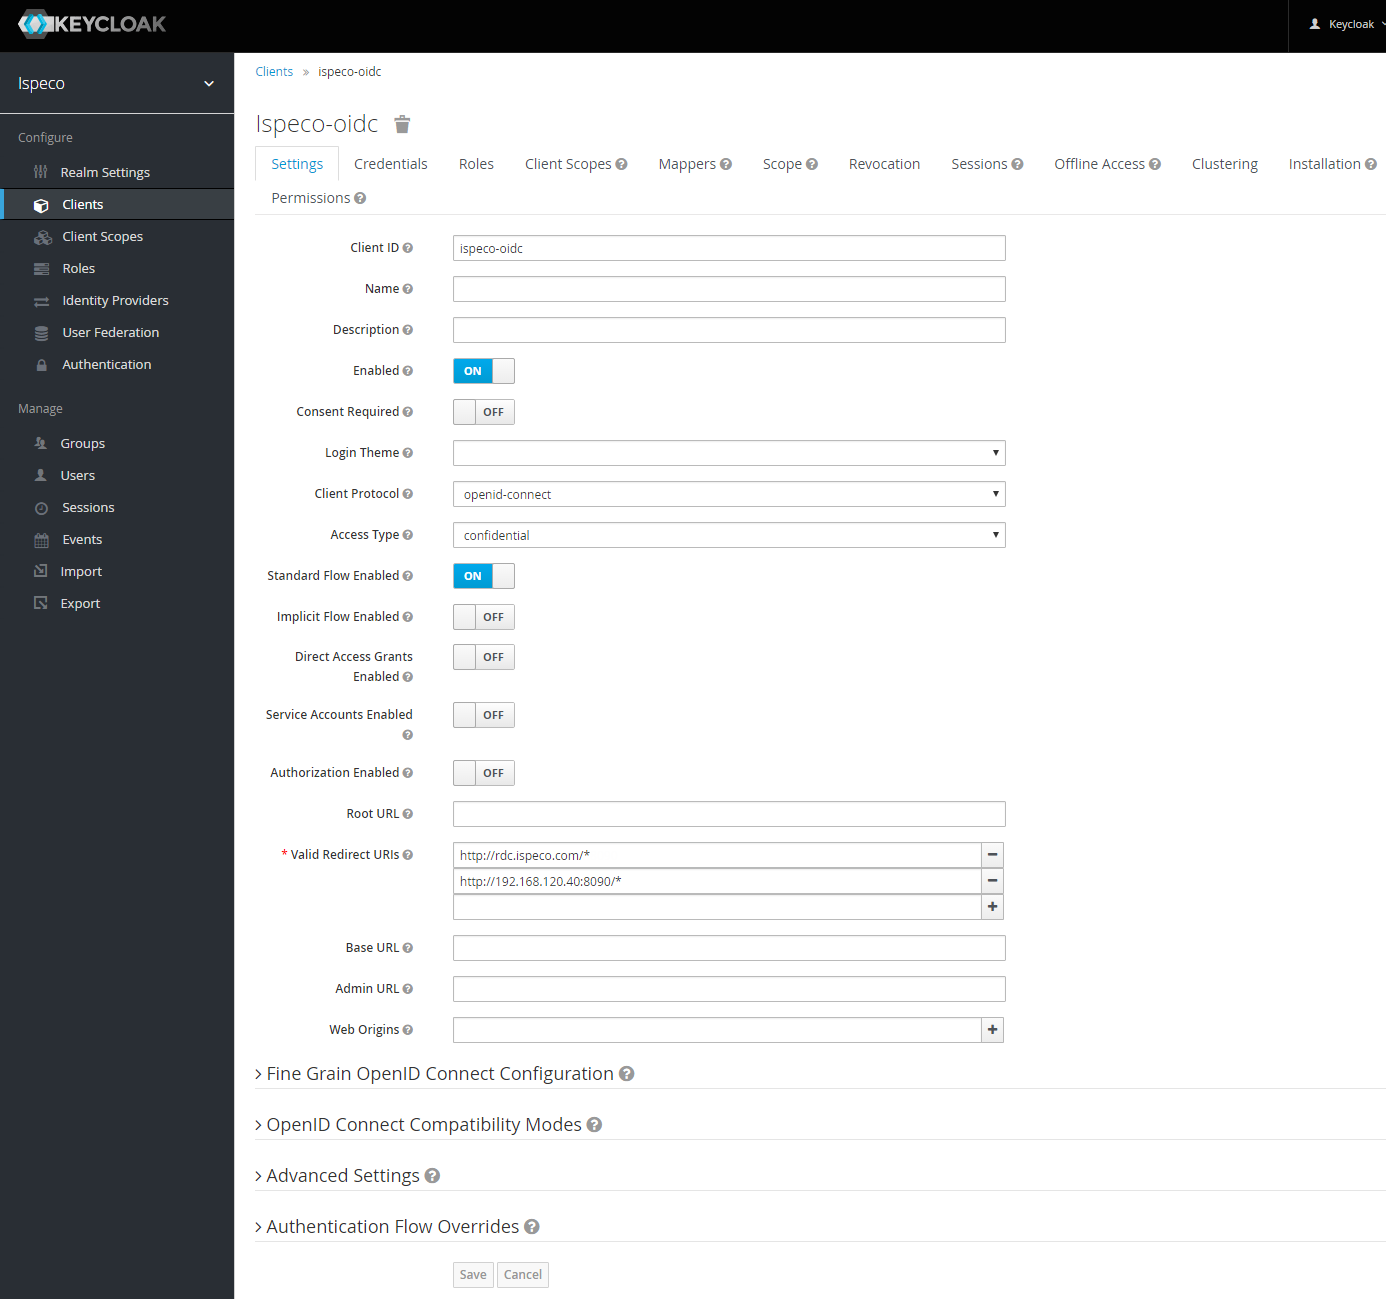
Finally click on the "Save" button.
Note: " Valid Redirect URIs" is to fill in the application (service) system (URL) allowed by Keycloak to use Keycloak's authentication and authorization service. It supports multiple urls. The recommended format is: /* after the service root address.
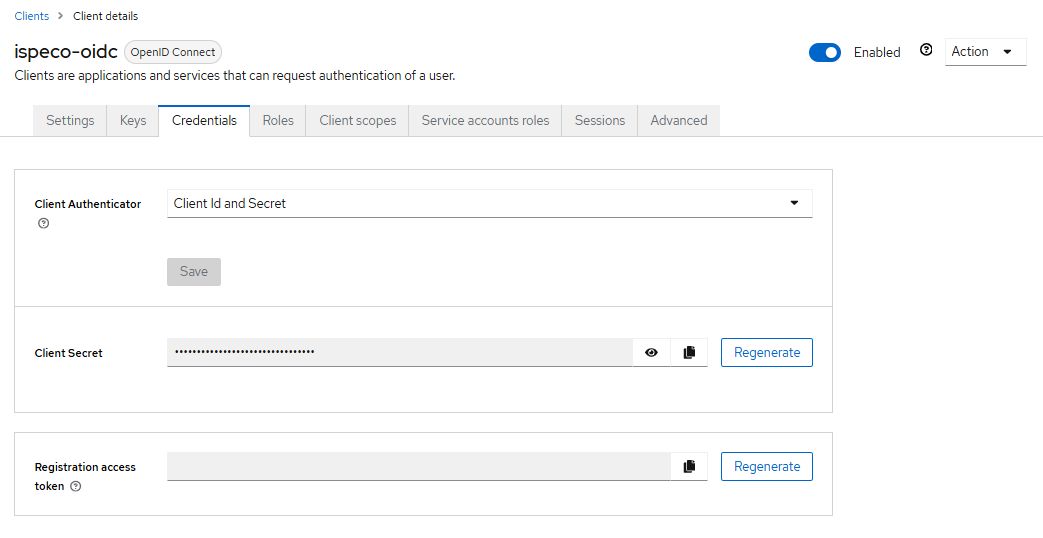
- Select the "Credentials" tab as shown below:
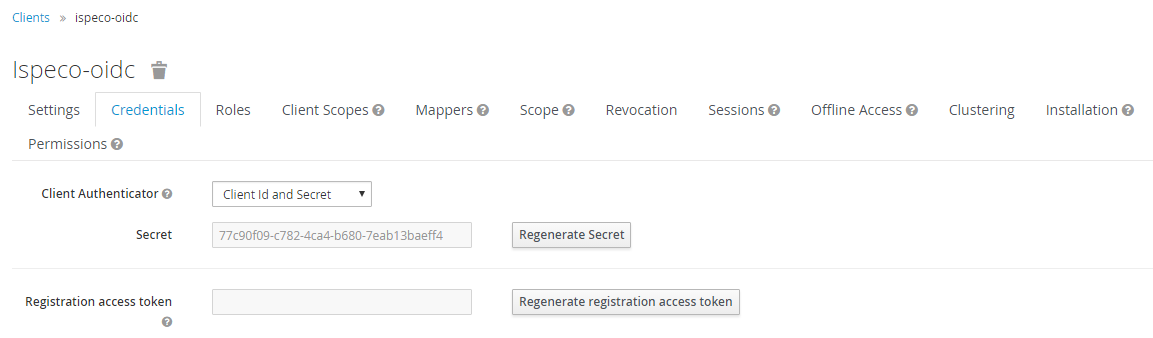
Note: "secret" is the client key, which is consistent with the "client key" of the "Keycloak login configuration" in SuperMap iServer/iPortal/iEdge.
- Select "Mappers" tab to configure the role mapping. Click the "Create" button to create a protocol mapper, the settings are shown as the following figure:
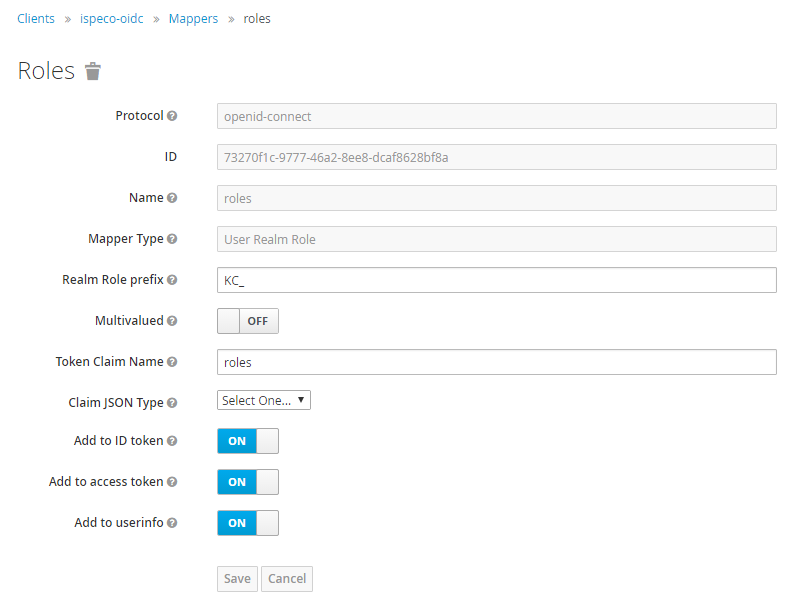
Descriptions:
- "Name": The name of the mapper, such as: roles. It is recommended to be consistent with the "Token Claim name" below.
- "Realm Role prefix": Keycloak automatically prefixes each role with a prefix when it returns the user's role information to the client. Feel free to fill in, for example: KC_. If not filled, it is passed to the client as it is. (This value corresponds to the prefix of the "Attribute" value when adding a role mapping in "Attribute role associated information configuration" in "Keycloak login configuration" in SuperMap iServer/iPortal/iEdge)
- "Token Claim name": It is recommended to be consistent with the "Name" above, for example: roles. Keycloak uses this field to pass the user's role information to the client. (This value corresponds to the "role attribute" in the "Keycloak login configuration" in SuperMap iServer/iPortal/iEdge)
Now you've done the all the configuration in Keycloak to link with SuperMap iServer/iPortal/iEdge, but you still need to do more settings in SuperMap iServer/iPortal/iEdge to complete the whole linking job. For details about confguring in SuperMap iServer/iPortal/iEdge, see: the Keycloak configuration of the SuperMap wagon is completed. Next, you need to configure the docking with Keycloak in the troika. For details, see: Configure to use_Keycloak.
-
Higher version Keycloak
Access the Keycloak service address: http://localhost:8080/auth/, click "Administration Console" to enter the Keycloak login page, enter the administrator account you created for Keycloak, and log in to Keycloak. You can switch the language of Keycloak by the following ways, the default is English, in this example, the language is switched to Chinese:
Click "Realm settings" in the left navigation bar, and select the "Themes" tab on the right side of the page. Select "Login theme", "Account theme", "Admin theme" and "Email theme". Select "keycloak" for all of them, select "Localization" tab, "Internationalization" item. Select "Enabled" to enable internationalization, select "Chinese (China)" for "Supported locales". Select "Chinese (China)" for "Default Locale", and finally click the "Save" button.
At this point, the administrator logs out, the Keycloak login page switches to Chinese, and you are logged into Keycloak.
Next you need to do the following configuration in Keycloak:
- Add a realm
Keycloak default domain is master, you can use the default master domain, you can also add a new domain. Mouse over the master domain in the left navigation bar, click "Create Domain" in the drop-down button, enter a domain name, for example: ispeco, click the "Create" button, at this time, enter the newly created ispeco, to do the following Configuration. Note that resources (including users, roles, clients, and all other information) are isolated from one domain to another.
- Create a client
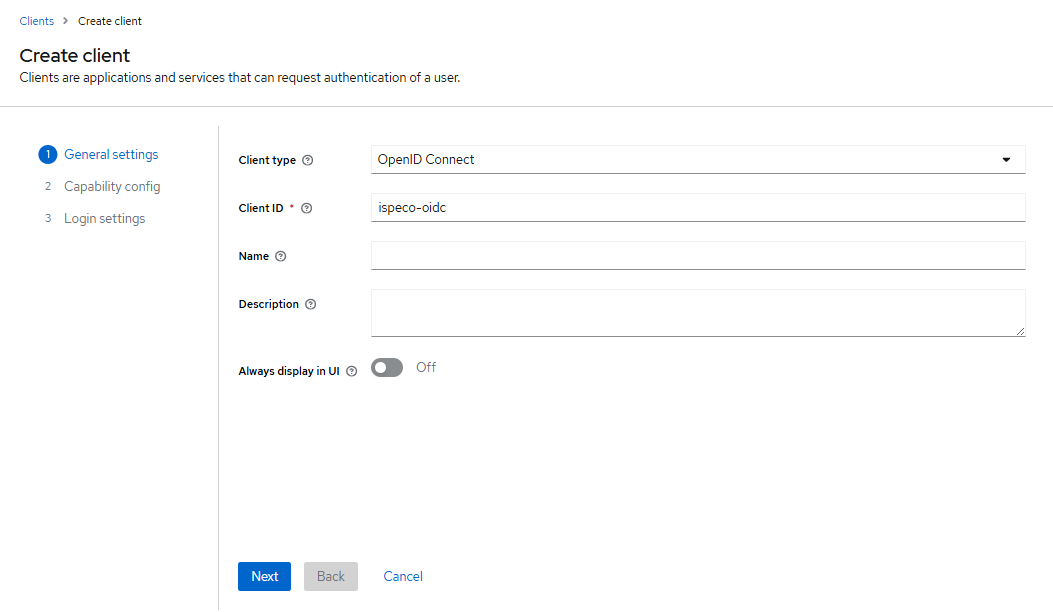
Select "Clients" in the left navigation bar, select the "Client List" tab in the right page, and click the "Create Client" button to add a client:
- "Client Type": Select the default OpenID Connect.
- "Client ID": enter the "Client ID", you can name this "Client ID" as you like, for example: ispeco-oidc, you need to note that this "Client ID" is not the same as the "Client ID" in SuperMap iMap. Note that this "Client ID" is the same as the "Client ID" in "Keycloak Login Configuration" in SuperMap iServer/iPortal/iEdge.
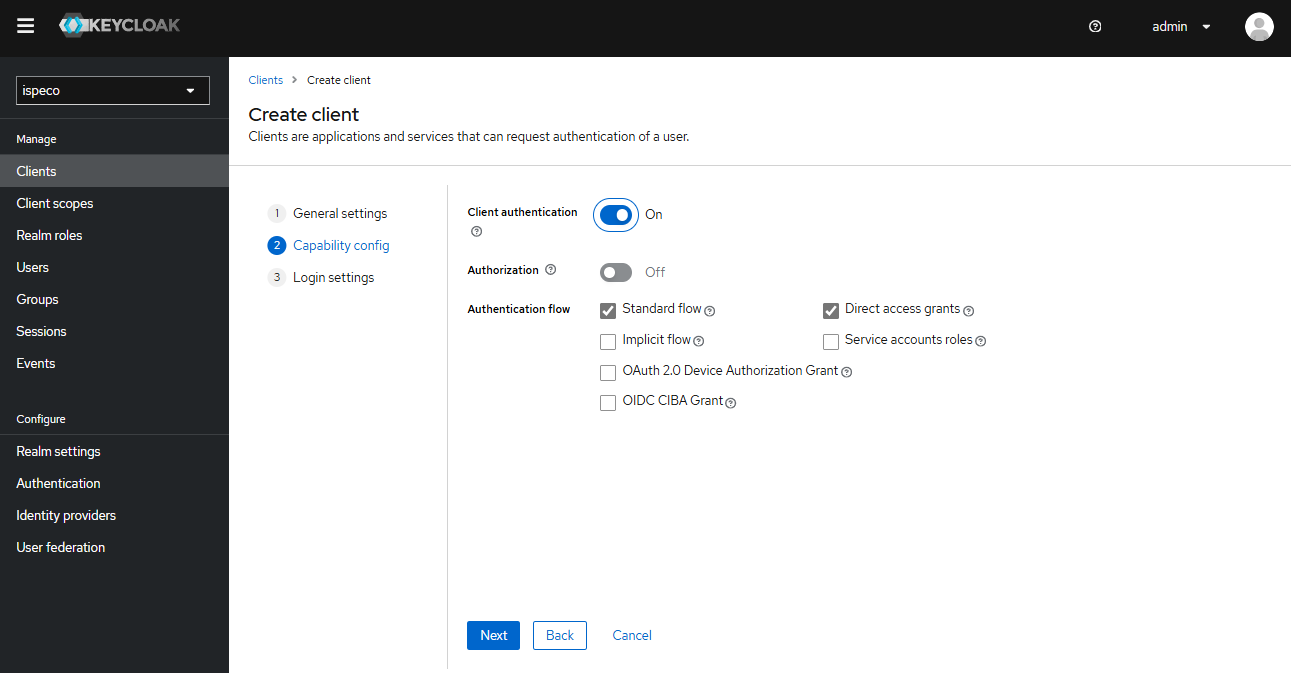
- Click the "Next" button to enter the Client Function Configuration page, and continue to configure as shown in the following figure:
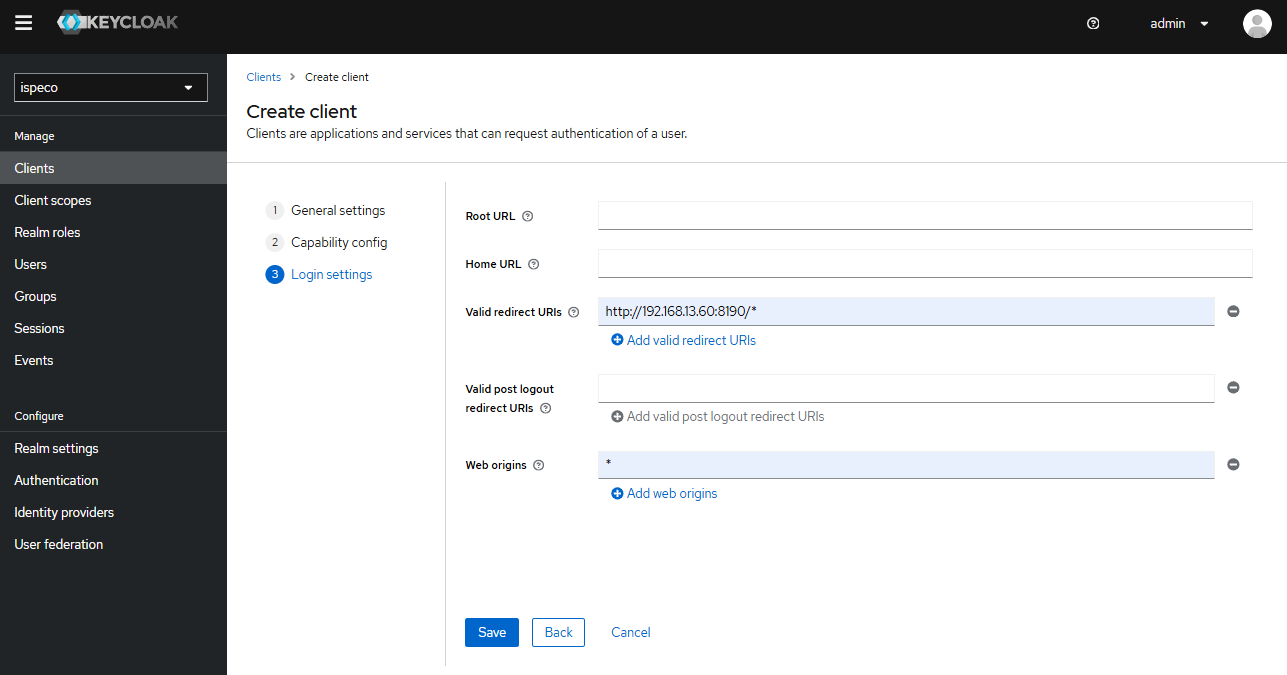
- Click the "Next" button to enter the Client Login Settings page, and continue to configure as shown in the following figure:
Finally, click the "Save" button.
Description:
- "Valid Redirect URLs" (required): fill in which applications (business) systems (URLs) are allowed by Keycloak to use Keycloak's Authentication Authorization Service, support to fill in more than one, fill in the format is recommended: the service root address followed by the /* sign.
- "Network Root" (required): the allowed CORS sources. To allow all sources for a valid redirect URL, add "+", but this does not include the "*" wildcard. To allow all sources, explicitly add "*".
Select the Credentials tab, as shown below:
Explanation: "Client password" is the client key, which is the same as the "Client key" in "Keycloak Login Configuration" in SuperMap iServer/iPortal/iEdge. Keycloak Login Configuration in SuperMap iServer/iPortal/iEdge.
- Create Protocol Mapper
- Select "Client Scope" in the left navigation bar, click "roles" in the client scope list, enter the Client Scope Details page, select the "Mapping" tab, click "realm", and then click "mapping". Click "realm roles" to configure the role mapping as shown in the following figure:
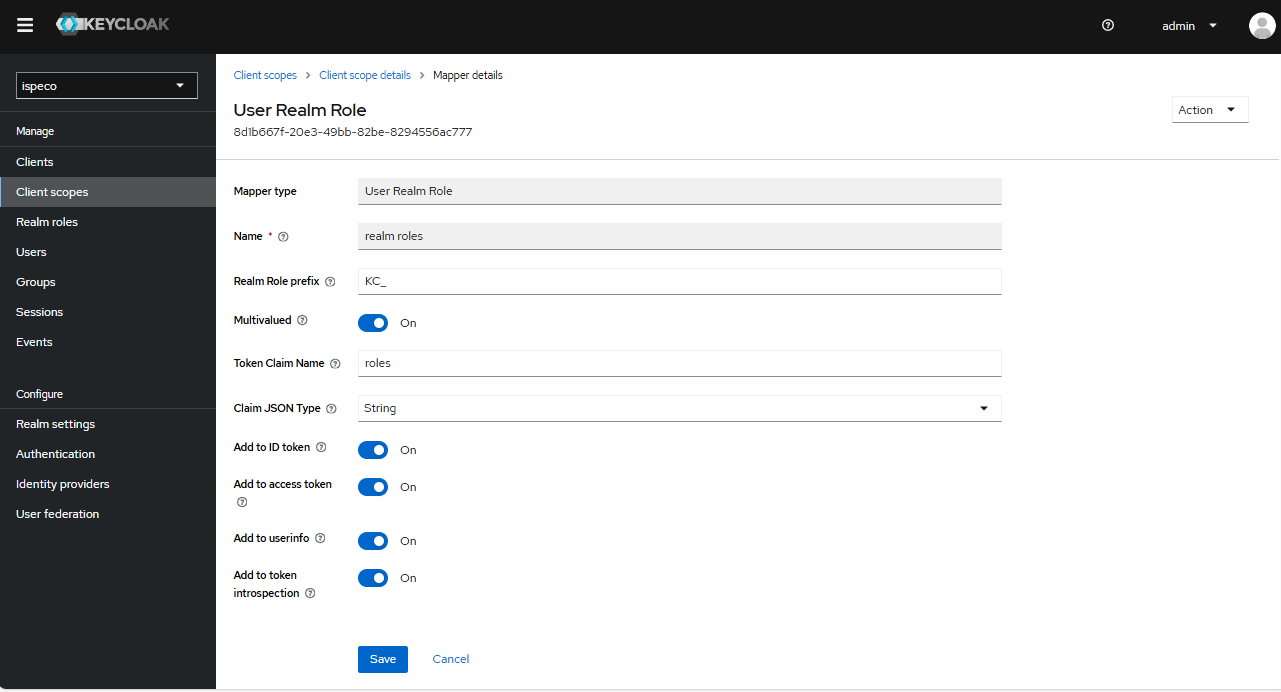
Finally, click the "Save" button.
Description:
- "Name": the name of the mapper, feel free to fill it in, e.g. roles, it is recommended to keep it consistent with the "Token Declaration Name" below.
- "Domain Role Prefix": A prefix that Keycloak automatically puts on each role when it returns the user's role information to the client. It is optional, e.g. KC_. If you don't fill it in, it means it will be passed to the client as it is. (This value corresponds to the "Attribute Value" in "Attribute Role Associated Information Configuration" in "Keycloak Login Configuration" in SuperMap iServer/iPortal/iEdge, when adding role mapping. (Prefix of "Attribute Value")
- "Token Declaration Name": It is recommended to keep the same name as above, e.g., roles. when Keycloak returns the user's role information to the client, from which attribute the client can retrieve the role information (this value corresponds to the (The value corresponds to the "Role Attribute Identifier" in the "Keycloak Login Configuration" in SuperMap iServer/iPortal/iEdge.)
At this point, the interface between Keycloak client and SuperMap iServer/iEdge is completed. After that, you need to add roles and users in the domain where the client is located.
Steps to configure Keycloak to interface with SuperMap iPortal
1. Low version Keycloak
The preliminaries for configuring Keycloak to interface with SuperMap iPortal are the same as those for SuperMap iServer/iEdge. In addition to completing the above configurations, you need to enable the token-exchange privilege of the above client, and use “Client” as the association policy to associate a client with the access type of public. client. Here are the next steps for interfacing with iPortal, based on the ispeco-oidc client created under the ispeco domain:
- Create a client with an access type of public
After you have created the ispeco-oidc client, you need to create a client with the access type public. Select “Clients” in the left navigation bar, and click the “Create” button on the right page to add a client:
- “Client ID": Enter the ‘Client ID’, you can name the ‘Client ID’ whatever you want, e.g. ispeco-kh. The “Client ID” corresponds to the “Associated public client ID” in “Keycloak Login Configuration” in SuperMap iPortal.
- “Client Protocol": choose the default openid-connect.
- Click the “Save” button to enter the client configuration details page, select the “Settings” tab, and continue to configure as shown in the following figure:
Description:
- “Access Type": select public, i.e. you don't need to carry a ‘secret’ (client key) to access this client.
- “Valid redirect URLs” (required): Fill in which applications (business) systems (URLs) are allowed by Keycloak to use Keycloak's Authentication Authorization Service, support for filling in more than one, fill in the recommended format: the root address of the service followed by the /* sign.
- “Web Origin” (required): Fill in the sites that allow cross-domain requests, the recommended format is: the root address of the service followed by the /* sign. It should be noted that if only “*” is filled in, it means that all cross-domain access is allowed, and should be used with caution.
- Enable Token-exchange Privileges for a Client
You need to enable the token-exchange privilege of the client ispeco-oidc that you created in the previous step, and use “Client” as the association policy to associate it with the client ispeco-oidc that you created in step 1. Select “Clients” in the left navigation bar, and then in the client list, click “ispeco-oidc”. Click “ispeco-oidc” to enter the client configuration page:
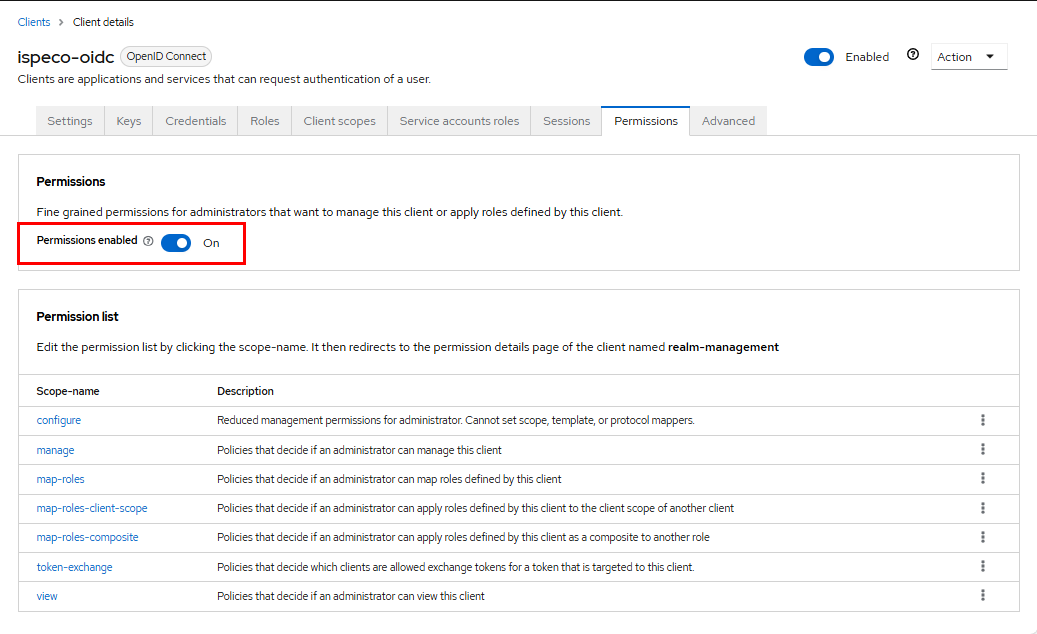
- Select the “Privileges” tab and turn on the privilege switch, as shown in the following figure:
Note: If your client configuration page does not have a “Permissions” tab, you will need to stop Keycloak and then execute the following DOS commands in the keycloak-4.8.3.Final/bin directory to enable fine-grained authorization and restart Keycloak:
standalone.bat -Dkeycloak.profile.feature.admin_fine_grained_authz=enabled -Dkeycloak.profile.feature.token_exchange=enabled
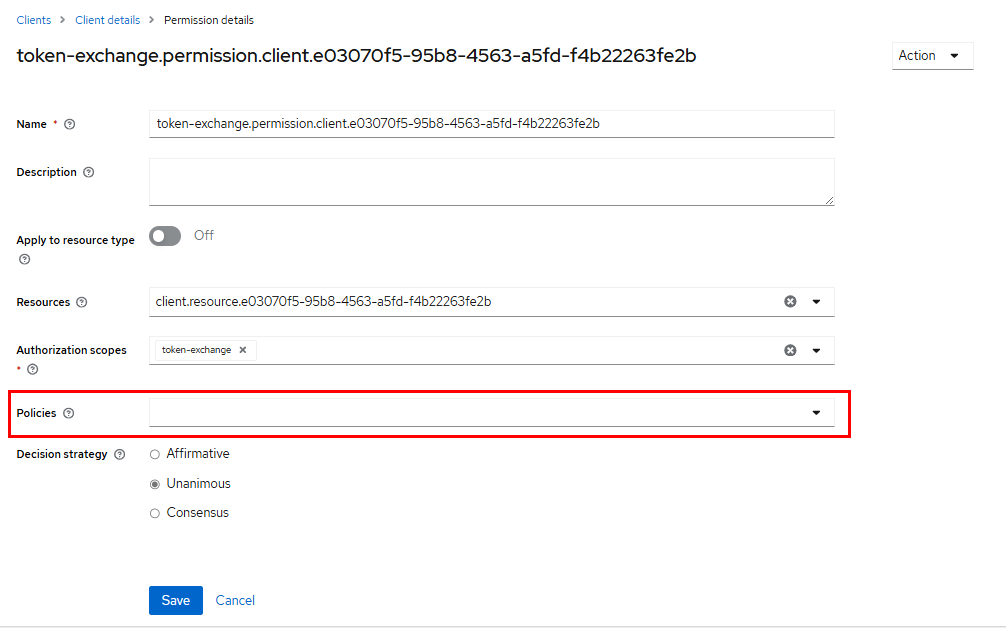
- Click on token-exchange to enter the token-exchange permissions page, as shown below:
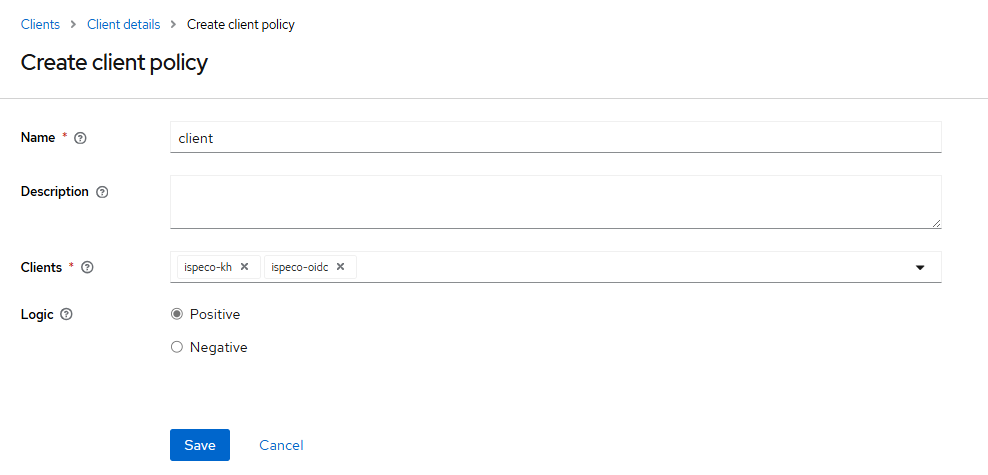
- Click Create Policy and select “Client” in the drop-down menu to create a “Client” (client-side) application policy for the token-exchange privilege, as shown below:
Description:
- “Name": the name of the policy, it can be filled in freely, for example: client.
- “Client": select the client to be associated with the current client, in this case, you should select the client ispeco-kh created in step 1 to be associated.
Finally, click “Save” button.
Note: Keycloak's default security policy only allows websites with the same source to load Keycloak's login page in the form of an iframe, this restriction is to prevent clickjacking attacks.
If your iPortal and Keycloak have different sources and you want iPortal to load Keycloak's login page as an iframe, you need to set <iframeable> to <iportal.xml> in the iportal.xml configuration file in the [SuperMap iPortal Installation Directory]\webapps\iportal\WEB-INF] folder. configuration file, set the <iframeable> parameter to true (the default is false, please refer to iPortal configuration file for details), and modify the related security policy configuration in Keycloak's domain settings as needed.
On the left navigation bar, select “Domain Settings” and on the right page, select the “Security” tab to change the content security policy:
“Content Security Policy": After frame-ancestors ‘self’, enter the site where iPortal is located. For example: http://192.168.120.154:8889, if you configure more than one site, just separate them with spaces.
At this point, the interface between Keycloak client and SuperMap iPortal is completed. After that, you still need to add roles and users in the domain where the client is located.
2. Higher version Keycloak
The steps before configuring Keycloak to interface with SuperMap iPortal are the same as those for SuperMap iServer/iEdge, except for the above configuration, you need to enable the token-exchange privilege of the above client, and use “Client” as the association policy, and associate a client with an access type of public. client. Here are the next steps for interfacing with iPortal, based on the ispeco-oidc client created under the ispeco domain:
- Create a client with an access type of public
After you have created the ispeco-oidc client, you need to create a client with the access type public. Select “Clients” in the left navigation bar and click the “Create Client” button on the right page to add a client:
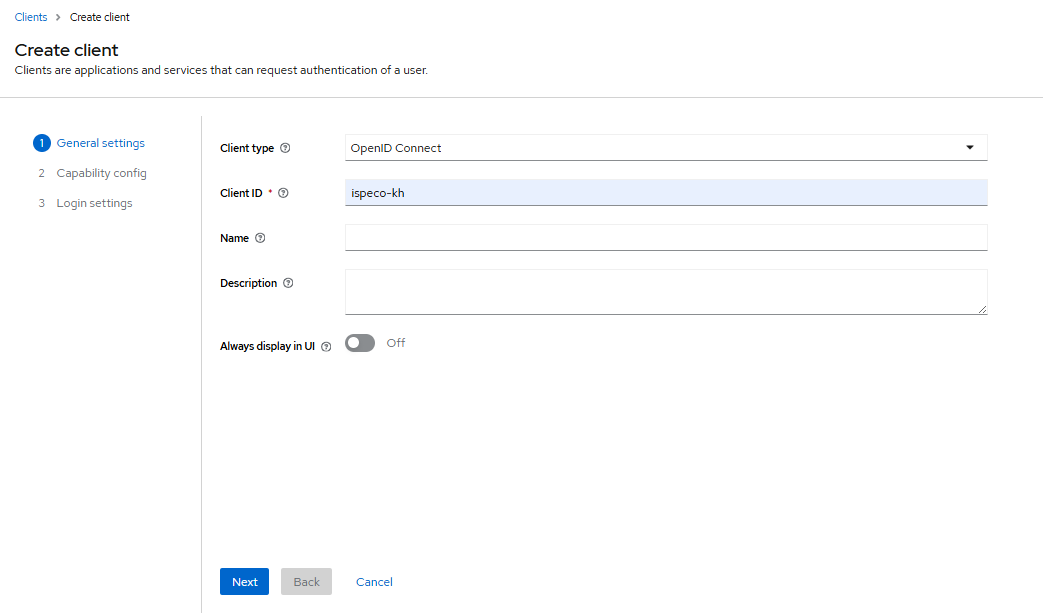
- For “Client Type”, select the default OpenID Connect.
- “Client ID": Enter the ‘Client ID’, you can name the ‘Client ID’ as you like, e.g.: ispeco-kh. The “Client ID” corresponds to the “Associated public client ID” in “Keycloak Login Configuration” in SuperMap iPortal.
- Click the “Next” button to enter the Client Function Configuration page, and continue to configure as shown in the following figure:

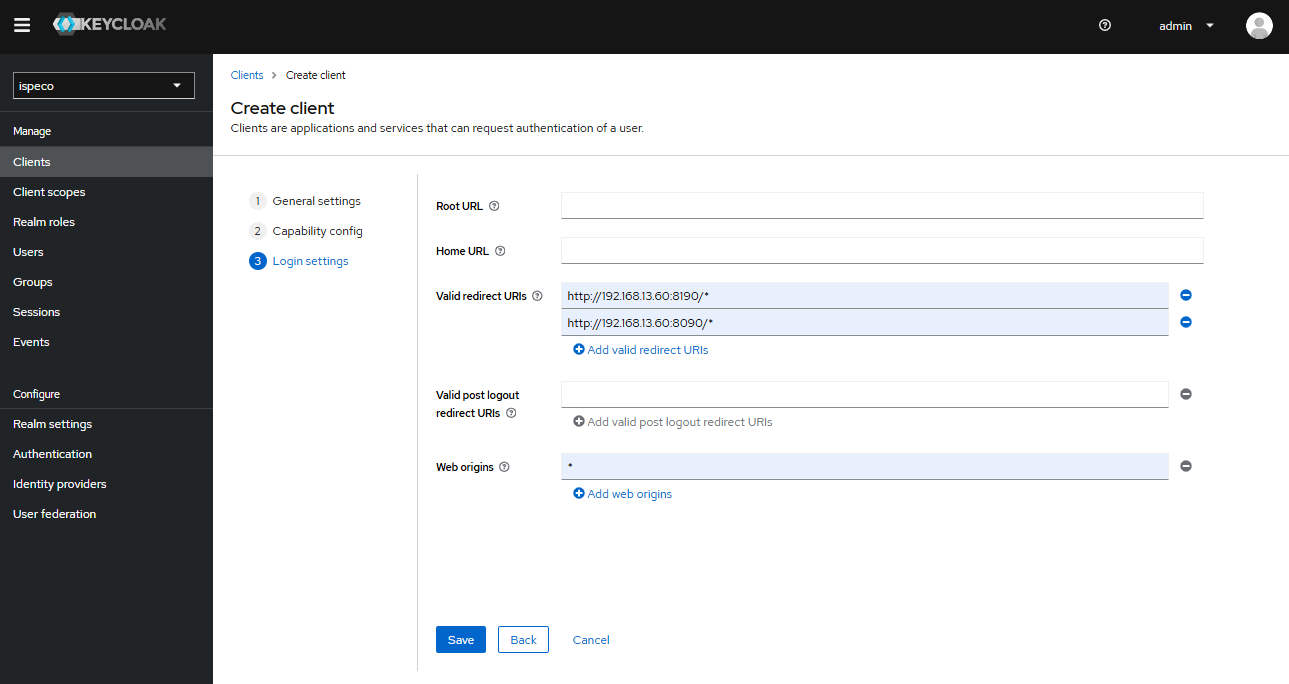
- Click the “Next” button to enter the Client Login Settings page, and continue to configure as shown in the following figure:
Finally, click the “Save” button.
Description:
- “Valid Redirect URLs” (required): fill in which applications (business) systems (URLs) are allowed by Keycloak to use Keycloak's Authentication Authorization Service, support to fill in more than one, fill in the format is recommended: the service root address followed by the /* sign.
- “Network Root” (required): the allowed CORS sources. To allow all sources for a valid redirect URL, add “+”, but this does not include the “*” wildcard. To allow all sources, explicitly add “*”.
- Enable Token-exchange Privileges for a Client
You need to enable the token-exchange privilege of the client ispeco-oidc that you created in the previous step, and use “Client” as the association policy to associate it with the client ispeco-oidc that you created in step 1. Select “Clients” in the left navigation bar, and then in the client list, click “ispeco-oidc”. Click “ispeco-oidc” to enter the client configuration page:
- Select the “Privileges” tab and turn on the privilege switch, as shown in the following figure:
Note: If your client configuration page does not have a “Permissions” tab, you will need to stop Keycloak and then execute the following DOS commands in the keycloak-x.x.x/bin directory to enable fine-grained authorization and restart Keycloak:
kc.bat start-dev --features="admin-fine-grained-authz,token-exchange”
- Click on token-exchange to enter the token-exchange permission settings page, as shown below:
- Click Policies, select “Create Client Policy” in the drop-down menu, and select “Client” to create a “Client” (client-side) application policy for the token-exchange privilege, as shown in the following figure:
Description:
- “Name": the name of the policy, it can be filled in freely, for example: client.
- “Client": select the client to be associated with the current client, in this case, you should select the client ispeco-kh created in step 1 to be associated.
Finally, click the “Save” button.
Note: Keycloak's default security policy only allows same-origin websites to load the Keycloak login page as an iframe, this restriction is to prevent clickjacking attacks.
If your iPortal and Keycloak have different sources and you want iPortal to load Keycloak's login page as an iframe, you need to set the <iframeable> parameter to true (the default is false) in the iportal.xml configuration file in the folder [SuperMap iPortal Installation Directory]\webapps/iportal\WEB-INF]. In the configuration file, set the <iframeable> parameter to true (the default is false, please refer to iPortal Configuration File for details), and modify the related security policy configurations in Keycloak's domain settings as needed.
Select “Domain Settings” on the left navigation bar, and select the “Security Defense” tab on the right page to change the content security policy:
“Content Security Policy: Enter the site where iPortal is located after frame-ancestors 'self'. For example: http://192.168.13.60:8190, if you configure more than one site, just separate them with spaces.
At this point, the interface between Keycloak client and SuperMap iPortal is completed. After that, you still need to add roles and users in the domain where the client is located.
Note: If you have configured Keycloak 19 or later, you need to set parameters before logout.
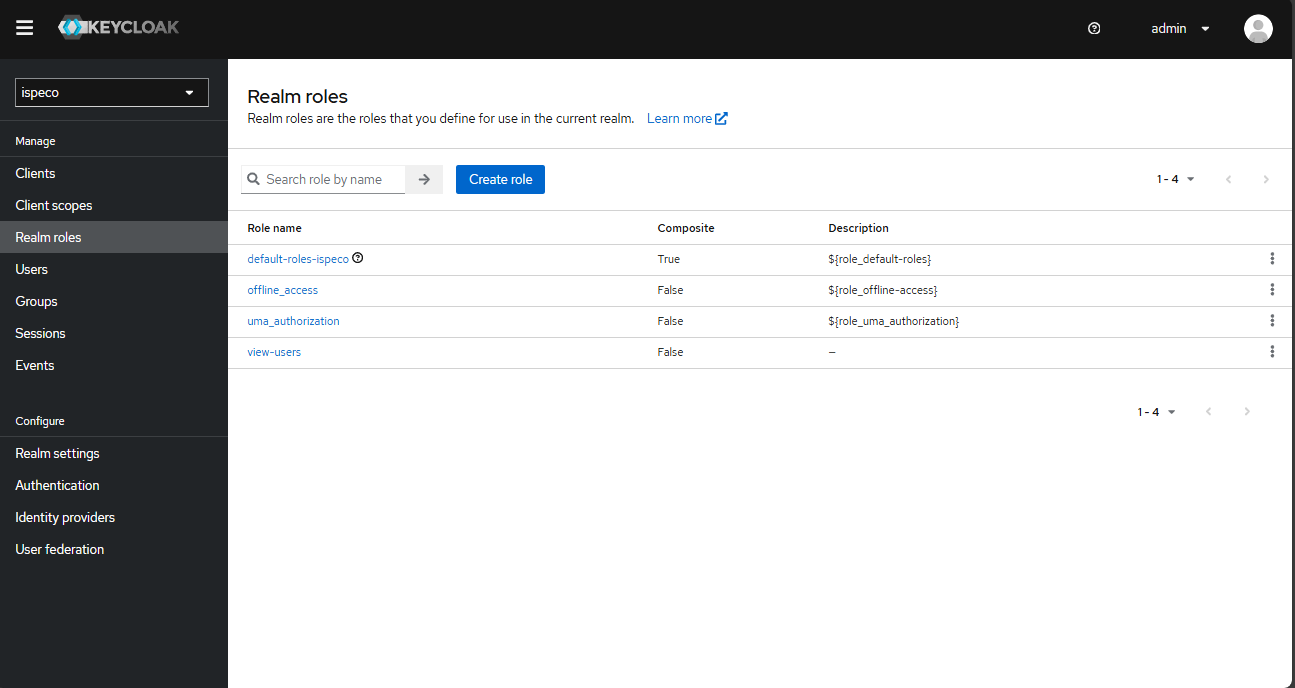
Select "Domain Role" in the left navigation bar and Create Role on the right page to add the view-users role as shown below:
Select "Client" in the left navigation bar, and click "ispeco-oidc" in the client list to enter the client details page:
- Select the "Service Account Roles" TAB and click "Assign Roles" as shown below:
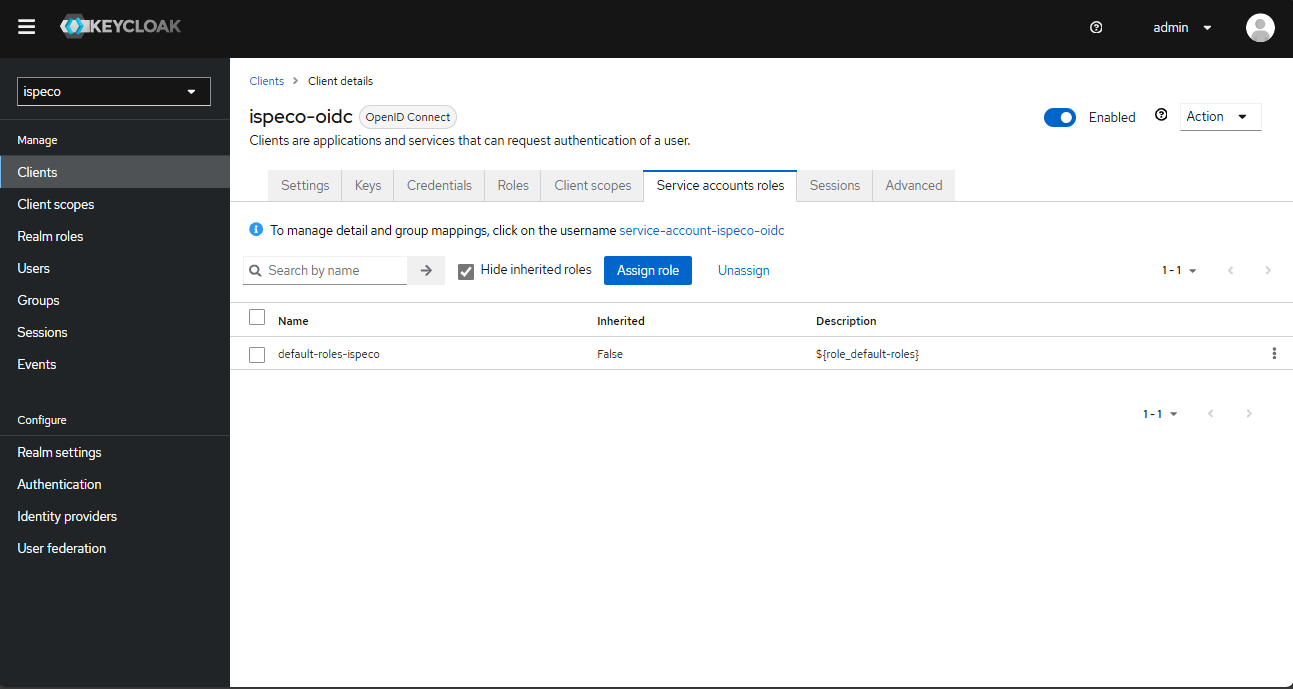
- On the role assignment page, select "Filter by client" in the filter, enter view-users in the search box, check view-users, and click "Assign" to successfully assign roles:

Configure Keycloak to link with SuperMap iDesktop
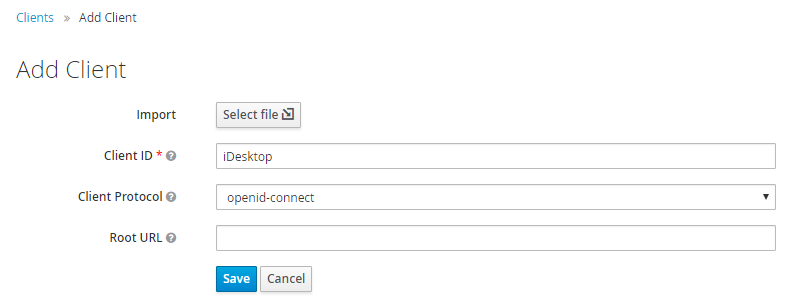
Take the created ispeco realm as an example to create a client. The client ID is named: iDesktop, which is a client ID name stipulated by SuperMap. The configuration is as shown below:
Click the "Save" button to enter the detailed configuration page:
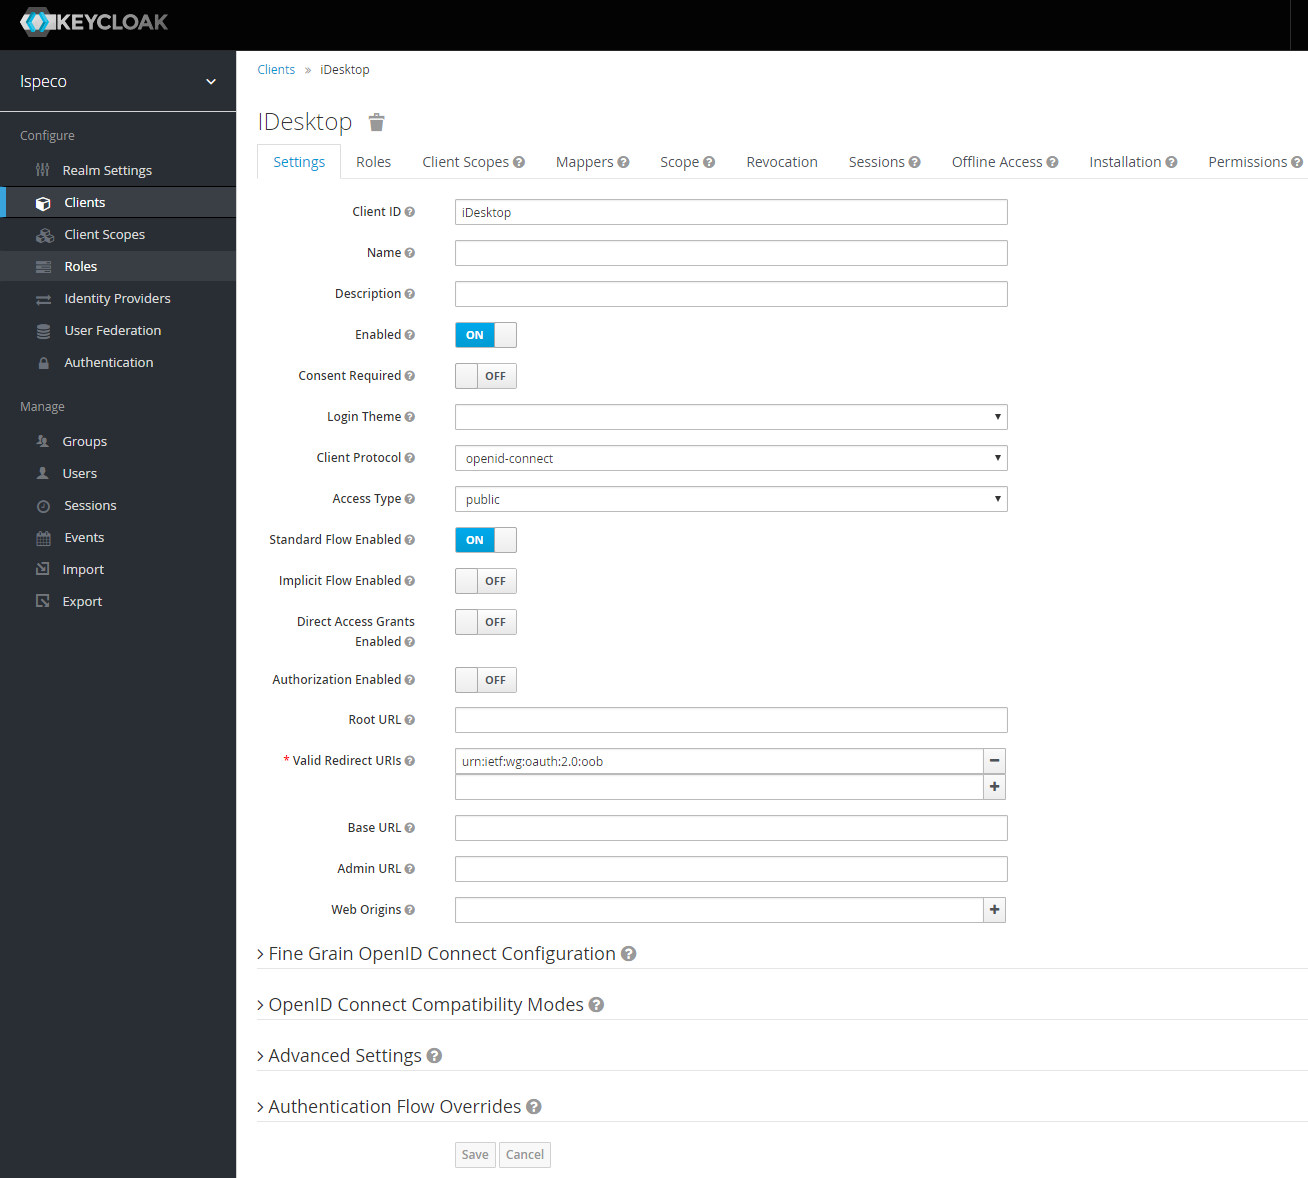
Note: "Valid Redirect URLs" fills in urn:ietf:wg:oauth:2.0:oob.
At this point, the Keycloak configuration of the linking SuperMap iDesktop is completed. When you open SuperMap iDesktop, you can log in to SuperMap iServer/iPortal/iEdge directly to get the resources using the account in Keycloak.
Add roles
Click on "Roles" in the navigation bar to add roles. You can create multiple roles according to your needs. It's recommended that the role name is consistent with the role name in SuperMap iServer/iPortal/iEdge, for example: DATA_CENTER, which will be displayed as "KC_DATA_CENTER" after adding the prefix KC_ in "Attribute role associated information configuration" in "Keycloak login configuration" in SuperMap iServer/iPortal/iEdge.
Add users
Once you've added the roles, you can start to create users. Keycloak allows adding users directly by the administrator and by opening user registration.
-
Administrator add users
-
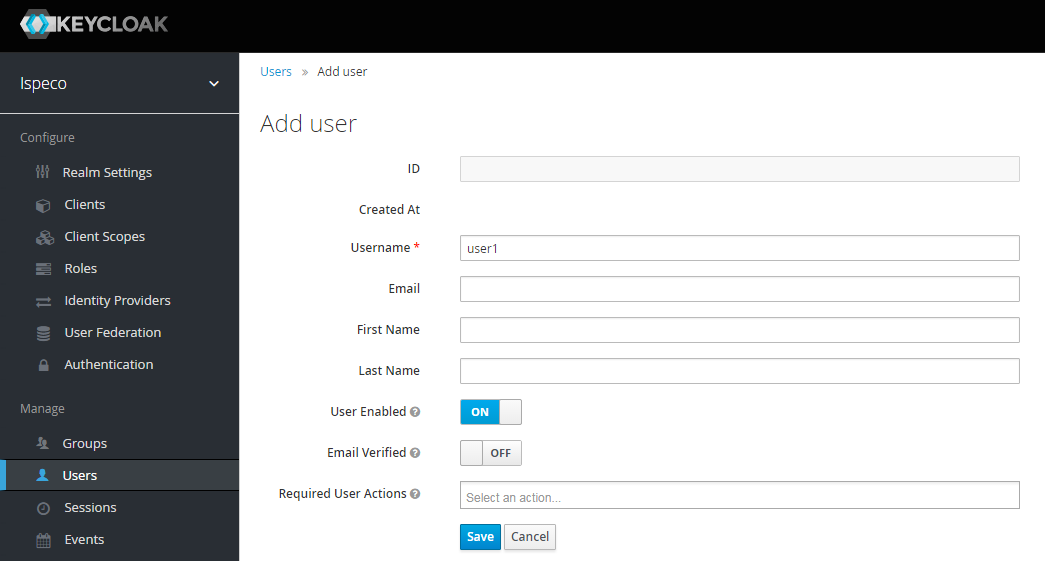
As an administrator, you can add a user by clicking "Users" on the left navigation bar on the Keycloak management page. Then fill in the user information. The user name is required. The rest can be filled in according to the requirements. Click “Save” button after completion.
-
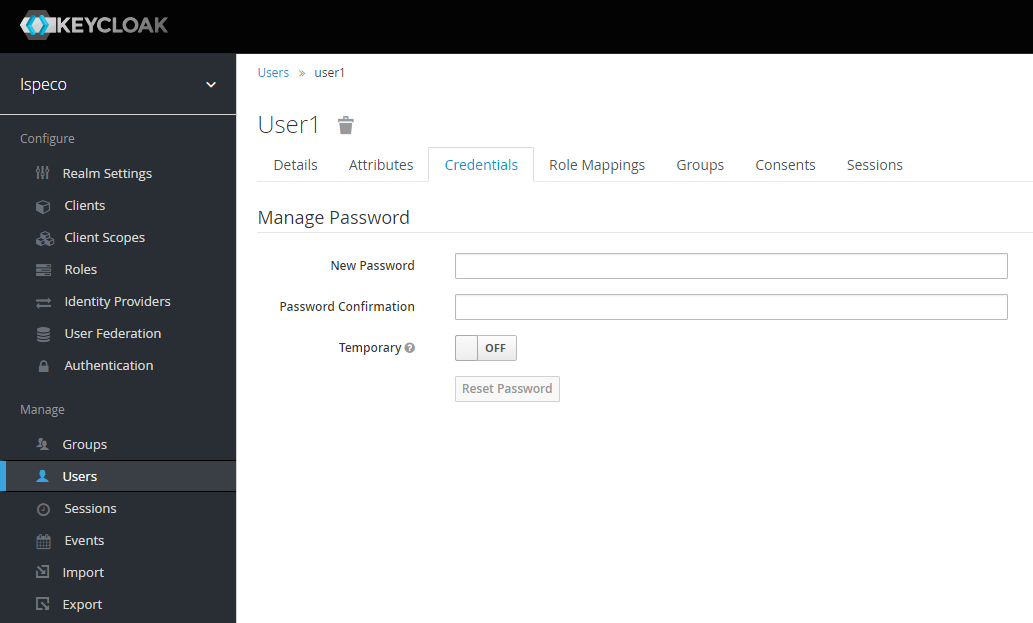
Select the "Credentials" tab, fill in and confirm your password, and turn off the "Temporary" option.
-
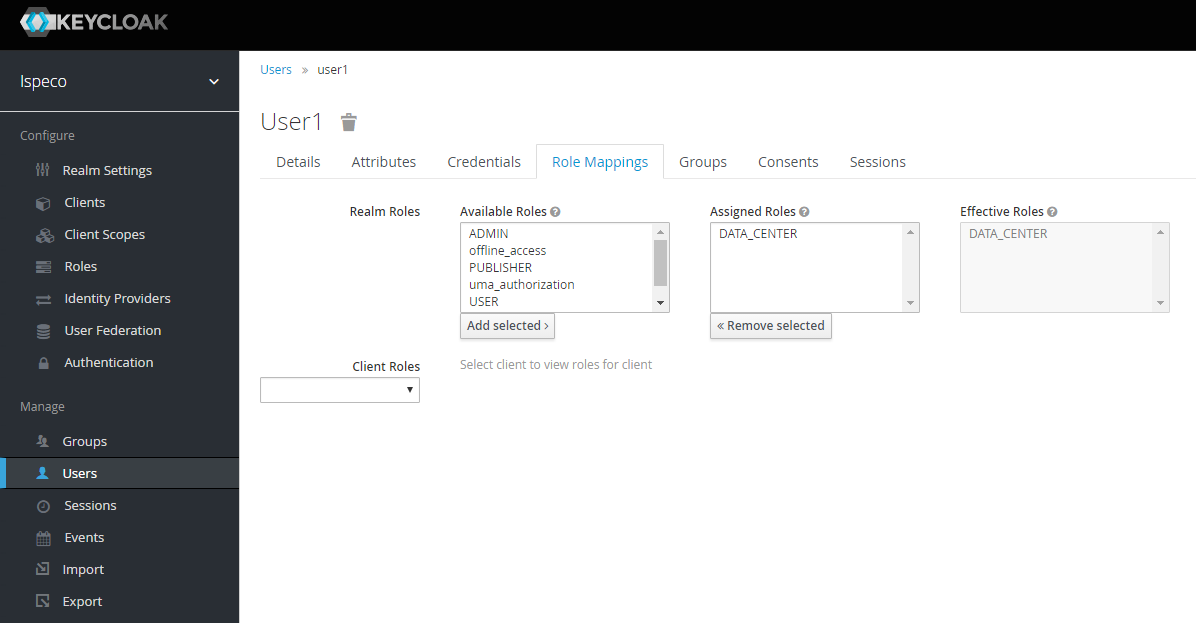
Select the "Role Mappings" tab, select the role you want to assign to the user, and click the "Add Selected" button to complete the assignment of the role. At this point, adding user process is completed.
-
Open user registration
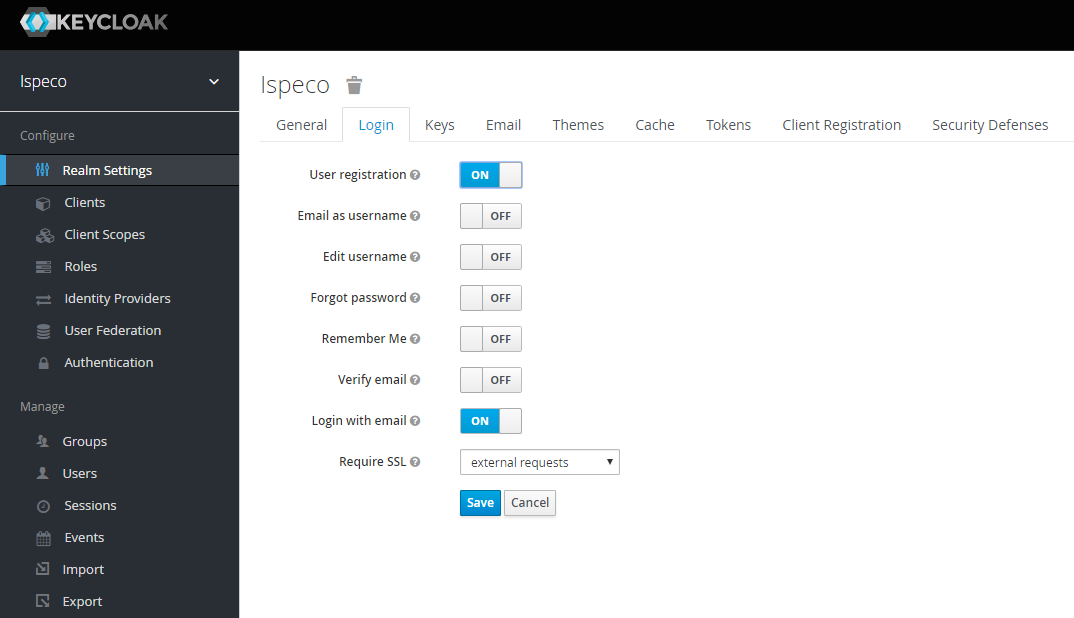
- Select "Realm Settings" in the left navigation bar, click the "Login" tab on the right side, enable the "User Registration" option, the rest of the settings can be selectively enabled as needed, finally click the "Save" button.
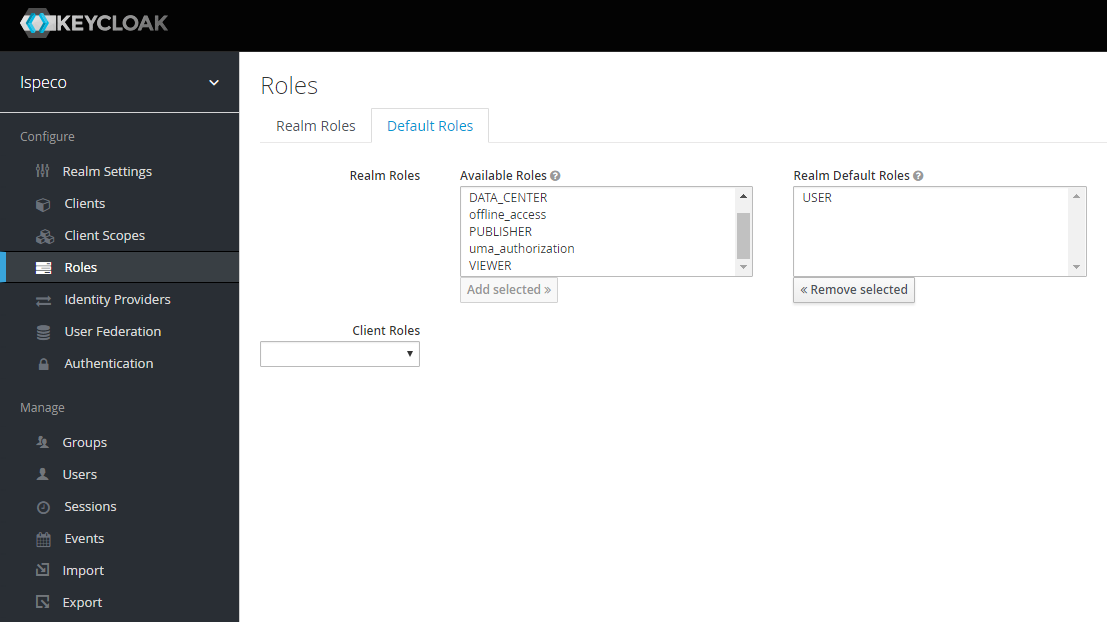
- After enabling the user registration, you also need to assign the default role for users to register, otherwise the registered user can't log in to SuperMap iServer/iPortal/iEdge. Select the "Roles" in the left navigation bar, click "Default Role" on the right side, select the default roles to be assigned to the registered user, and click the "Add Selected" button, the assigned default roles will be displayed in "Realm Default Roles" area. It's recommended to assign " PORTAL_USER" as the default role. Now the assignment is finished. For detailed information about roles, see: Roles and permissions.
- After the registration function is enabled and the default role is assigned, you need to connect the Keycloak in SuperMap iServer/iPortal/iEdge. For details, see: Configure to use Keycloak for authentication and authorization.. After the connecting, when users log in to SuperMap iServer/iPortal/iEdge, it will redirect to the Keycloak login page, and the user registration entry can also be found on the right side of the login page. Now the user registration function is available to use.