

In iPortal, you can use service proxy and reverse proxy together to provide double protection for the security of the portal and services. The reverse proxy mechanism is used to protect the security of the iPortal portal platform. As the reverse proxy, Nginx is responsible for receiving and forwarding requests from the client. It acts as a server externally, and the client does not know the existence of other servers in the internal network, so the internal network servers can be protected. While the iPortal service proxy mechanism is used to secure the registered/hosted services in iPortal by providing portal-level service access control, establishing a mapping between the original service address and the proxied service address, so that authorized users can only access the proxied service address, thus the original service address is protected.
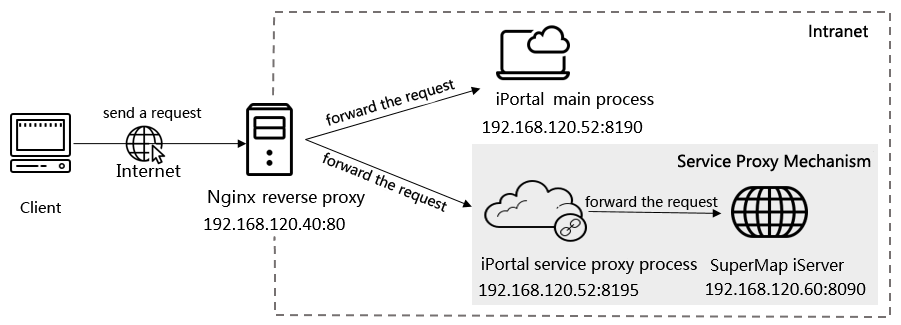
The following will introduce in detail how to use service proxy with Nginx reverse proxy. First of all, please make sure that the service proxy function is enabled on your iPortal. For specific configuration information, please refer to: Service Proxy Configuration.
Next, you need to configure the Nginx reverse proxy server.
Start Nginx
Here we take Windows as an example:
- Unzip nginx to the specified directory
- In the root directory of nginx, start nginx by the following command:
start nginx
Exit nginx command:
nginx –s quit
- Verify nginx starts normally via one of the following ways:
- Open the task manager and check whether the nginx process has started.
- Open the browser, access http://127.0.0.1 or http://localhost, the page shows "Welcome to nginx!".
Using HTTP protocol with Nginx and iPortal
Configure Nginx
Open [nginx installation directory]\conf\nginx.conf file, modify the server node under http node:
server {
listen 80;
server_name www.myiportal.com;
location /{
proxy_pass http://192.168.120.52:8190/;
proxy_set_header Host $host:80;
proxy_set_header X-Read-IP $remote_addr;
proxy_set_header X-Forwarded-For $proxy_add_x_forwarded_for;
}
location /portalproxy/ {
proxy_pass http://192.168.120.52:8195;
proxy_set_header Host $host:80;
proxy_set_header X-Read-IP $remote_addr;
proxy_set_header X-Forwarded-For $proxy_add_x_forwarded_for;
}
}
- Listen: Sets the listening port of the reverse proxy site, the default is 80.
- server_name: The reverse proxy server name, usually uses the domain of the reverse proxy server.
- proxy_pass: Sets the address of the site to be forwarded, which can be in the form of an IP address or a domain name. There are two site addresses that need to be forwarded in the example, namely the portal address of iPortal: http://192.168.120.52:8190/, and the service proxy root address: http://192.168.120.52:8195.
- proxy_set_header: Sets the request header used to forward the request. Syntax format: proxy_set_header Field Value. Specific settings are as follows:
- Host: The request header field, corresponding value $host:80. Used to transfer the server name and proxy server port.
- X-Read-IP: A custom variable name, corresponding value $remote_addr. Used to obtain the real client IP, not the IP of the Nginx server.
- X-Forwarded-For(optional): The corresponding value is $proxy_add_x_forwarded_for. When two or more Nginx servers are used for reverse proxy, it is used to obtain the real client IP and Nginx server IP to ensure normal communication between proxy servers.
Save the above changes and restart nginx to make it effective. The restart command is as follows:
nginx -s reload
If you need to configure the reverse proxy for multi-iPortals or multi-iServers, you can configure multiple server nodes in nginx.conf.
Note: To ensure the accessibility of the services registered in iPortal when the iPortal service proxy is on, which had been proxied by Nginx service before registration, it's recommended to set the Host parameter as: Host $http_host.
If you need to match multiple service addresses, you can configure multiple locations in nginx.conf.
Configure the maximum number of bytes of a single file that Nginx allows the client to request
By default, Nginx allows the client to request the maximum single file byte size of 1m. If the user accesses iPortal through the Nginx proxy and uploads a large data file to the portal, 1m is not enough at this time. It is recommended to modify it to 1024m, that is It is allowed to upload a data file with a size of up to 1024m at a time. You can also configure it according to specific business needs. Specific operation:
Open the [Nginx installation path]\conf\nginx. conf file and add the following line of code under the HTTP node:
client_max_body_size 1024m;
client_max_body_size: Indicates the maximum allowable size of the server requested by the client, in megabytes. If the amount of data requested is greater than the value set in client_max_body_size, the HTTP protocol will report error 413: "Request Entity Too Large", so when the amount of data you upload is large, you need to increase the parameter value.
Note: If after completing the above configuration, iPortal still freezes when uploading files with a large amount of data, you need to continue to modify the content of client_max_body_size and keepalive_timeout under the http node to set larger values. For details, see: FAQ.
Configure iPortal
To use the Nginx to proxy the services of iPortal(when the service proxy is on) and hide the port of the service proxy, you also need to configure the iportal.xml file in the [SuperMap iPortal installation directory]\webapps\iportal\WEB-INF folder. Open the configuration file, add a <proxyServerRootUrl> node under the <serviceProxy> node to set the root address of the Nginx reverse proxy. Since there are two ways to display the Host in the proxy service address: domain name or IP, there are two ways to configure the <proxyServerRootUrl> node:
Method 1: Domain format
<serviceProxy>
<enable>true</enable>
<port>8195</port>
<proxyServerRootUrl>http://www.myiportal.com[:port]</proxyServerRootUrl>
<httpConnPoolInfo>
<maxTotal>20</maxTotal>
<defaultMaxPerRoute>2</defaultMaxPerRoute>
</httpConnPoolInfo>
</serviceProxy>
Method 2: IP format
<serviceProxy>
<enable>true</enable>
<port>8195</port>
<proxyServerRootUrl>http://{ProxyHost}[:port]</proxyServerRootUrl>
<httpConnPoolInfo>
<maxTotal>20</maxTotal>
<defaultMaxPerRoute>2</defaultMaxPerRoute>
</httpConnPoolInfo>
</serviceProxy>
After configuration, restart iPortal.
Note: For the two above methods, [:port] represents the Nginx service port. If you leave it empty, it uses the default port number: 80.
Using HTTPS protocol with Nginx and iPortal
Configure Nginx
- After downloading and installing nginx, navigate to the nginx installation directory and enter the following command in the command line to start nginx:
start nginx
- Purchase a domain name from a domain name service provider, complete the filing (ICP registration), and map the domain name to the public IP of the machine where nginx is located.
- Apply for two SSL certificates from an official Certificate Authority (CA), one for nginx configuration and the other for iPortal configuration.
- Configure the proxy forwarding rules. Open the [nginx installation directory]/conf/nginx.conf configuration file and add a new server node as follows:
server {
listen 443;
server_name www.iportal.com;
ssl on;
ssl_certificate E:\nginx.cer;
ssl_certificate_key E:\nginx.key;
ssl_session_timeout 5m;
ssl_protocols SSLv2 SSLv3 TLSv1;
ssl_ciphers HIGH:!aNULL:!MD5;
ssl_prefer_server_ciphers on;
location / {
proxy_pass https://192.168.13.69:8190;
proxy_set_header Host $http_host;
proxy_set_header X-Real-IP $remote_addr;
proxy_set_header X-Forwarded-For $proxy_add_x_forwarded_for;
}
location ~*/iserver/services/{
proxy_pass https://192.168.13.69:8195;
proxy_set_header Host $http_host;
proxy_set_header X-Real-IP $remote_addr;
proxy_set_header X-Forwarded-For $proxy_add_x_forwarded_for;
}
location ~*\w*/iserver/services/{
proxy_pass ttps://192.168.13.69:8195;
proxy_set_header Host $http_host;
proxy_set_header X-Real-IP $remote_addr;
proxy_set_header X-Forwarded-For $proxy_add_x_forwarded_for;
}
}
Explanation of the bold parts:
- listen: The port nginx listens on. 443 is the default HTTPS port for web servers, allowing direct access via the domain name without specifying a port in the URL.
- server_name: The domain name assigned to iPortal. Modify this according to the actual domain name you obtained.
- ssl_certificate: The file path to the SSL certificate used by nginx.
- ssl_certificate_key: The file path to the SSL private key used by nginx.
- proxy_pass: The target address for proxy forwarding. The first proxy_pass is the original service address of iPortal. The latter two proxy_pass are the proxy addresses of iPortal. Modify these according to your actual iPortal IP and port deployment.
- Enter the following command in the command line to reload the nginx configuration for the changes to take effect:
nginx -s reload
Configure iPortal
- Configure iPortal to start with the HTTPS protocol. Open the [iPortal installation directory]/conf/server.xml file and add the following content:
<Connector port="8443" protocol="org.apache.coyote.http11.Http11NioProtocol"
maxThReads="150"
scheme="https"
secure="true"
SSLEnabled="true"
keystoreFile="D:/iportal.pfx"
keystorePass="xxxxxx"
clientAuth="false"
sslProtocol="TLS"
sslEnabledProtocols="TLSv1.2"/>
Where keystoreFile and keystorePass are the SSL certificate file path and private key password for iPortal, respectively. You can also comment out the following content to disable HTTP:
<Connector port="8090" protocol="HTTP/1.1"
relaxedQueryChars="[]|{}"
relaxedPathChars="[]|{}"
connectionTimeout="8000"
redirectPort="8453"
executor="tomcatThreadPool"
enableLookups="false"
URIEncoding="utf-8"
compression="on"
compressionMinSize="2048"
compressableMimeType="text/html,text/xml,text/plain,text/javascript,text/css,application/javascript,application/xml,application/json,application/rjson"/>
- After configuring SSL in iPortal, to avoid the security vulnerability of "Missing Secure Attribute in Cookie", you can add the Secure attribute through middleware. In the [SuperMap iPortal installation directory]/conf/web.xml file, find the following configuration:
<session-config>
<session-timeout>30</session-timeout>
</session-config>
Modify it to:
<session-config>
<session-timeout>30</session-timeout>
<cookie-config>
<http-only>true</http-only>
<secure>true</secure>
</cookie-config>
</session-config>
- Open the [iPortal installation directory]/webapps/iportal/WEB-INF/iportal.xml file and modify the bold parts as follows:
<serviceProxy>
<!-- Whether registered and hosted services use the proxy, default value: true, enables service proxy function -->
<enable>true</enable>
<!-- Whether to enable the built-in proxy service, default value: true, uses iPortal built-in proxy. Set to false when using an independent process proxy -->
<enableBuiltinProxy>true</enableBuiltinProxy>
<port>8195</port>
<rootUrlPostfix><rootUrlPostfix>
<proxyServerRootUrl>https://{ProxyHost}</proxyServerRootUrl>
<httpConnPoolInfo>
<maxTotal>100</maxTotal>
<defaultMaxPerRoute>10</defaultMaxPerRoute>
<connectionTimeout>30000</connectionTimeout>
<socketTimeout>30000</socketTimeout>
</httpConnPoolInfo>
<!-- Set which protocol to use to start the proxy service. Default uses HTTP protocol. If setting HTTPS protocol, need to configure httpsSetting-->
<scheme>https</scheme>
<httpsSetting>
<keyStorePath>D:\iPortal.pfx</keyStorePath>
<keyStorePassword>xxxxxx</keyStorePassword>
</httpsSetting>
Parameter Description:
- rootUrlPostfix: The suffix for the proxy service root address, default is portalproxy. Here, it is set to an empty value, meaning no suffix is carried.
- proxyServerRootUrl: The proxy service root address. After setting it to https://{ProxyHost}, iPortal will automatically identify the current domain name and dynamically display the proxy service address.
- scheme: The protocol used by the proxy service. Change it to https to enable the proxy service using the HTTPS protocol.
- keyStorePath: The file path to the iPortal SSL certificate.
- keyStorePassword: The private key password for the iPortal SSL certificate.
- Start iPortal. You can then access iPortal via the domain name https://www.iportal.com
Using HTTPS Protocol with Nginx and HTTP Protocol with iPortal
In addition to having both Nginx and iPortal use either HTTP or HTTPS protocols, you can also choose to have Nginx use the HTTPS protocol while iPortal uses the HTTP protocol.
Configuring Nginx
In the [Nginx installation directory]/conf/nginx.conf file, configure the SSL certificate. The SSL certificate is obtained by the client unit from a CA institution using the government network IP, including two files: the private key *.*.*.*.key and the certificate *.*.*.*.cer. Configure them in the server node of the file as follows:
server {
listen 443 ssl;
server_name localhost 10.150.145.118 *.*.*.*;
ssl_certificate sslkey/*.*.*.*.cer;
ssl_certificate_key sslkey/*.*.*.*.key;
ssl_session_timeout 5m;
ssl_protocols TLSv1 TLSv1.1 TLSv1.2;
ssl_ciphers AESGCM:ALL:!DH:!EXPORT:!RC4:+HIGH:!MEDIUM:!LOW:!aNULL:!eNULL;
ssl_prefer_server_ciphers on;
}
- listen: The port nginx listens on. 443 is the default HTTPS port for web servers, allowing direct access via the domain name without specifying a port in the URL.
- server_name: The domain name assigned to iPortal. Modify this according to the actual domain name obtained.
- ssl_certificate: The file path to the SSL certificate used by nginx.
- ssl_certificate_key: The file path to the SSL private key used by nginx.
The location directive matches SuperMap iPortal or SuperMap iPortal Proxy based on different URIs, redirecting HTTPS to HTTP while maintaining the same request scheme information.
Continue editing the [Nginx installation directory]/conf/nginx.conf file and configure the following within the server node:
location / {
proxy_pass http://10.150.145.104:8190;
proxy_redirect http:// https://;
proxy_set_header Host $http_host;
proxy_set_header Referer $http_referer;
proxy_set_header Cookie $http_cookie;
proxy_set_header X-Real-IP $remote_addr;
proxy_set_header X-Forwarded-For $proxy_add_x_forwarded_for;
proxy_set_header X-Forwarded-Host $server_addr;
proxy_set_header X-Forwarded-Port $server_port;
proxy_set_header X-Forwarded-Proto $scheme;
}
location ~* /portalproxy/ {
proxy_pass http://10.150.145.53:8195;
proxy_redirect http:// https://;
proxy_set_header Host $http_host;
proxy_set_header Referer $http_referer;
proxy_set_header Cookie $http_cookie;
proxy_set_header X-Real-IP $remote_addr;
proxy_set_header X-Forwarded-For $proxy_add_x_forwarded_for;
proxy_set_header X-Forwarded-Host $server_addr;
proxy_set_header X-Forwarded-Port $server_port;
proxy_set_header X-Forwarded-Proto $scheme;
}
- proxy_pass: The target address for proxy forwarding. The first proxy_pass is the original service address of iPortal. The latter two proxy_pass are the proxy addresses of iPortal. Modify these according to your actual iPortal IP and port deployment.
After modifying the configuration, Nginx needs to reload the configuration file. Before reloading, it is best to use the command to check the Nginx configuration.
Nginx Check Configuration File
/usr/local/openresty/nginx/sbin/nginx -t
Nginx Reload Configuration File
/usr/local/openresty/nginx/sbin/nginx -s reload
Configuring iPortal
Modify the following three configuration files in SuperMap iPortal:
- [SuperMap iPortal installation directory]/conf/server.xml, Not mandatory but recommended
- [SuperMap iPortal installation directory]/webapps/iportal/WEB-INF/web.xml
- [SuperMap iPortal installation directory]/webapps/iportal/WEB-INF/iportal.xml
- Not mandatory but recommended. In [SuperMap iPortal installation directory]/conf/server.xml, modify the Connecto node. Change its redirectPort attribute to redirectPort="443". This will automatically redirect non-SSL requests to the port specified by redirectPort. Additionally, add the attribute proxyPort="443", indicating that this connector is used behind a proxy. After configuration, accessing http://ip:8190 will be forcibly redirected to https://ip:443 .
<Connector port="8190" protocol="HTTP/1.1"
relaxedQueryChars="[]|{}"
relaxedPathChars="[]|{}"
connectionTimeout="8000"
redirectPort="443" proxyPort="443"
executor="tomcatThreadPool"
enableLookups="false"
URIEncoding="utf-8"
compression="on"
compressionMinSize="2048"
compressableMimeType="text/html,text/xml,text/plain,text/javascript,text/css,application/javascript,application/xml,application/json,application/rjson" />
- In [SuperMap iPortal installation directory]/webapps/iportal/WEB-INF/web.xml, add the following configuration:
Before all <filter-mapping> entries, add the following <filter> configuration anywhere within the list of <filter> configurations:
<filter>
<filter-name>remoteIpFilter</filter-name>
<filter-class>com.supermap.services.filter.RemoteIpFilter</filter-class>
</filter>
Before the <filter-mapping> entry with <filter-name> iserver-services, add the following <filter-mapping> configuration:
<filter-mapping>
<filter-name>remoteIpFilter</filter-name>
<url-pattern>/*</url-pattern>
</filter-mapping>
- In [SuperMap iPortal installation directory]/webapps/iportal/WEB-INF/config/proxy/WEB-INF/web.xml, the configuration file for the built-in proxy service, add the following configuration:
Before all <filter-mapping> entries, add the following <filter> configuration anywhere within the list of <filter> configurations:
<filter>
<filter-name>remoteIpFilter</filter-name>
<filter-class>com.supermap.services.filter.RemoteIpFilter</filter-class>
</filter>
After the <filter-mapping> entry with <filter-name> crossOriginFilter, add the following <filter-mapping> configuration:
<filter-mapping>
<filter-name>remoteIpFilter</filter-name>
<url-pattern>/*</url-pattern>
</filter-mapping>
- In [SuperMap iPortal installation directory]/webapps/iportal/WEB-INF/iportal.xml, modify the port port, the unified suffix name rootUrlPostfix for the proxy service root address, and the service address after proxying proxyServerRootUrl.
<!-- Whether registered and hosted services use the proxy, default value: true, enables service proxy function -->
<enable>true</enable>
<!-- Whether to enable the built-in proxy service, default value: true, uses iPortal built-in proxy. Set to false when using an independent process proxy -->
<enableBuiltinProxy>true</enableBuiltinProxy>
<port>8195</port>
<rootUrlPostfix>portalproxy</rootUrlPostfix>
<proxyServerRootUrl>https://{ProxyHost}</proxyServerRootUrl>
<httpConnPoolInfo>
<maxTotal>100</maxTotal>
<defaultMaxPerRoute>10</defaultMaxPerRoute>
<connectionTimeout>30000</connectionTimeout>
<socketTimeout>30000</socketTimeout>
</httpConnPoolInfo>
- port: The cloud GIS portal platform proxy package SuperMap iPortal Proxy uses port 8195.
-
rootUrlPostfix: The unified suffix name for the proxy service root address is set to portalproxy. It can be flexibly customized as needed and must be consistent with the configuration in SuperMap iPortal Proxy.
-
proxyServerRootUrl: The proxied service address proxyServerRootUrl is modified to {ProxyHost}. Instead of using a fixed IP or domain name, using {ProxyHost} allows the proxy service address to dynamically display the IP based on the user's current network environment. Also, no port number is specified, so it uses the default port 443 for the HTTPS protocol.
- After completing the above configuration modifications, restart SuperMap iPortal. Your project can then provide GIS services that comply with the HTTPS protocol externally.
Access iPortal and the services of iPortal
After completing the above configurations, accessing the IP of the Nginx reverse proxy server will provide the same content as accessing the original iPortal portal. For example: http://192.168.120.40:80, where the default port 80 can be omitted. The root address of services after enabling service proxy will also become: http://192.168.120.40:80, thus also hiding the service proxy port "8195".
In actual business applications, if you want to use a domain name to access the iPortal portal and services, you need to bind the IP of the Nginx reverse proxy server to the domain name, and then access the proxied portal through that domain name, i.e., http://www.myiportal.com:80. At the same time, the root address of services after enabling service proxy will also become: http://www.myiportal.com:80.