SSO introduction
In a sound GIS system, multiple GIS servers need to be deployed to work together, such as a system deployed with an iPortal node, multiple iServer and multiple iEdge nodes. When accessing these GIS server nodes, users need to frequently switch the product's access website and log in with a different account. To solve the problem of frequently login actions and the difficulty to remember different accounts, we applied single sign-on (SSO) in our system. The SSO in here refers to the Web SSO.
Advantages of using SSO
When users are accessing a GIS server which applied SSO, first the received request will be forwarded to the authentication server by the GIS server for user authentication. At this point, the user needs to enter his/her username and password, after the validation, he/her can continue to access the GIS services. When he/she go to access a different GIS server, the request will be forwarded to the authentication server, too. At this time, the authentication server finds the current user has been verified and will tell the GIS server, so the user can access the services successfully. During the process, the user only needs to login once to access all the GIS servers. And the authentication server only conducts the user authentication for once and accesses the user database for once.
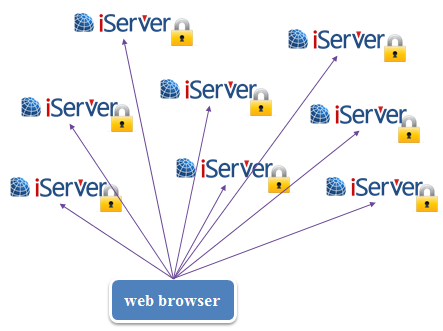
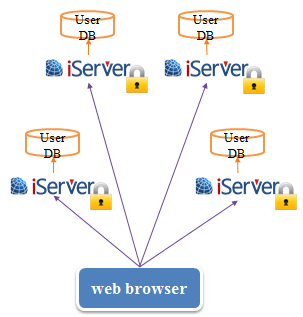
If the system doesn't apply SSO, each time the user accesses a different GIS server, he/she needs to login. And each GIS server has its own user database, so each user authentication needs to read its own user database information.
|
|
Using SSO |
Without using SSO |

Advantages of SSO:
- Login once to access all the iPortal, iServer and iEdge products.
- Improve the efficiency of authentication.
- Reduce the difficulty of remembering the username and password.
Configure to use CAS SSO
CAS (Central Authentication Service) is introduced by Yale University to build a Java open source project called Web SSO. iServer/iPortal/iEdge supports CAS based single sign-on. When users configure single sign-on, they need to set the CAS authentication server which is responsible for authenticating the user information. The authentication server can be deployed independently in the network environment. This section introduces how to configure the SSO in iServer/iPortal/iEdge for using. For the procedures of installing and configuring the CAS, see: CAS installation and configuration.
Enable SSO
Log in to SuperMap iServer Manager, click Security>CAS Configuration, check Enabled option, then set the CAS attribute field and the CAS service address, click Save to make it work. Where:
- "Built-in Account Login" refers to whether retaining the original User login in iServer configuration while enabling CAS. If this option is checked, both the iServer users and the CAS users can log in and access iServer; If this option is not checked, only the CAS user can access iServer, and the built-in user of iServer can not access.
- "CAS User Attribute Field" is the identification field of user identities in CAS, this field is used to associate the created Role in iServer.
- "CAS Service Access Address" is the preconfigured address of CAS server.
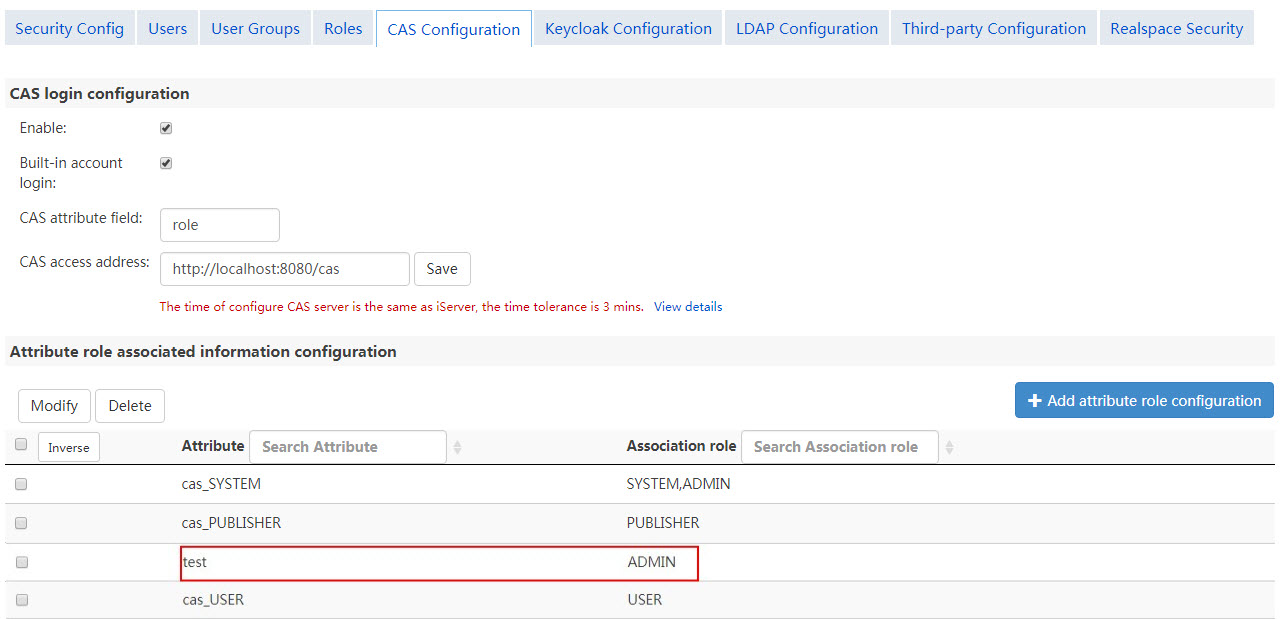
Configure the association between CAS user attributes and iServer roles
iServer/iPortal/iEdge identifies different CAS user permissions through the association between the existing roles and the CAS user attributes. If a particular CAS user attribute is associated with an existing role of iServer, it means that the CAS user has the same permissions with the role.
The relationship between CAS attribute values and iServer/iPortal/iEdge existing roles is many to many. iServer built-in roles USER, PUBLISHER and ADMIN match the three CAS user attributes as cas_USER, cas_Publisher, cas_ADMIN respectively. If there are no these three attribute values in the specified association fields of CAS server, the association does not take effect.
Click on the "Add Attribute Role Configuration" button, users can add new CAS user attributes to associate it with existing roles of iServer.
Other optional configurations
If the login/logout address of CAS Server is different form the authentication address( for example: CAS Server runs in dual or multiple NIC, the login/logout address and authentication address use different IP), you need open shiro.ini file( locates in [SuperMap iServer installation directory]\webapps\iportal\WEB-INF) with text editor and add parameter-Realm.casLoginLogoutPrefix to configure the login/logout address as shown in the following bold codes:
casRealm.enabled = false
casRealm.reserveSystemAccount = true
casRealm.casServerUrlPrefix = http://{ip}:{port}/cas
casRealm.casLoginLogoutPrefix=http://{ip}:{port}/cas
...
Additional configurations for iPortal
For SuperMap iPortal, users can log in to iPortal home page with the CAS account only by associating the CAS user attribute with the ADMIN and PORTAL_USER roles. Or it will display a unregistered status.
After finishing the above configurations, the logged CAS users can only browse maps, services, etc., while cannot perform operations like creating maps, registering services. To make these operations available to user, additional configurations are required. Open shiro.ini file which locates in [SuperMap iPortal installation directory]\webapps\iportal\WEB-INF folder with a text editor, add casRealm.backRealm parameter for casRealm variable as shown in the following bold codes. After finishing the edit, restart iPortal service.
...
casRealm = com.supermap.iportal.security.IportalCasRealm
casRealm.attributeRuleMapping = iserver_att={cas_SYSTEM=[SYSTEM,ADMIN],cas_PUBLISHER=[PUBLISHER],cas_USER=[USER]}
...
usernamepasswordrealm = com.supermap.services.security.BuiltInTokenSupportedRealm
casRealm.backRealm = $usernamepasswordrealm
...
Note:
- The shiro.ini file does not exist before you start the iPortal service for the first time. So edit the file after successfully starting the iPortal service for the first time.
- If one account in user's application system uses CAS to log in to iPortal, this user will be inserted into user table of iPortal, and it will occupy one user license. So if one account in user's application system was deleted, the corresponding user in iPortal should be deleted synchronously.
- If the CAS user has the same name as the existed user in iPortal, then this CAS user only has the permission to browse maps, services, etc., but doesn't have the permission to create maps, register services, etc., even though the additional configurations for iPortal have been configured. Since the user name in iPortal is unique, so the action of creating the corresponding user in iPortal will fail.
Log in with CAS accounts
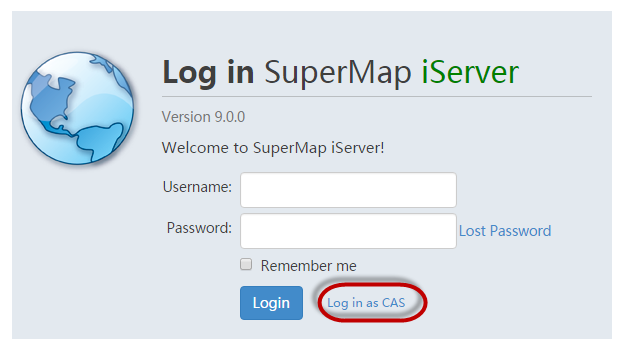
After single sign-on is enabled, CAS user accounts can be used to access protected services or to log in Service Manager. If " Built-in Account Login" option is checked when configuring the SSO, the login interface is shown as below. Users can choose to use the existing user to log in, or click on the Log in as CAS to jump to the CAS user's login interface, then CAS users can log in. After successful authentication by the CAS server, users can access iServer services and CAS server associated GIS services of iServer and iEdge and iPortal.
If " the Built-in Account Login" option is not checked when enabling single sign-on, then accessing the protected services or service manager will jump directly to the login interface of CAS server.
SSO of iPortal needs to log in via "http://localhost:8090/iportal/services/security/login", not the homepage("http://localhost:8090/iportal/").
Note:
If the CAS authentication server and GIS server are not in a same computer, it may be a failure to login because of the system time differences. So you need to change the system time of the two computers, or adjust the fault-tolerant interval. The default time interval is 3 minutes. Edit the shiro.ini file (in WEB-INF). And modify the casRealm.tolerance parameter, as shown below:
...
casRealm.enabled = false
casRealm.reserveSystemAccount = true
casRealm.casServerUrlPrefix = http://{ip}:{port}/cas
casRealm.casService = http://{ip}:{port}/{contextPath}/shiro-cas
casRealm.securityInfoDAO = $sqliteRealm
casRealm.tolerance = 180000
...