SuperMap iServer distributed analysis supports Hadoop Yarn cluster, you can build it yourself by following the process below. This chapter describes how to set up a Hadoop Yarn cluster that uses Kerberos authentication.
Software requirements
To set up a Hadoop Yarn cluster environment with Kerberos authentication, you need to configure the Java environment (JDK download address http://www.oracle.com/technetwork/java/javase/downloads/index-jsp-138363.html#javasejdk, JDK 8 and above is recommended), SSH and hadoop.
The softwares used in this example are:
Hadoop installation package: hadoop-2.7.3.tar.gz stored in: /home/iserver
JDK installation package: jdk-8u131-linux-x64.tar.gz
Jsvc installation package: commons-daemon-1.0.15-src.tar.gz
Kerberos client installation package (windows): kfw-4.1-amd64.msi
Construction process
This example mainly shows how to build a Hadoop Yarn cluster with one master and one worker on two centos7 virtual machines (each has 12 g of memory )
- Configure Hadoop
Machine Name IP Memory Processes
master 192.168.112.162 10G namenode、resourcemanager、kerberos server
worker 192.168.112.163 10G datanode、nodemanager
Note:
-
- hostname must be lowercase, otherwise it will be wrong when integrating kerberos
-
Turn off the firewall of the master and each worker
- Create the following user groups and users separately on the master and each node.
-
-
Create a new user group, the command is as follows:
-
groupadd hadoop
-
-
Create new users: hdfs and yarn, which need to set userID <1000, the commands are as follows:
-
useradd -u 501 hdfs -g hadoop
useradd -u 502 yarn -g hadoop
And use the passwd command to set a password for the new users:
passwd hdfs input new password
passwd yarn input new password
-
-
After the users are created, use the id user command to view the user infos as shown below:
-

-
- Configure DNS and gateway. If it is a virtual machine, the DNS and gateway need to be the same as the physical machine.
- Add the ip of the master node into DNS service and set teh domain name, such as: master162.ispeco.com
- Configure login without password for root, hdfs and yarn users between each node
-
- Take hdfs user as an example to show how to configure login without password.
- Execute ssh-keygen -t rsa -P'' on master and worker respectively (-P indicates password, can be ignored, defaults to enter three times of "Enter" key). After executing the command, the private key file (id_rsa) and public key file (id_rsa.pub) will be generated in /home/hdfs/.ssh directory.
id_rsa private key file
id_rsa.pub public key file
-
-
- Then execute the following command on the master and worker respectively:
-
ssh-copy-id -i /home/hdfs/.ssh/id_rsa.pub ip
When execute on master, wirite the ip of the worker node; and write the ip of the master node if executing on worker node.
-
-
- Run ssh worker/master on the master and worker to verify if the configuration is successful.
-
ssh-copy-id -i /home/hdfs/.ssh/id_rsa.pub ip
-
- Perform the same operations shown above to configure login without password for root and yarn users.
- Install jdk
- Unzip jdk-8u131-linux-x64.tar.gz and set its path to the environment variable.
- Install jsvc
- Unzip file: commons-daemon-1.0.15-src.tar.gz
- Enter commons-daemon-1.0.15-src/src/native/unix directory,
- execute: support/buildconf.sh
- execute: ./configure
- execute: make
- Compile. After successful, you can see the jsvc file in the commons-daemon-1.0.15-src/src/native/unix directory, copy it to the [hadoop-2.7.3 installation package]/libexec directory.
Note: If your commons-daemon-1.0.15-src.tar.gz already has jsvc, you don't need to execute a, b, just execute c directly.
- Kerberos service installation and configuration
-
- The master node installs the krb server and client, the worker only installs the krb client.
yum install krb5-server (server)
yum install krb5-workstation krb5-libs krb5-auth-dialog (client)
-
- Configure Kerberos service related files.
-
-
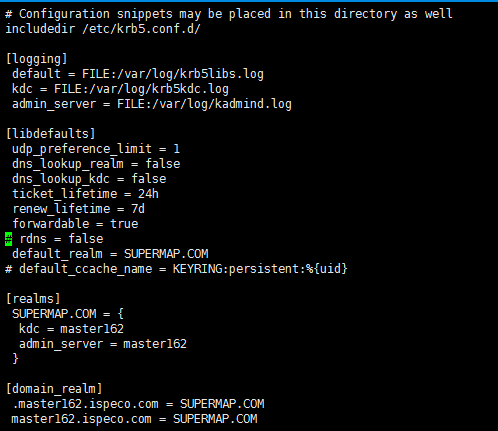
- etc/krb5.conf. Modify the realm and change the default EXAMPLE.COM to the value you want to define, such as: SUPERMP.COM. Among them, the following parameters need to be modified:
- default_realm: The default realm. Set to realm, such as SUERMAP.COM
- kdc: represents the location of kdc to be added. Add format is machine name.
- admin_server: represents the location of the admin. The format is the machine name.
- default_domain: represents the default domain name. (Set the domain name corresponding to the master host, such as master162.ispeco.com)
- etc/krb5.conf. Modify the realm and change the default EXAMPLE.COM to the value you want to define, such as: SUPERMP.COM. Among them, the following parameters need to be modified:
-
Note: /etc/krb5.conf (Both the Master and Worker nodes have to place this file, and the file content must be the same)
The file after modified is shown below:
-
-
- vi /var/kerberos/krb5kdc/kdc.conf (Configure on the master node. If this file doesn't exist, you need to build it yourself):
-

-
-
- vi /var/kerberos/krb5kdc/kadm5.acl (Configure on the master node. If this file doesn't exist, you need to build it yourself):
-

-
- Configure Kerberos service related files.
To create a Kerberos database, you need to set an administrator password. After the creation is successful, a series of files will be generated under /var/Kerberos/krb5kdc/. If you want to recreate it, you need to delete the related principal files in /var/kerberos/krb5kdc.
Execute the following command on the root user of the master node:
kdb5_util create -s -r SUPERMAP.COM
After successful execution, the result is shown as following figure:
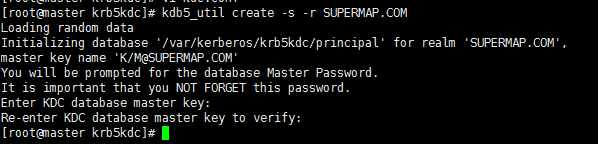
Note: After the database is created successfully, you need to restart the krb5 service.
krb5kdc restart
-
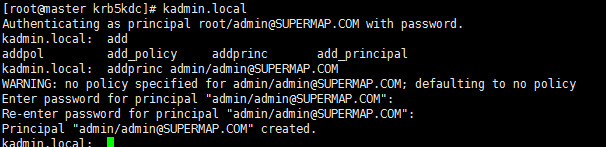
- Create an administrator for kerberos.
Execute the following commands on the root user of the master node:
kadmin.local
addprinc admin/admin@SUPERMAP1.COM
As shown below:
-
- Create common users and key files for kerberos so that when configuring <!--YARN kerberos security-->, each node can access each other.
-
-
- Execute the following commands on the root user of the master node:
-
kadmin.local
#create users
addprinc -randkey yarn/master162.ispeco.com@SUPERMAP.COM
addprinc -randkey yarn/worker163@SUPERMAP.COM
addprinc -randkey hdfs/master162.ispeco.com@SUPERMAP.COM
addprinc -randkey hdfs/worker163@SUPERMAP.COM
#generate key files (generated to the current path)
xst -k yarn.keytab yarn/master162.ispeco.com@SUPERMAP.COM
xst -k yarn.keytab yarn/worker163@SUPERMAP.COM
xst -k hdfs.keytab hdfs/master162.ispeco.com@SUPERMAP.COM
xst -k hdfs.keytab hdfs/worker163@SUPERMAP.COM
-
-
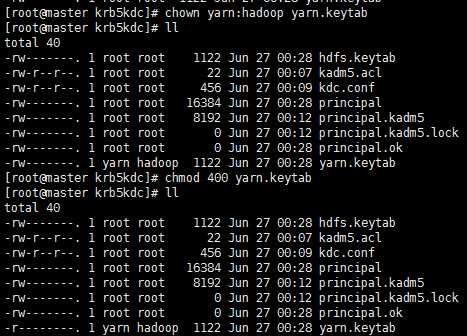
- Copy the yarn.keytab (yarn:hadoop 400) and hdfs.keytab (hdfs:hadoop 400) files to the /var/kerberos/krb5kdc/ directory of the Master and Worker nodes, and set the corresponding groups the files belong to, set the permission of the files as 400, which are shown as follows:
-
- Modify the hadoop cluster configuration file
Under {HADOOP_HOME}/etc/hadoop directory:
-
-
- The contents of the core-site.xml file are as follows:
-
<configuration>
<property>
<name>fs.defaultFS</name>
<value>hdfs://192.168.112.162:9000</value>
</property>
<property>
<name>hadoop.tmp.dir</name>
<value>file:/home/iserver/hadoop-2.7.3/tmp</value>
<description>Abasefor other temporary directories.</description>
</property>
<property>
<name>hadoop.security.authentication</name>
<value>kerberos</value>
</property>
<property>
<name>hadoop.security.authorization</name>
<value>true</value>
</property>
<property>
<name>hadoop.rpc.protection</name>
<value>authentication</value>
</property>
<property>
<name>hadoop.security.auth_to_local</name>
<value>DEFAULT</value>
</property>
</configuration>
-
-
- The contents of the yarn-site.xml file are as follows:
-
<configuration>
<property>
<name>yarn.nodemanager.aux-services</name>
<value>mapreduce_shuffle</value>
</property>
<property>
<name>yarn.nodemanager.aux-services.mapreduce.shuffle.class</name>
<value>org.apache.hadoop.mapred.ShuffleHandler</value>
</property>
<property>
<name>yarn.resourcemanager.address</name>
<value>192.168.112.162:8032</value>
</property>
<property>
<name>yarn.resourcemanager.scheduler.address</name>
<value>192.168.112.162:8030</value>
</property>
<property>
<name>yarn.resourcemanager.resource-tracker.address</name>
<value>192.168.112.162:8031</value>
</property>
<property>
<name>yarn.resourcemanager.admin.address</name>
<value>192.168.112.162:8033</value>
</property>
<property>
<name>yarn.resourcemanager.webapp.address</name>
<value>192.168.112.162:8088</value>
</property>
<!--YARN kerberos security-->
<property>
<name>yarn.resourcemanager.keytab</name>
<value>/var/kerberos/krb5kdc/yarn.keytab</value>
</property>
<property>
<name>yarn.resourcemanager.principal</name>
<value>yarn/master162.ispeco.com@SUPERMAP.COM</value>
</property>
<property>
<name>yarn.nodemanager.keytab</name>
<value>/var/kerberos/krb5kdc/yarn.keytab</value>
</property>
<property>
<name>yarn.nodemanager.principal</name>
<value>yarn/master162.ispeco.com@SUPERMAP.COM</value>
</property>
<property>
<name>yarn.nodemanager.container-executor.class</name>
<value>org.apache.hadoop.yarn.server.nodemanager.LinuxContainerExecutor</value>
</property>
<property>
<name>yarn.nodemanager.linux-container-executor.group</name>
<value>hadoop</value>
</property>
<property>
<name>yarn.nodemanager.local-dirs</name>
<value>/home/iserver/hadoop-2.7.3/local</value>
</property>
<property>
<name>yarn.nodemanager.log-dirs</name>
<value>/home/iserver/hadoop-2.7.3/log</value>
</property>
</configuration>
-
-
- The contents of the Hdfs-site.xml file are as follows:
-
<configuration>
<property>
<name>dfs.https.enable</name>
<value>false</value>
</property>
<property>
<name>dfs.namenode.http-address</name>
<value>192.168.112.162:50070</value>
</property>
<property>
<name>dfs.https.port</name>
<value>504700</value>
</property>
<property>
<name>dfs.namenode.secondary.http-address</name>
<value>192.168.112.162:9001</value>
</property>
<property>
<name>dfs.namenode.name.dir</name>
<value>file:/home/iserver/hdfs/name</value>
</property>
<property>
<name>dfs.datanode.data.dir</name>
<value>file:/home/iserver/hdfs/data</value>
</property>
<property>
<name>dfs.replication</name>
<value>2</value>
</property>
<property>
<name>dfs.webhdfs.enabled</name>
<value>true</value>
</property>
<property>
<name>dfs.permissions</name>
<value>false</value>
</property>
<property>
<name>dfs.encrypt.data.transfer</name>
<value>true</value>
</property>
<property>
<name>dfs.block.access.token.enable</name>
<value>true</value>
</property>
<property>
<name>dfs.namenode.kerberos.principal</name>
<value>hdfs/master162.ispeco.com@SUPERMAP.COM</value>
</property>
<property>
<name>dfs.namenode.keytab.file</name>
<value>/var/kerberos/krb5kdc/hdfs.keytab</value>
</property>
<property>
<name>dfs.namenode.kerberos.internal.spnego.principal</name>
<value>HTTP/master162.ispeco.com@SUPERMAP.COM</value>
</property>
<property>
<name>dfs.web.authentication.kerberos.keytab</name>
<value>/var/kerberos/krb5kdc/hdfs.keytab</value>
</property>
<property>
<name>dfs.web.authentication.kerberos.principal</name>
<value>http/master162.ispeco.com@SUPERMAP.COM</value>
</property>
<property>
<name>dfs.namenode.kerberos.https.principal</name>
<value>host/master162.ispeco.com@SUPERMAP.COM</value>
</property>
<property>
<name>dfs.namenode.secondary.http-address</name>
<value>192.168.112.162:50090</value>
</property>
<property>
<name>dfs.secondary.namenode.keytab.file</name>
<value>/var/kerberos/krb5kdc/hdfs.keytab</value>
</property>
<property>
<name>dfs.secondary.namenode.kerberos.principal</name>
<value>hdfs/master162.ispeco.com@SUPERMAP.COM</value>
</property>
<property>
<name>dfs.secondary.namenode.kerberos.internal.spnego.principal</name>
<value>HTTP/master162.ispeco.com@SUPERMAP.COM</value>
</property>
<property>
<name>dfs.datanode.kerberos.principal</name>
<value>hdfs/master162.ispeco.com@SUPERMAP.COM</value>
</property>
<property>
<name>dfs.datanode.keytab.file</name>
<value>/var/kerberos/krb5kdc/hdfs.keytab</value>
</property>
<property>
<name>dfs.encrypt.data.transfer</name>
<value>false</value>
</property>
<property>
<name>dfs.datanode.data.dir.perm</name>
<value>700</value>
</property>
<property>
<name>dfs.datanode.address</name>
<value>192.168.112.163:1004</value>
</property>
<property>
<name>dfs.datanode.http.address</name>
<value>192.168.112.163:1006</value>
</property>
<property>
<name>dfs.datanode.https.address</name>
<value>192.168.112.163:50470</value>
</property>
</configuration>
-
-
- The contents of the container-executor.cfg file are as follows:
-
yarn.nodemanager.linux-container-executor.group=hadoop
#configured value of yarn.nodemanager.linux-container-executor.group
banned.users=hdfs
#comma separated list of users who can not run applications
min.user.id=0
#Prevent other super-users
allowed.system.users=root,yarn,hdfs,mapred,nobody
##comma separated list of system users who CAN run applications
-
-
- In hadoop-env.sh file, add:
-
export JAVA_HOME=/home/supermap/java/jdk1.8.0_131
export JSVC_HOME=/home/supermap/hadoop/hadoop-2.7.3/libexec
If you need to debug, add:
export HADOOP_OPTS="$HADOOP_OPTS -Dsun.security.krb5.debug=true"
-
-
- In yarn-env.sh file, add:
-
export JAVA_HOME=/home/supermap/java/jdk1.8.0_131
-
-
- In masters file, add:
-
master (the host name of the master)
-
-
- In slaves file, add:
-
worker (the host name of the Worker)
-
-
- Copy the configured hadoop installation package to the worker node and place it in the same path as the master node.
- Set ermissions (Both Master and Worker nodes need to be set)
-
The Hadoop installation package is placed under the root and the directory with permissions 755.
The following files need to be configured with the corresponding permissions and user groups separately:
| Corresponding parameters/files | File |
Need to be set to user: group |
Permission |
|
dfs.namenode.name.dir |
hdfs-site.xml |
hdfs-site.xml |
drwx------ (700) |
|
dfs.datanode.data.dir |
hdfs-site.xml |
hdfs-site.xml |
drwx------ (700) |
|
$HADOOP_LOG_DIR |
hadoop_env.sh |
hdfs:hadoop |
drwxrwxr-x(775) |
|
$HADOOP_YARN_HOME/logs |
yarn-env.sh |
hdfs:hadoop |
drwxrwxr-x(775) |
|
yarn.nodemanager.local-dirs |
yarn-site.xml |
yarn:hadoop |
drwxr-xr-x(775) |
|
yarn.nodemanager.log-dirs |
yarn-site.xml |
yarn:hadoop |
drwxr-xr-x(755) |
|
container-executor |
hadoop installation directory/bin/ |
root:hadoop |
--Sr-s--*(6050) |
|
container-executor.cfg |
hadoop installation directory/etc/haddop/ |
root:hadoop |
r-------*(400) |
|
tmp |
hadoop installation directory/ |
hdfs:hadoop |
- |
|
start-dfs.sh |
hadoop installation directory/sbin |
hdfs:master |
- |
|
start-secure-dns.sh |
root:maste |
||
|
start-yarn.sh |
yarn:master |
- Start the yarn cluster with krb authentication enabled and the hadoop cluster with krb authentication enabled.
Execute the following command in the HADOOP installation directory under the master node:
-
-
Start the Kerberos service (root user)
-
krb5kdc start
-
-
Formatting the cluster under user hdfs (this step is required only for the first installation or after modifying the hadoop related settings)
-
[hdfs@master bin]$ ./hadoop namenode –format
-
-
Start the cluster
-
[hdfs@master sbin]$ ./start-dfs.sh
[root@master sbin]# ./start-secure-dns.sh
[yarn@master sbin]$ ./start-yarn.sh
-
-
To shut down the cluster, execute:
-
[yarn@master sbin]$ ./stop-yarn.sh
[root@master sbin]# ./stop-secure-dns.sh
[hdfs@master sbin]$ ./stop-dfs.sh
- Verify that the yarn cluster and the hadoop cluster are successfully started.
For yarn cluster, access MasterIP:8088
For hadoop, access MasterIP:50070
- To perform distirbuted analysis, you also need to configure UGO for each sub-node of the Hadoop Yarn cluster. For details, see: ugo configuration.