Installing license driver
Note: The Linux operating system supports both file license and hardware license, which must install drivers. All the verifications of licenses are communicated in the mode of driver.
Note: The following processes should be performed as root.
In the supermap_iserver _ * _ linux64/support/SuperMap_License/Support directory to extract the driver installation package * .tar, install the driver;
The unzipping commands as follows:
tar -xvf *.tar
Navigate into the decompression of the file, execute the following command to install the driver:
./dinst
or
sh dinst
You can get a 90-day trial license to use SuperMap GIS 9D after installing the driver. If dinst has no executable permissions, please grant permissions by executing the following commands:
chmod +x dinst
If an "The 32bit support is missing ..." error happens on a Linux 64-bit OS, it means Linux 64-bit operating system lacks a 32-bit support library. You need to install a support library of 32 bit.
Refer to the following list of support libraries that need to be installed.
- Libc6-i386 and ia32-libs (Ubuntu)
- Libstdc ++ - devel.i686, glibc.i686, libgcc.i686, libstdc ++. I686, glibc-devel.i686 (RHEL, CentOS, OpenSUSE, SLES, and OES)
- Glibc-32bit (OpenSUSE, SLES and OES)
The recommended installation method is: in the [SuperMap iServer installation directory] supermap_iserver_*_linux64/support directory, execute the following command:
./dependencies_check_and_install.sh install -y
The system will automatically detect and install the required dependencies.
Configuring license
Configuring file license
Unlike the GUI configuration on Windows, the Linux platform configures the file license in the way of commands with /licensetool.sh command.
Enter the root directory of the package, execute the following command, you can view the command to configure the file license:
./licensetool.sh
Enter the root directory of the package, use the "software activation" way to configure the license, the steps are as follows:
(1) Get the machine information. Execute the following command, and specify the path where the generated local information file is stored, then a * .c2v file in the specified path will be generated.
./licensetool.sh -create/pathname/*.c2v
(2) Submit the local information to the Beijing SuperMap Software Co., Ltd.
Submit the local information file (* .c2v) generated by the above steps to Beijing SuperMap Software Co., Ltd., we will generate *. V2c official license file based on it and return to you, through which you configure the official license.
(3) Make the license work. Place your *. V2c official license file into a specified location, execute the following command:
./licensetool.sh -update/pathname/*.v2c
Configuring hardware license
Ensure that you have obtained a legal license from SuperMap Software Co., Ltd. before configuring license. If the license server is configured within the same network segment, the license is automatically configured and does not need to be configured manually. If there is a hardware key available in the current network environment (other network segments), follow the steps below to configure the license:
(1) Open the browser, visit http://localhost:1947 or http://local IP:1947.
(2) In the left Options, select Configuration.
(3) On the right side, select the Access to Remote License Managers tab.
(4) On Specify Search Parameters fill in license server IP of other network segment, click Submit.
(5) Wait for a few minutes, under Sentinel Keys on the left side of the Options you can see sentinel keys of this server .
You also can view the license status by executing the following command in the supermap_iserver _ * _ linux64 root directory:
./licensetool.sh -s
Applying for a trial license
(1) Generate the running report
Execute the following command with a specific path to store the runnning report file:
./licensetool.sh -report / pathname /*.report
After executing the command, a * .report file will be generated under the specified path.
(2) Apply for a trial license
You can directly apply for a trial license in the Beijing SuperMap Software Co., Ltd. official website , "SuperMap Technology Resource Center" section. After the application you will receive :
- If you are applying for SuperMap GIS 7C series, you will receive a * .lic7c format license file
- If you are applying for the SuperMap GIS 8C series, you will receive a * .lic format license file
- If you are applying for the SuperMap GIS 9D series, you will receive a * .lic9d format license file
- If you are applying for the SuperMap GIS 10 series, you will receive a * .lic10i format license file
(3) Make the trial license take effect
You can make it work in one of the following ways:
- Method 1: Place the trial license file in the opt directory of your OS, specifically: /opt/SuperMap/License/. Please note that the directory is granted read and write access. System will automatically use the license file of the directory without other configuration.
- Method 2: Enter the supermap_iserver _ * _ linux64 root directory, place your trial license file to the specified file location, execute the following command:
./licensetool.sh -update/pathname/*.lic
or
./licensetool.sh -update/pathname/*.lic7c
or
./licensetool.sh -update /pathname/*.lic9d
Managing license information
With License Management, you can view licensing status, update licenses, borrow /lend license, return license, and so on.
Viewinging the license status
License status query can be done by executing the following command in the product root directory:
./licensetool.sh -s
The license status information is listed as the product ID, the module ID, the product name, the license type (both the official version and the trial version), the number of licenses, and the license expiration time.
Updating license
Specify the obtained official *.v2c license file to the file location, execute the following commands:
/licensetool.sh -update/pathname/*.v2c
The following different kinds of files are supported updating. They have different purpose:
- License activation file (*.v2c), used to activate the purchased official license on the current computer. You need to acquire the local information to generate the license activation file firstly.
- File license for 7C (*.lic7c), used to update the trial license of 7C series products on the current computer. You need to generate the running report of the computer firstly.
- File license for 8C (*.lic), used to update the trial license of 8C series products on the current computer. You need to generate the running report of the computer firstly.
- File license for 9D (*.lic9d), used to update the trial license of 9D series products on the current computer. You need to generate the running report of the computer firstly.
- File license for 10i (*.lic10i), used to update the trial license of 10i series products on the current computer.
- License lending credential (*.h2r), used to lend a license of the network file license to the current computer.
- License returning credential (*.r2h), used to return a lent license to the license server, which is generated by the computer who borrows the license.
Borrowing/Lending license
- Generate the borrow information file(* .id)
Run the following command on the target machine that needs to borrow the license to generate the borrow information file (* .id) for the machine:
./licensetool.sh –id *.id
- Set up to allow lending licenses
On the license server, enable the lending function:
- Open the browser, visit http://localhost:1947 or http://local IP:1947
- In the left Options click on the Configuration, enter the configuration page
- Click the Detachable License at the top right of the page to open the lend configuration page
- Check the Enable Detaching of Licenses to allow the license to be lent
- You can also set the lending restrictions according to the real situation, such as Max. Detach Duration, etc.
- Generate the lending credential file
Run the following command on the server that lends the license to generate the loan document:
./licensetool.sh -detach [daycount] [productid] [idfile] [h2rfile]
Example: (lend for 2 days, the product ID is 1, server1.id is the information file of the machine who borrows the license, mylicense.h2r is the credential file for lending)
./licensetool.sh -detach 2 1 server1.id mylicense.h2r
Where:
- daycount, the number of days that need to be lent, and can not exceed the maximum lent time
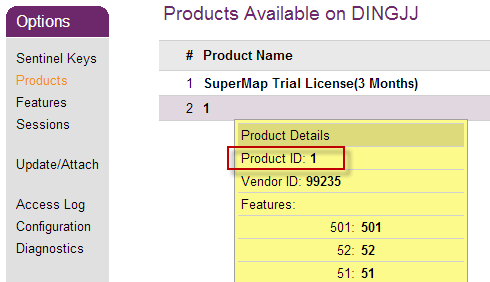
- productid, the ID of the lent product, you can view the product ID by http://localhost:1947 on the Products page.
- idfile, the information file (* .id) of the machine that borrows the license.
- h2rfile, credential file for lending (* .h2r)
- Configure the borrowed license
After obtaining lent credential file (* .h2r), you need to execute the command to update the license:
./licensetool.sh –u *.h2r
Returning license
First check the KeyID used to get the returning credential file. The KeyID can be viewed from the license information file of the local machine, which can be generated by executing infofile command as follows, where pathname shows the output path for the license information file.
./licensetool.sh –infofile /pathname/
After executing the above command, a license information file with the suffix .xml is generated in the specified directory, where <attach> is true indicates that the value of <KeyID> is available.
Then execute the following command with the obtained KeyID from the above steps to get the returning credential file (*.r2h):
./licensetool.sh –cd [KeyID] canceldetachfile
Run the license update command on the license server to complete the license returning.
./licensetool.sh –update *.r2h
You can see that the total number of licenses is automatically increased by checking the license status command.
./licensetool.sh –status