


Access Video
Video Control
There are "local video view control" and "live video view control" in the development process. The latter requires the introduction of DJI MSDK V4. Both local video and real-time video are accessed through corresponding video controls.
Local Video Control
- Introduce control
The local video control is UAVVideoEffectView, and its parent class is EffectView (EffectView inherits RelativeLayout). It has the ability to load local video and manage drone attitude parameters, and it can also be added to the program in the same way as Relativelayout.
- UML diagram
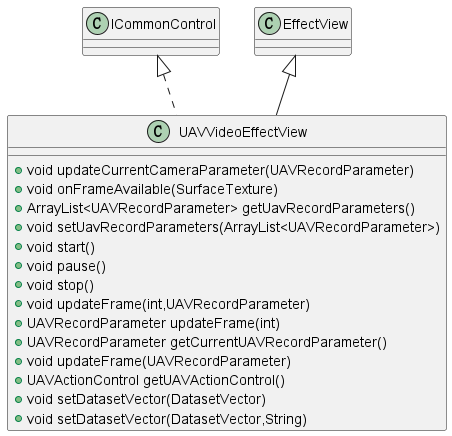
Figure: UML diagram
Real-time Video Control
- Introduce control
The real-time video control is DJIFPVEEffectView, and its parent class is also EffectView (EffectView inherits from RelativeLayout). It introduces DJI MSDK, which has the ability to display real-time video images and manage drone attitude parameters, and can also be added to the program in the same way as Relativelayout.
- UML diagram
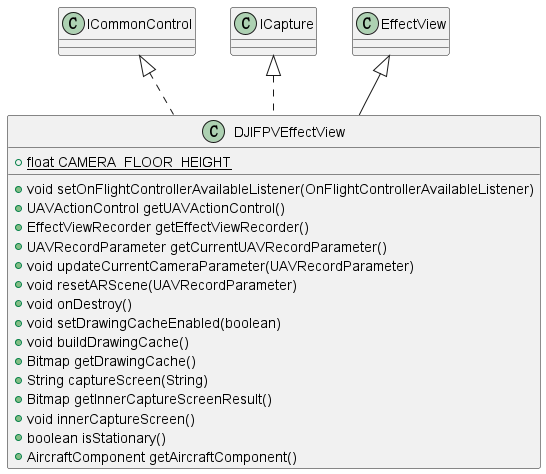
Figure: UML diagram - Use control
Please refer to the "Development Process" -> "Writing Code" section.
Video Data
- Data Specification
In the current version, there are two ways to access video. One is to access through attitude video (attitude data + video file), and the other is to load the video dataset configured by SuperMap iDesktopx.
The latter is recommended here. The video dataset contains pose information and the path of the video resource, just copy it to the mobile device (mobile phone, tablet).
- Pose video
When using the first method for video access, in order to ensure that the video scene can be opened normally and overlaid with the map accurately, it is necessary to check whether the following conditions are met:
- It is necessary to ensure that the video content has no distortion, no stretching, and no black borders.
- Make sure that the pose data (*.csv) includes at least the following parameters:
- Time value (time stamp), unit: us
- The longitude of the camera (usually the longitude of the drone)
- The latitude of the camera (usually the latitude of the drone)
- The height of the camera relative to the take-off position (usually the relative height of the drone)
- The yaw angle of the camera (pay attention to distinguish the yaw angle of the drone)
- The pitch angle of the camera (pay attention to distinguish the pitch angle of the drone)
- The roll angle of the camera (pay attention to distinguish the roll angle of the drone)
- The camera's vertical field of view, horizontal field of view or 35mm equivalent focal length (choose one of the three)
When the CSV file is available and compliant, use the following method to read the CSV file to get the UAV parameter set.
UAVCsvReader uavCsvReader = new UAVCsvReader(getApplicationContext(), new UAVCsvReader.OnReadUpdateListener() { @Override public void onUpdate(UAVRecordParameter currentPara, String[] value) { //value[i] corresponds to the corresponding column of the csv file currentPara.setUnixTimeStamp(Long.parseLong(value[1])); currentPara.setSensorLongitude(Double.parseDouble(value[2])); currentPara.setSensorLatitude(Double.parseDouble(value[3])); currentPara.setPlatformHeight(Float.parseFloat(value[4])); currentPara.setYaw(Float.parseFloat(value[5])); currentPara.setPitch(Float.parseFloat(value[6])); currentPara.setRoll(Float.parseFloat(value[7])); currentPara.setVerticalFOV(Float.parseFloat(value[8])); currentPara.setHorizontalFOV(Float.parseFloat(value[9])); } }); ArrayListuavRecordParameters = uavCsvReader.readFileFromSdCard(SDCARD + "/SuperMap/UavDemo/record.csv"); uavVideoEffectView.setUavRecordParameters(uavRecordParameters); When MP4 files are available, add MP4 to the scene by the following method.
uavVideoEffectView.setDataSource(SDCARD + "/SuperMap/UavDemo/record.mp4");
Video Dataset
Video dataset is a data type supported by SuperMap iDesktopX and SuperMap iMobile.
The video dataset can import one or more videos, and the dataset stores information such as video path, video registration, range, etc., which is convenient for video storage and management.
After creating a new video dataset in SuperMap iDesktopX, the pose video (pose data + video file) can be imported by importing "Camera Parameters" and "Video File". For more iDesktopX video dataset production process, please refer to the link:https://help.supermap.com/iDesktopX/1101/zh/tutorial/SpecialFeatures/ARMap/NewARDataset.
The video dataset produced by SuperMap iDesktopX can be loaded on mobile devices through the following code.
DatasetVector video= (DatasetVector) datasource.getDatasets().get(0);
uavView.setDatasetVector(video);
Video Linkage
2D Map Linkage
Video Delivery
- Functional description
Realize the effect of overlaying video frames on a two-dimensional map.
- Function realization
Based on the AR and Mapping modules, use the CameraWindowRenderer class.
The key code is as follows:
CameraWindowRenderer renderer = new CameraWindowRenderer(arView,map,CameraWindowRenderer.RenderType.VIDEO_FRAME);
renderer.setEnabled(true);//Enable
Then add the renderer.refresh() method in the OnUpdateListener callback of the video control, so that the video screen can be updated synchronously on the two-dimensional map. (Note: You can also use a method similar to a timed task)
- Example effect
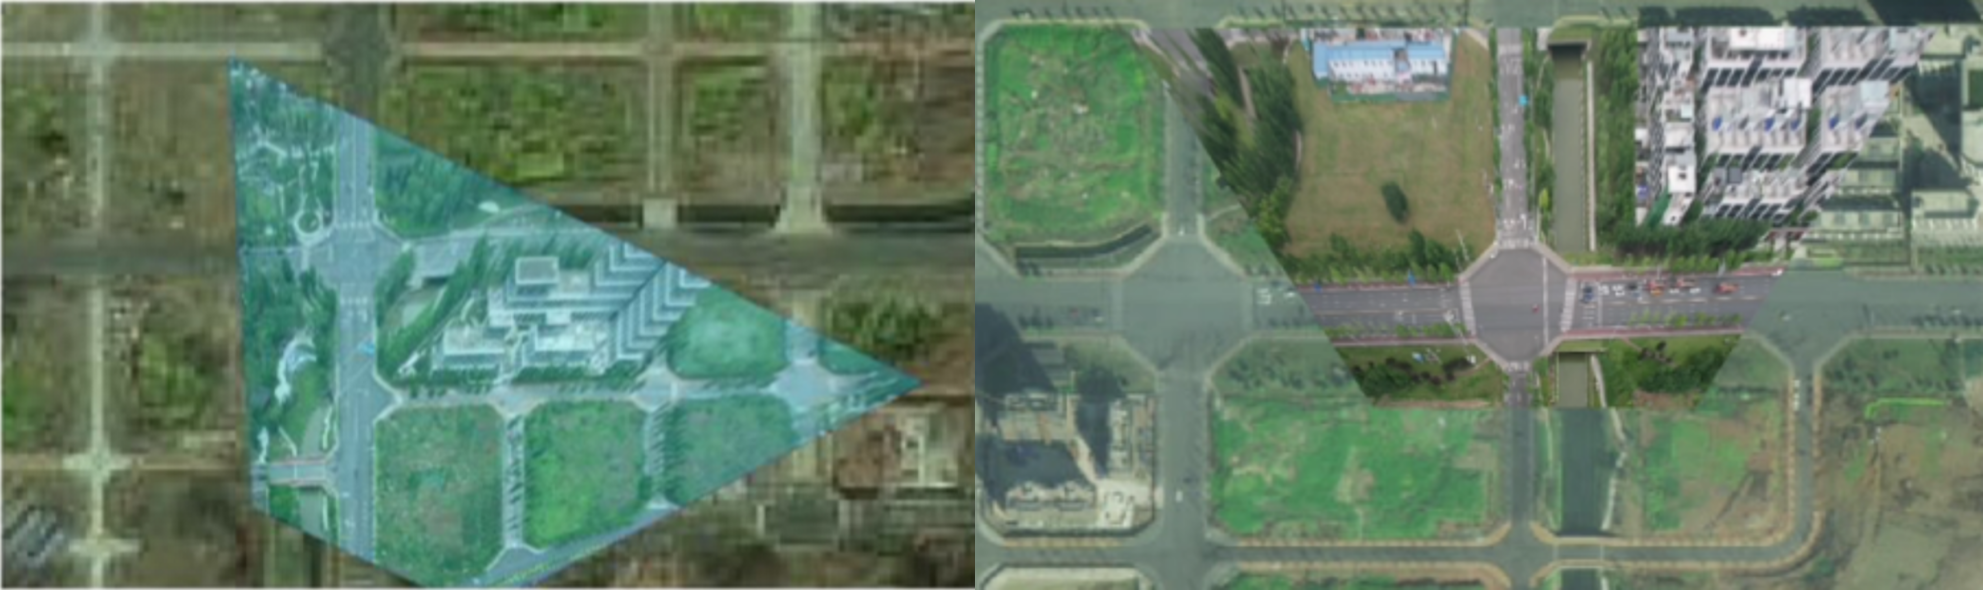
Figure: Visualization models (default styles) - Note
- When using CameraWindowRender, you need to ensure that com.supermap.ai.jar is introduced.
- com.supermap.ai has opencv dependencies, so it is necessary to prevent additional dependencies on opencv.
Camera field of view
- Functional description
Realize displaying the visible range of the camera on a two-dimensional map.
- Function realization
Based on the AR and Mapping modules, use the CameraWindowRenderer class.
The key code is as follows:
CameraWindowRenderer renderer = new CameraWindowRenderer(arView,map,CameraWindowRenderer.RenderType.VIDEO_FRAME); renderer.setEnabled(true);//Enable - Example effect
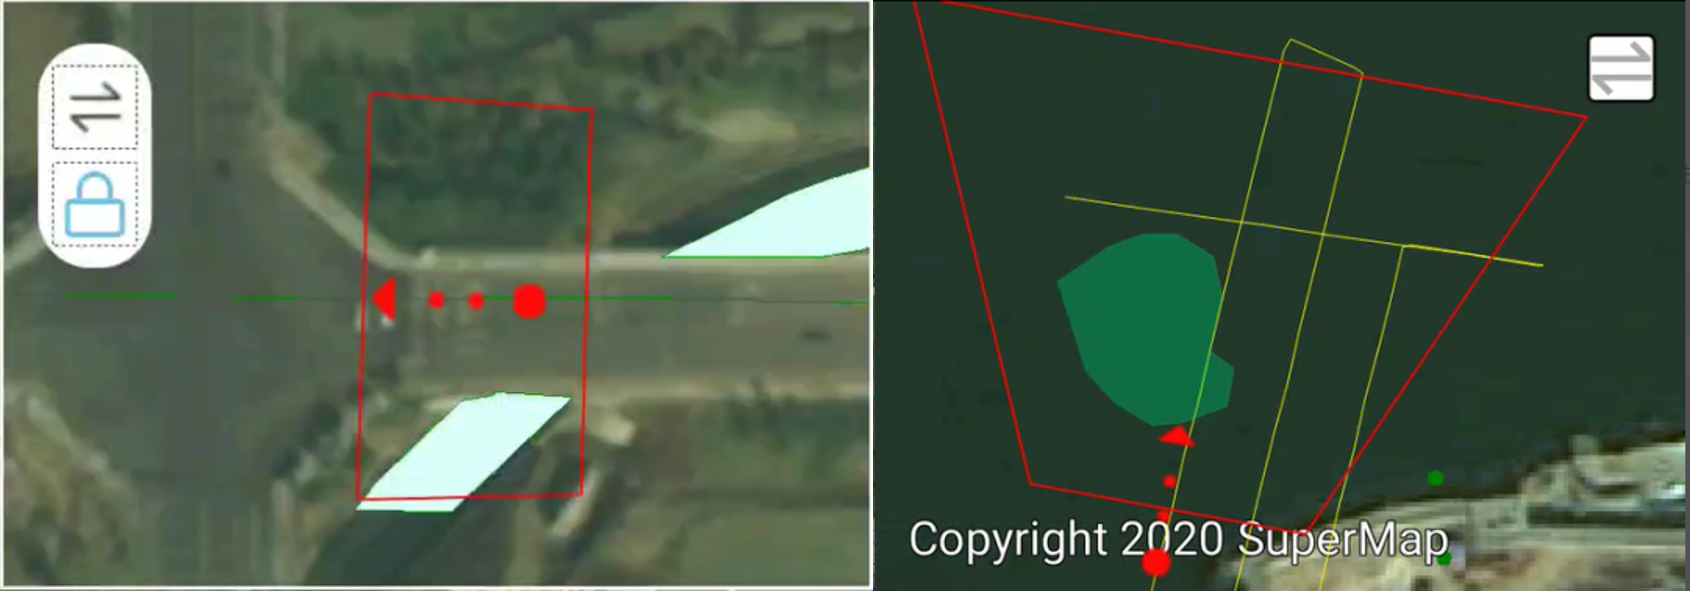
Figure: Example effect
3D scene linkage
Video Delivery
- Functional description
Realize the effect of overlaying video frames on a 3D map.
- Function realization
Based on the Realspace and AR modules, use the ProjectionImage class.
The key code is as follows:
effectView.innerCaptureScreen(); bitmap = effectView.getInnerCaptureScreenResult(); UAVRecordParameter parameter = effectView.getCurrentUAVRecordParameter(); if (parameter == null){ return; } if (!create) { projectionImage = new ProjectionImage(sceneControl.getScene()); create = true; }else { projectionImage.clear(); } projectionImage.setHintLineVisible(true); projectionImage.setHintLineLength(100.0f); projectionImage.setPosition(new Point3D(parameter.getSensorLongitude(),parameter.getSensorLatitude(),parameter.getPlatformHeight())); projectionImage.setHeading(parameter.getYaw()); projectionImage.setPitch(parameter.getPitch()); projectionImage.setRoll(parameter.getRoll()); projectionImage.setHorizontalFov(parameter.getHorizontalFOV()); projectionImage.setVerticalFov(parameter.getVerticalFOV()); projectionImage.setImage(bitmap); projectionImage.build(); - Example effect
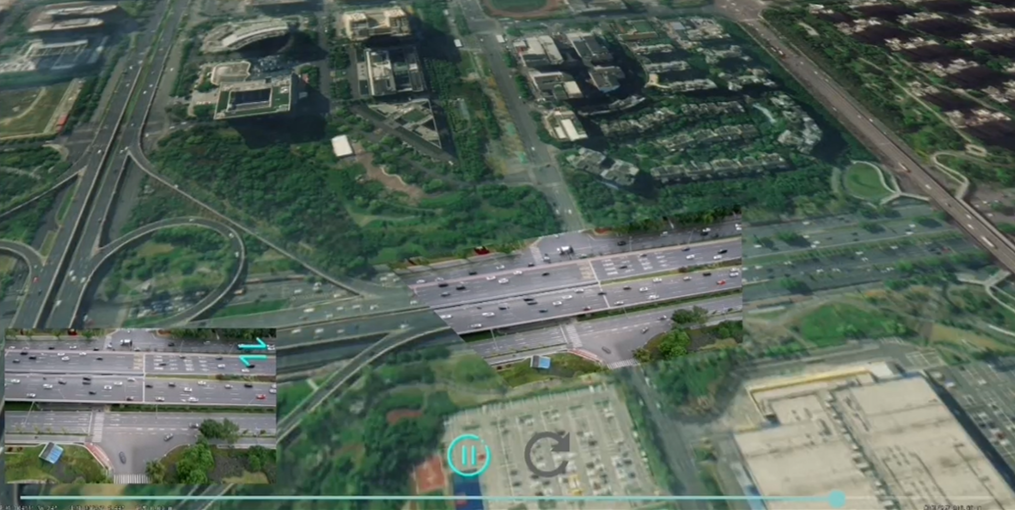
Figure: Example effect
Camera field of view
- Functional description
Realize displaying the visible range of the camera on a 3D map.
- Function realization
Based on the Realspace and AR modules, use the Viewshed3D class.
The key code is as follows:
viewshed3D = new Viewshed3D(sceneControl.getScene()); viewshed3D.setDistance(500); viewshed3D.setHiddenAreaColor(new Color(3,218,255,255)); viewshed3D.setVisibleAreaColor(new Color(3,218,255,255)); viewshed3D.setHintLineColor(new Color(0,255,0,255)); viewshed3D.build(); - Example effect
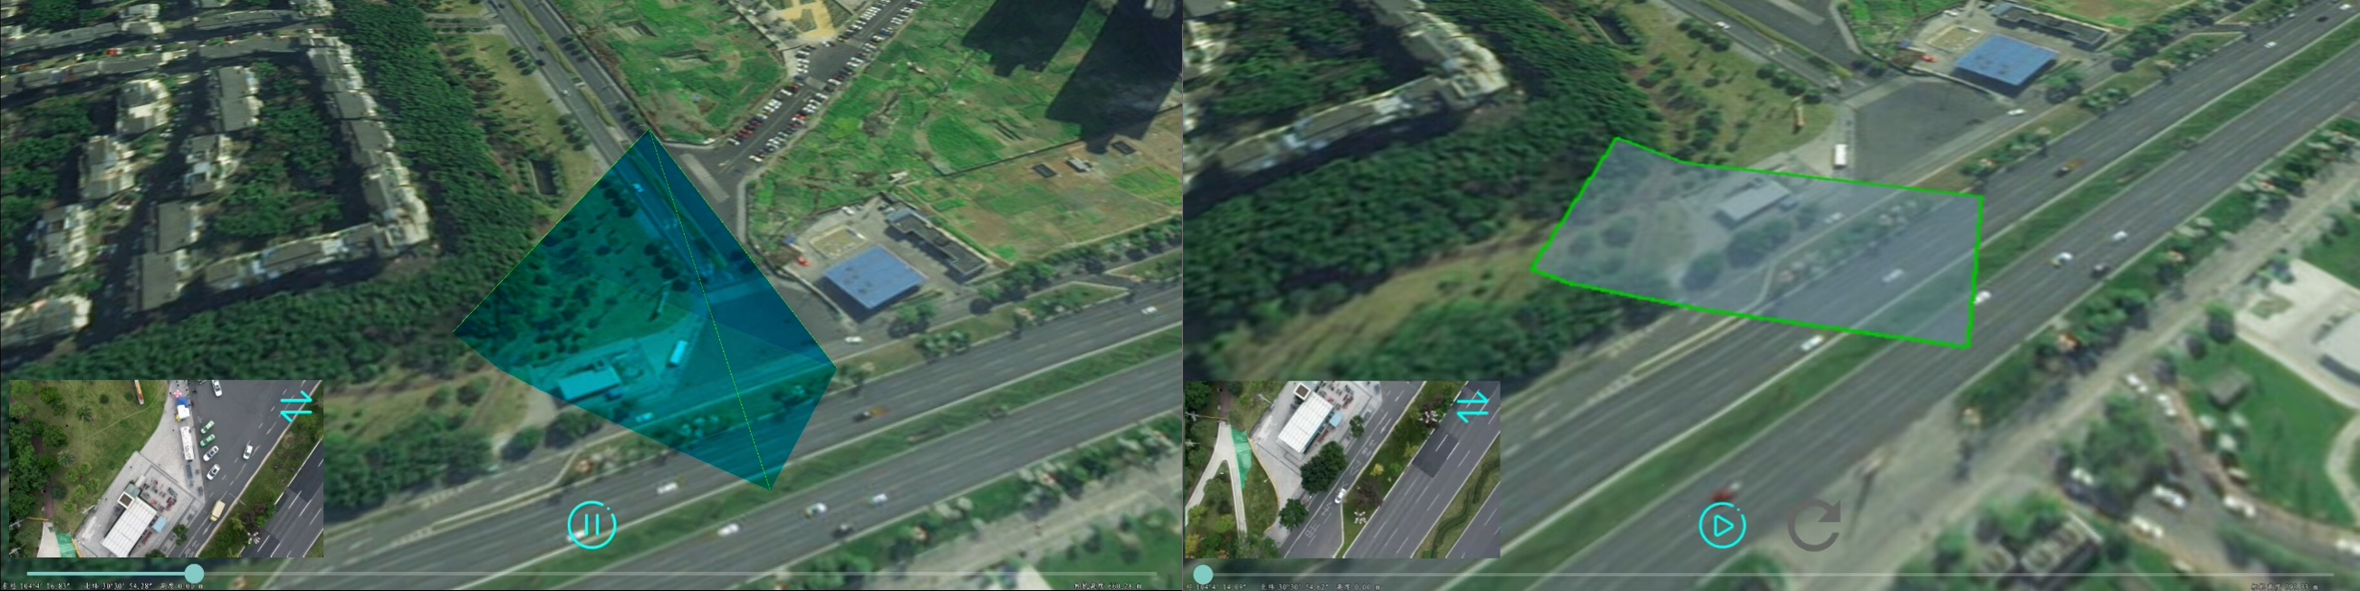
Figure: Example effect
Video picture in picture
- Functional description
Combine the 3D scene with the video screen, and play the video synchronously in a "picture-in-picture" manner.
- Function realization
Based on the Realspace and AR modules, update LookAt camera.
The key code is as follows:
public void updateLookAt(EffectView view, UAVRecordParameter parameter){ if (isCompleted() && parameter != null){ LookAt lookAt = getLookAt(view, parameter); sceneControl.getScene().setLookAt(lookAt); } } - Example effect
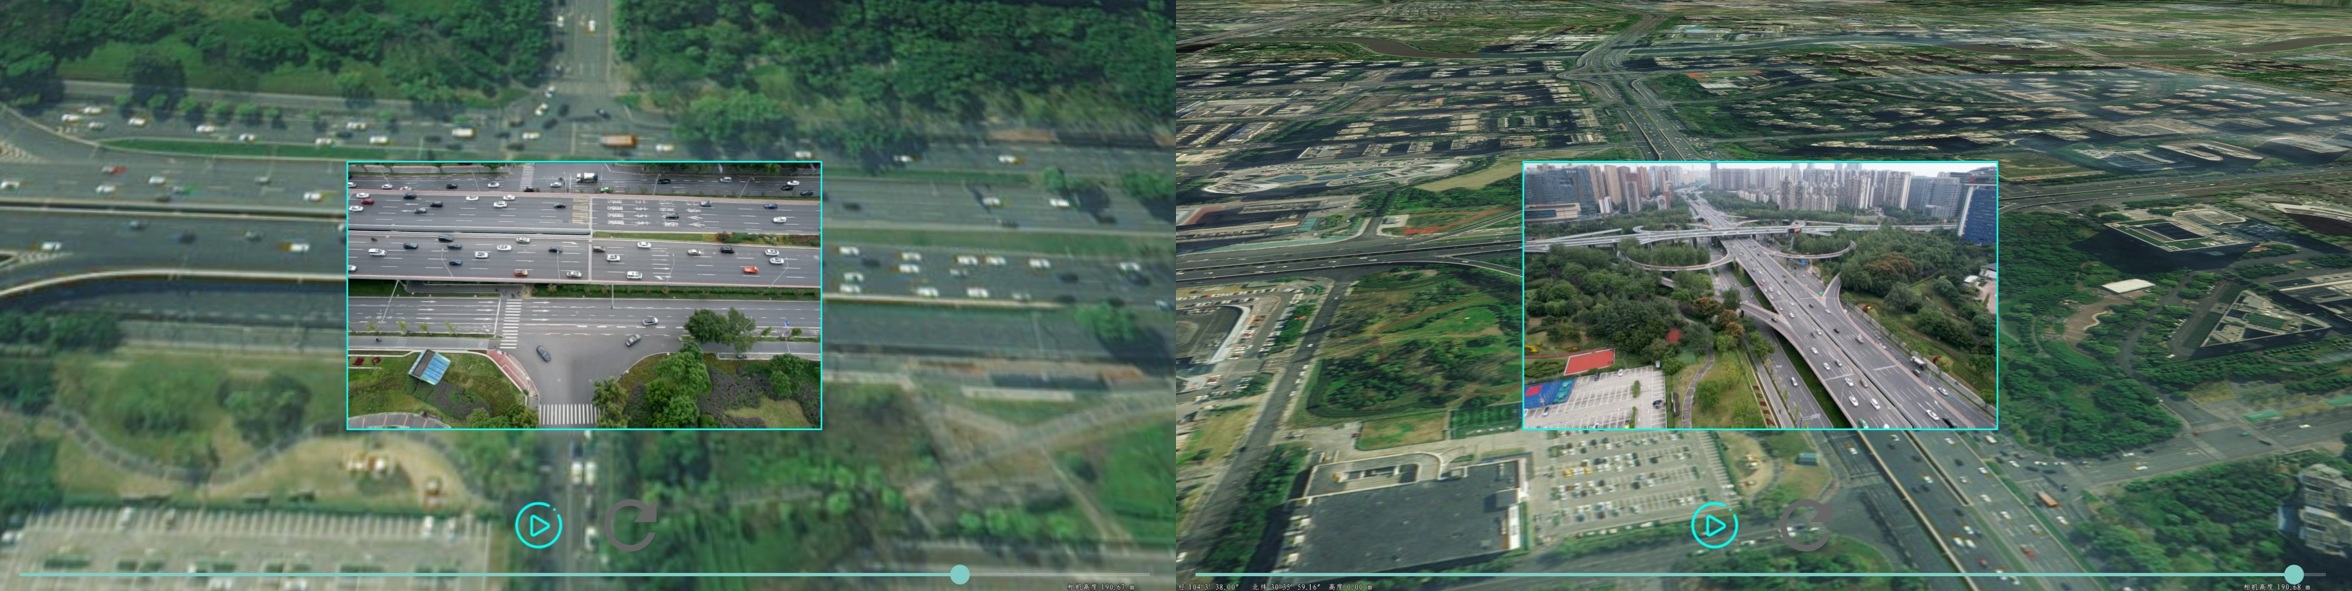
Figure: Example effect
Data Management
After starting a drone view, there will be a drone layer group automatically, and all added data needs to be managed through the layer group.
uavView.getUAVLayers();//Get drone layer group3D Scene
- Key codes
The current version supports overlaying the configured workspace scene on the UAV video scene.
The following code demonstrates how to get the layer group from the video control and how to add the scene to the layer group.
mUAVLayers = uavView.getUAVLayers(); /** * @param workspace Workspace * @param index Scene index */ mUAVLayers.fromScene(workspace,0); - Sample Application
Below is the load on desktop and mobile.
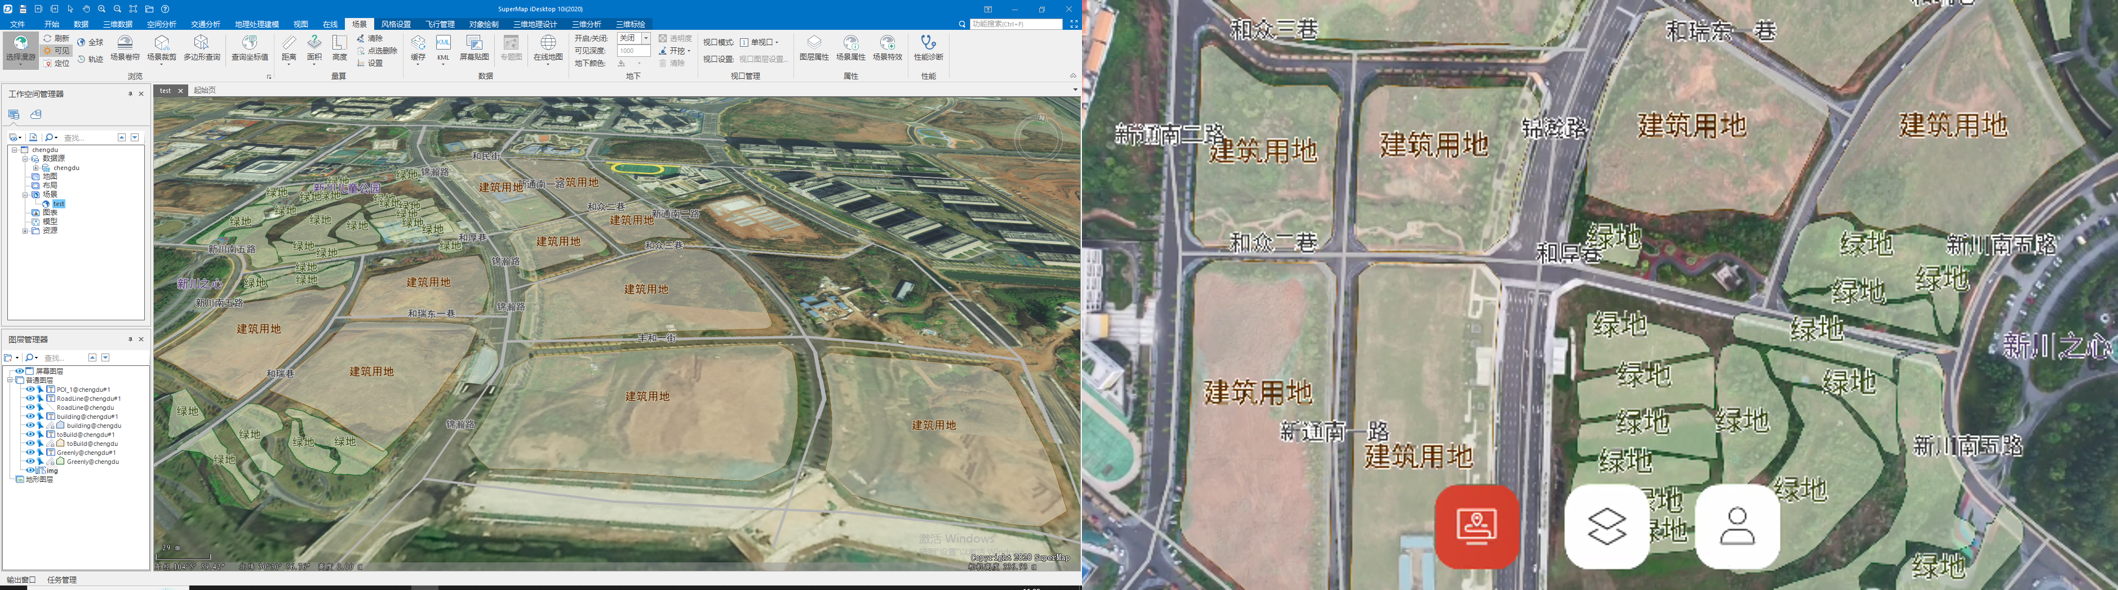
Figure: Load on desktop and mobile
Vector Data
- Key codes
The current version supports the overlay of vector (point, line, surface) datasets in the datasource to the UAV video scene.
The following code demonstrates how to add a polygon vector dataset to a group layer.
DatasetVector region= (DatasetVector) datasource.getDatasets().get(0);
mUAVLayers.add(region);
In addition, the current version also supports setting the layer style, supporting point symbol color, size; line symbol width, color; area symbol color, line width, line color, and transparency.
The sample code is as follows:
LayerStyle layerStyle=layer.getLayerStyle(); layerStyle.setAlpha(); layer.setPolygonColor(); - Sample Application
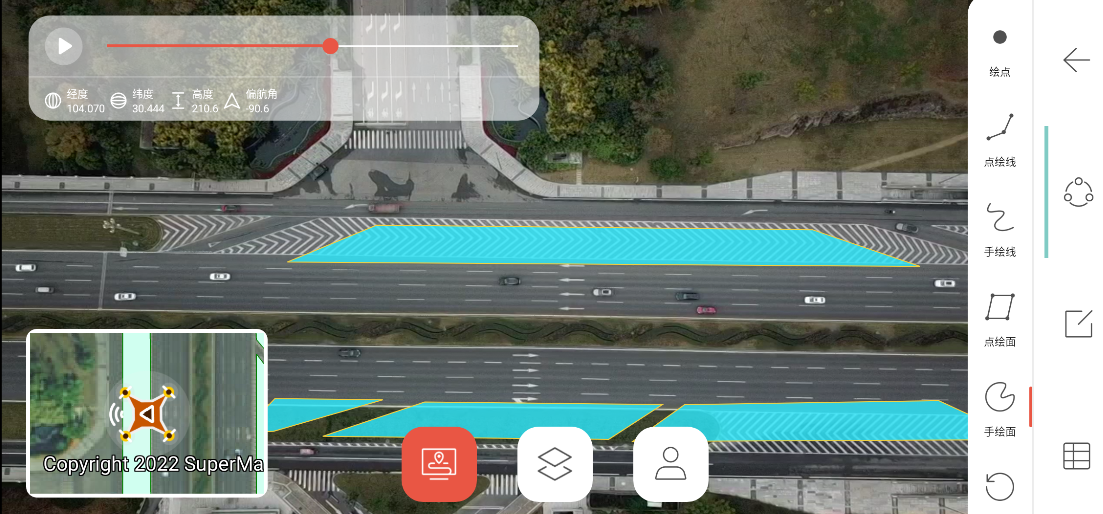
There are applications for the above functional interfaces in UAVSurvey.
A screenshot of loading the sample vector dataset is as follows:
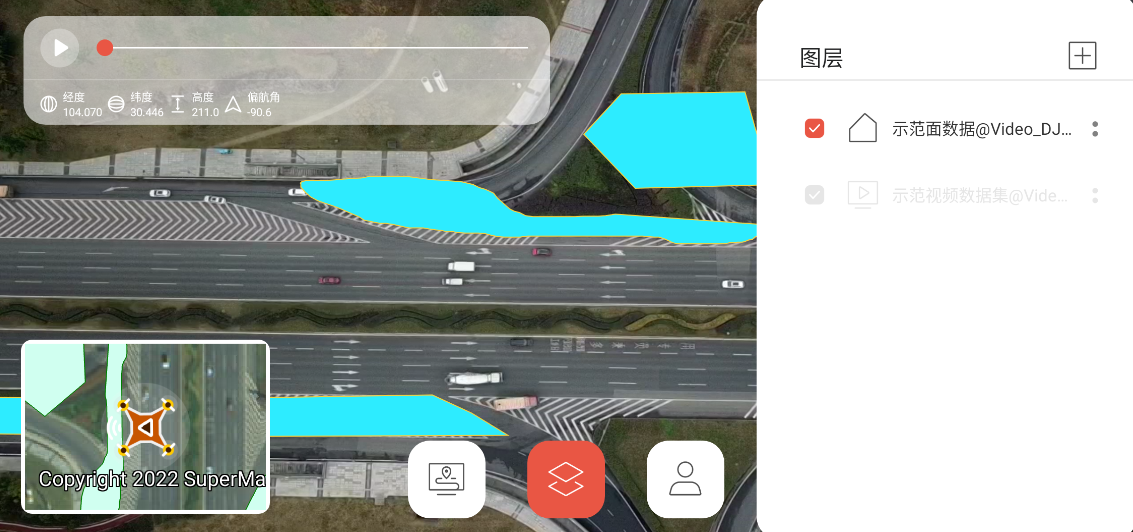
Figure: Loading the sample vector dataset The screenshot of the style modification is as follows:
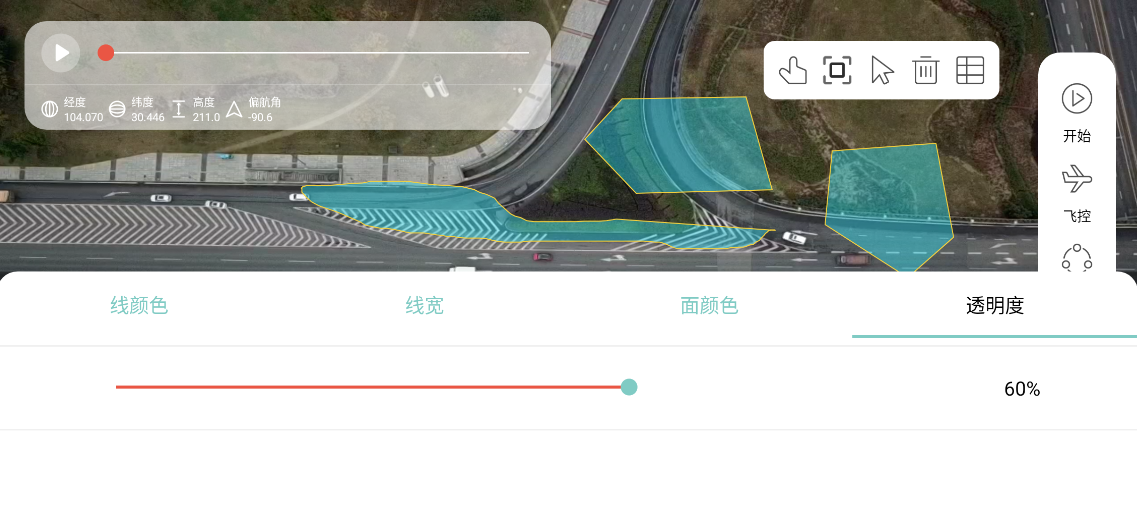
Figure: The screenshot of the style modification
KML Data
- Prepare data
First, configure a kml data in the spherical scene of SuperMap iDesktopX. The current version only supports POI, line, and surface elements in kml.
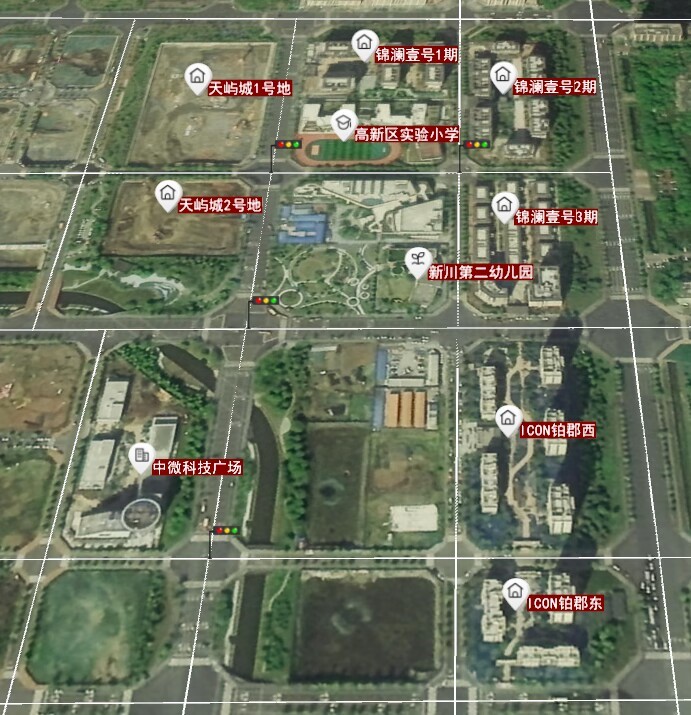
Figure: Data in the spherical scene of SuperMap iDesktopX - Key codes
The following code demonstrates loading the file into the drone scene
String kmlPath= PathConfig.UAV_User_KML+"city.kml"; mUAVLayers.addKmlLayer(kmlPath); - Sample application
There are applications for the above functional interfaces in SuperMap UAVSurvey, and the measured screenshots are as follows:
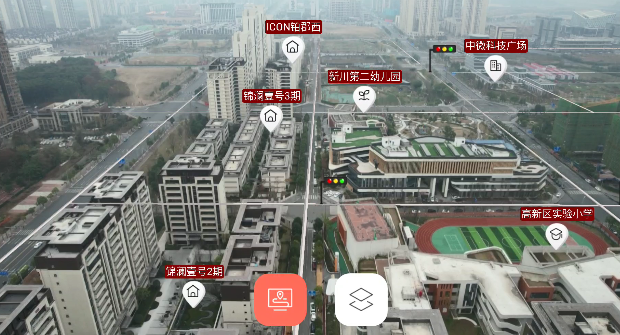
Figure: The measured screenshots More KML data loading is as follows:
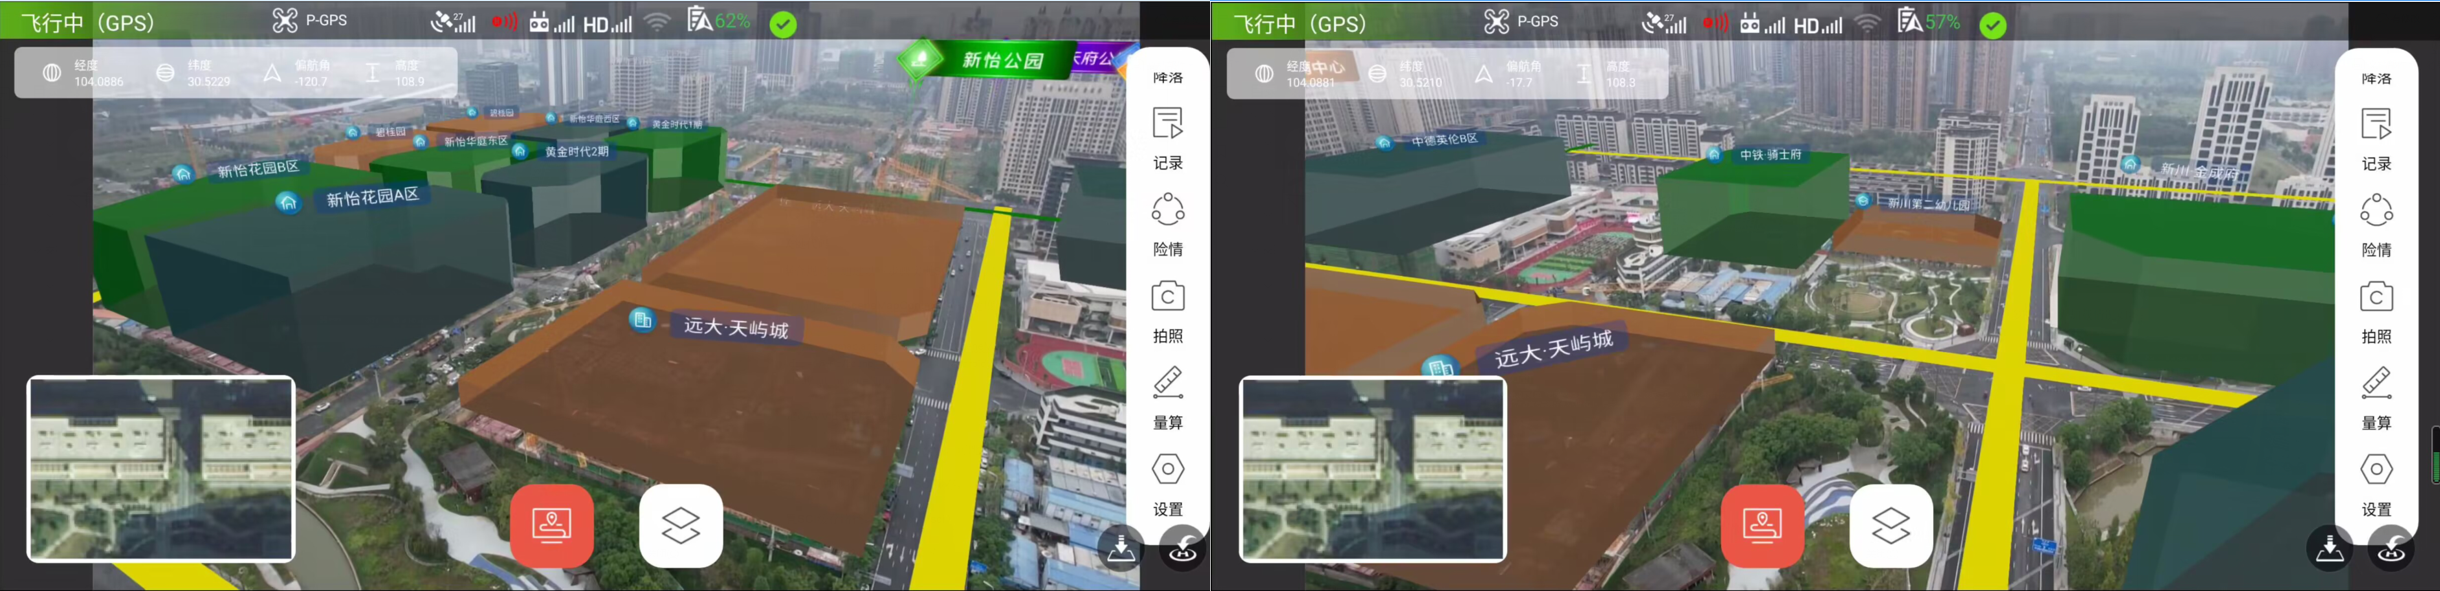
Figure: More KML data loading
SCI Map Cache
- Key codes
When the data is compliant, load the SCI cache through the following steps.
- Add the SceneMapControl control to the layout, the width and height settings have no effect.
- Bind the UAVVideoEffectView control.
- Set up the workspace. (Only open the SCI cache, you can skip this step)
- Open the specified map. (Only open the SCI cache, you can skip this step)
- Set the SCI cache path. (points to xxx.sci)
- Enabling caching. The sample code for steps 2-6 is as follows:
sceneMapControl = findViewById(R.id.scene_map); //Bind scene view sceneMapControl.bindEffectView(uavVideoEffectView,/*Arithmetic square root of number of tiles*/5); //Get the map object and open the specified map Map map = sceneMapControl.getMap(); map.setWorkspace(DatasetVectorReader.mWorkSpace); map.open("thMap"); sceneMapControl.setCacheFolderPath(SDCARD+"/000MapCache/map3/map3.sci"); sceneMapControl.setUseCache(true); sceneMapControl.setRefreshListener(new SceneMapRefreshListener() { @Override public void onRefresh(RefreshStatus refreshStatus) { Log.i(TAG, "onRefresh: " + refreshStatus.toString()); } }); - Refresh the map by calling the refresh method. In addition, in order to dynamically update the display range of map tiles, you can refer to the following code:
uavVideoEffectView.addOnUpdateListener(new EffectView.OnUpdateListener() { @Override public void onUpdate() { UAVRecordParameter currentUAVRecordParameter = uavVideoEffectView.getCurrentUAVRecordParameter(); if (currentUAVRecordParameter != null){ sceneMapControl.refresh(uav.getSensorLongitude(),uav.getSensorLatitude(),/*Zoom*/18); } } });
<com.supermap.ar.areffect.uav.map.SceneMapControl android:id="@+id/scene_map" android:layout_width="1dp" android:layout_height="1dp"/> - Sample Effect
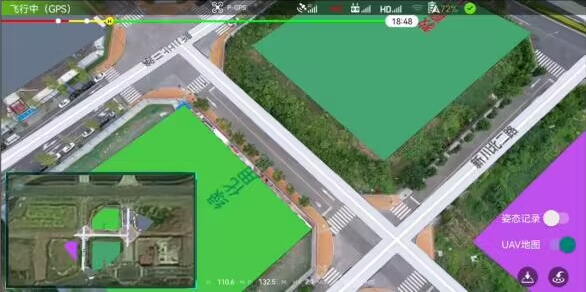
Figure: Sample Effect - Note
In the current version, you need to ensure that the sci cache meets the following conditions when generating tiles through SuperMap iDesktopX:
- Make sure that the coordinate system of the tile is WGS_1984/Web_Mercator (EPSG Code 3857).
- The subdivision method is "global subdivision".
- The storage type is "original".
- The currently supported image types are PNG, WEBP, and JPG. When you need a transparent background, you need to check the background transparent, and JPG cannot be used.
- The block size is recommended to be "1024x1024", the larger the block size, the larger the range displayed in the UAV scene.
- Note: After generating tiles, you need to check whether the level corresponding to the folder of the resulting tile is consistent with the level selected for tile generation.
Model Data
It supports the two-dimensional surface data to generate a white model by stretching the height. The renderings are as follows:/p>
 |
| Figure: The renderings |
Model files in gltf2.0 format can also be loaded by linking model resource paths through attribute data. The key screenshots are as follows:
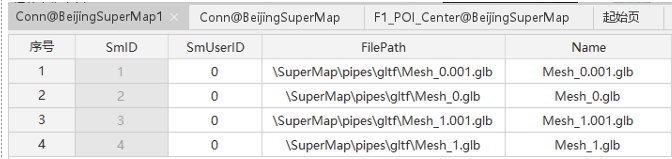 |
| Figure: The key screenshots |
Interactive Operation
Gesture Types
The current version supports the following multiple action types.
| Gesture types | Description |
|---|---|
| PAN | Pan gesture (zoom) |
| CREATE_POINT | Draw point |
| CREATE_LINE | Draw line |
| MEASURE_DISTANCE | Measure distance |
| MEASURE_AREA | Measure area |
| com.supermap.track.jar | Measure distance |
| MEASURE_HEIGHT | Measure height |
| SELECT | Select |
| EDIT_NODE | Edit node |
| ADD_NOD | Add node |
| DELETE_NODE | Delete node |
Collect Data
Just modify the Action of ActionControl, the reference code is as follows:
mUAVActionControl = uavView.getUAVActionControl();//Get gesture controller
mUAVActionControl.setAction(UAVAction.NONE);The following is a screenshot of the effect realized in UAVSurvey based on this functional interface.
 |
| Figure: The screenshot of the effect realized in UAVSurvey |
Data Edit
- Key codes
Just modify the Action of ActionControl, the reference code is as follows:
UAVLayers.get(1).UAVBaseLayer.setEditable(true); mActionControl.setAction(UAVAction.SELECT); mActionControl.setAction(UAVAction.ADD_NODE); - Example effect
The following is a screenshot of the effect implemented in UAVSurvey based on this functional interface:
Modify data space information:
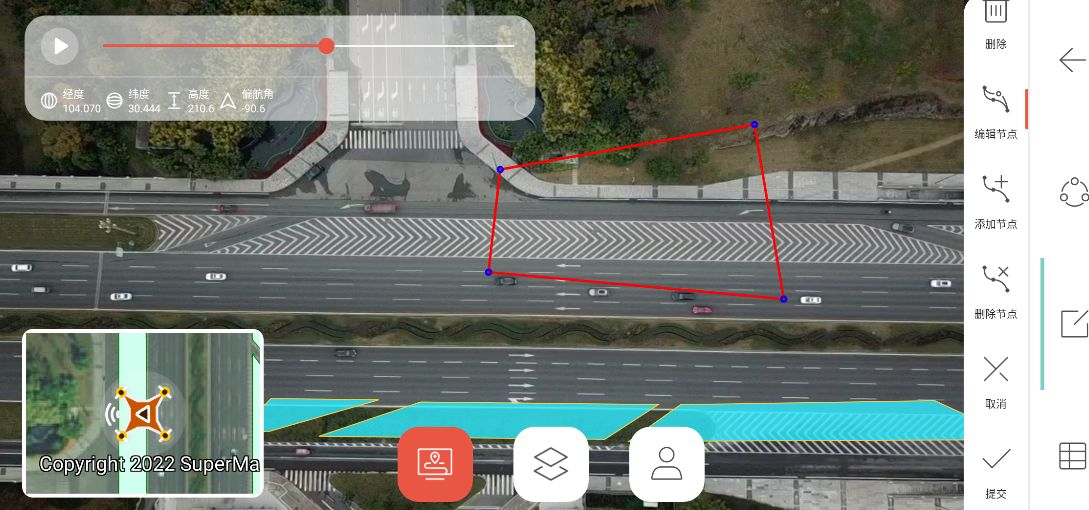
Figure: Modify data space information Modify data attribute information:
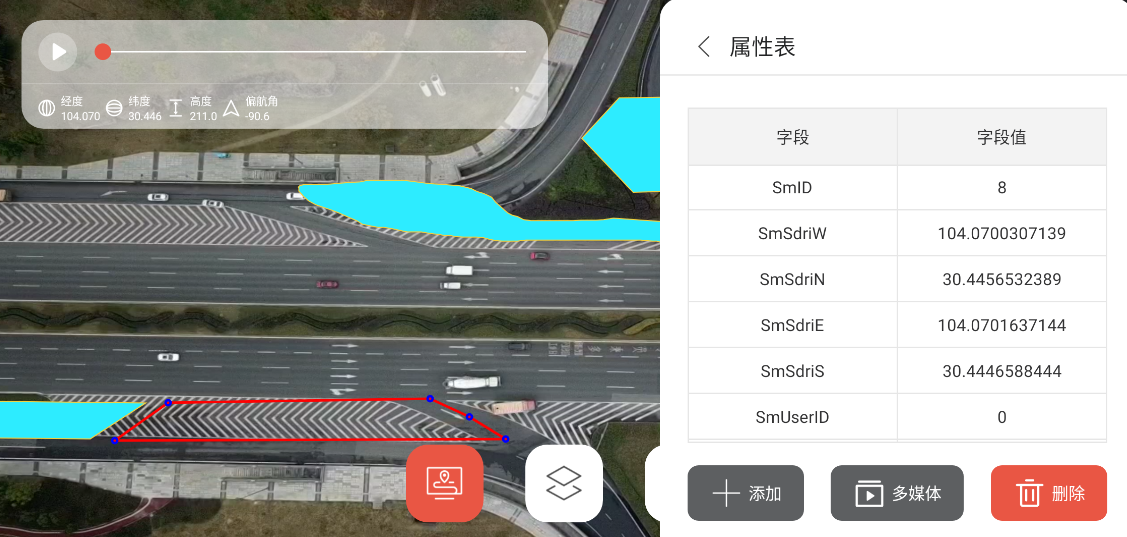
Figure: Modify data attribute information The data collected and edited by the above methods can be directly opened on SuperMap iDesktopX.
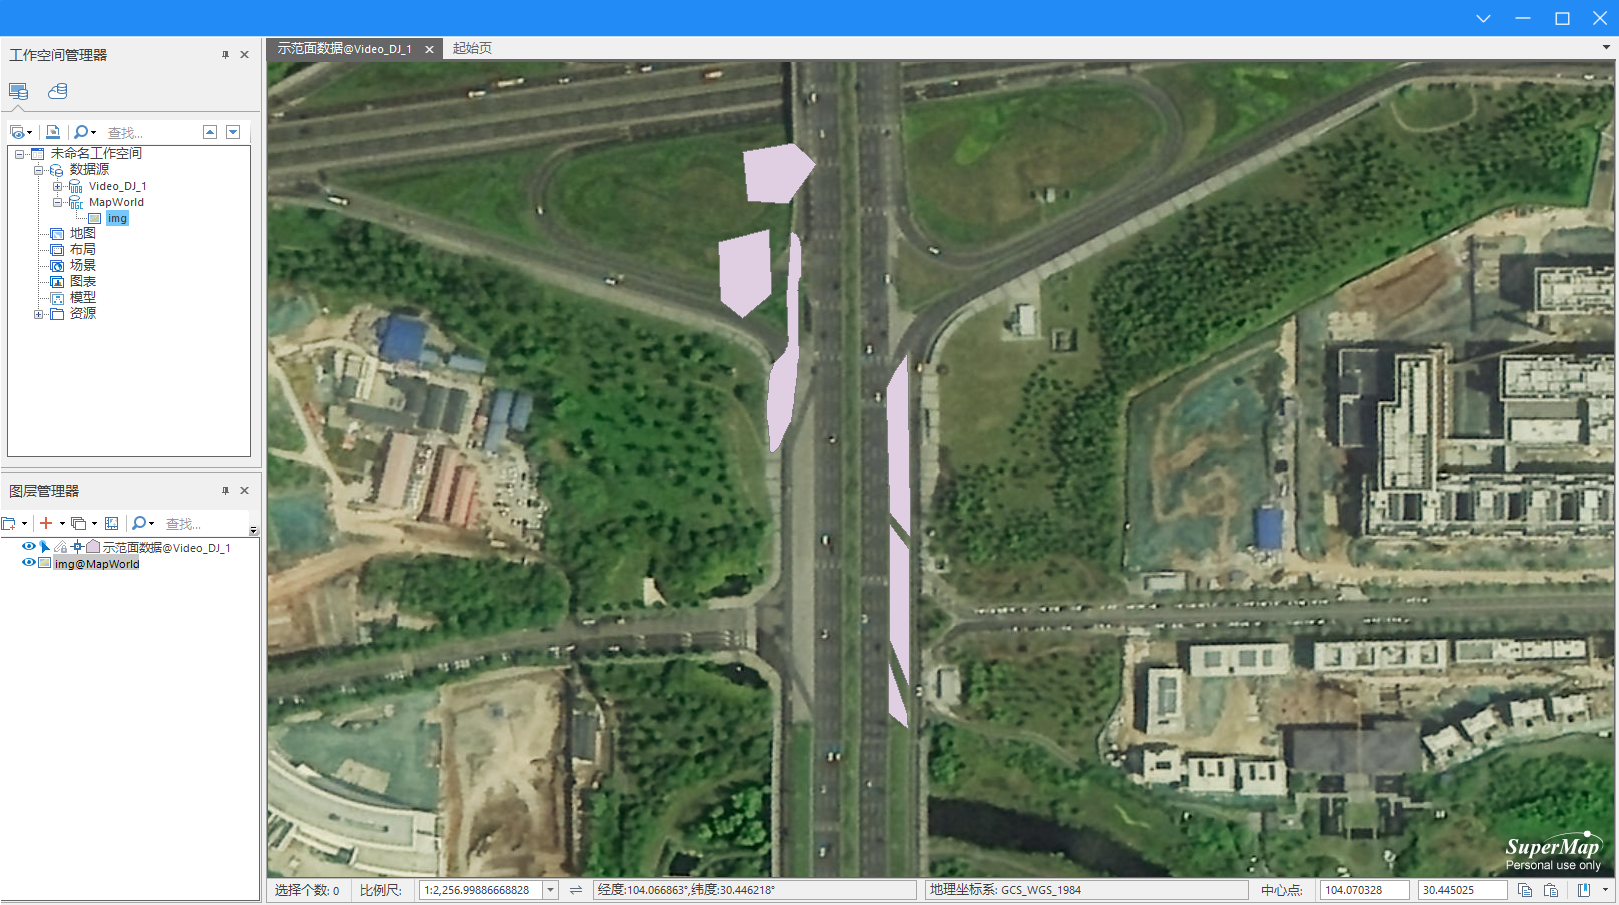
Figure: The data collected and edited by the above methods
Video Measurement
Currently supports three measurement methods of length, height and area. It should be noted that the measurement operation can only be performed on a flat surface.
Just modify the Action of ActionControl, the reference code is as follows:
mUAVActionControl.setAction(UAVAction.MEASURE_AREA);The following are the actual measurements of height, length and area:
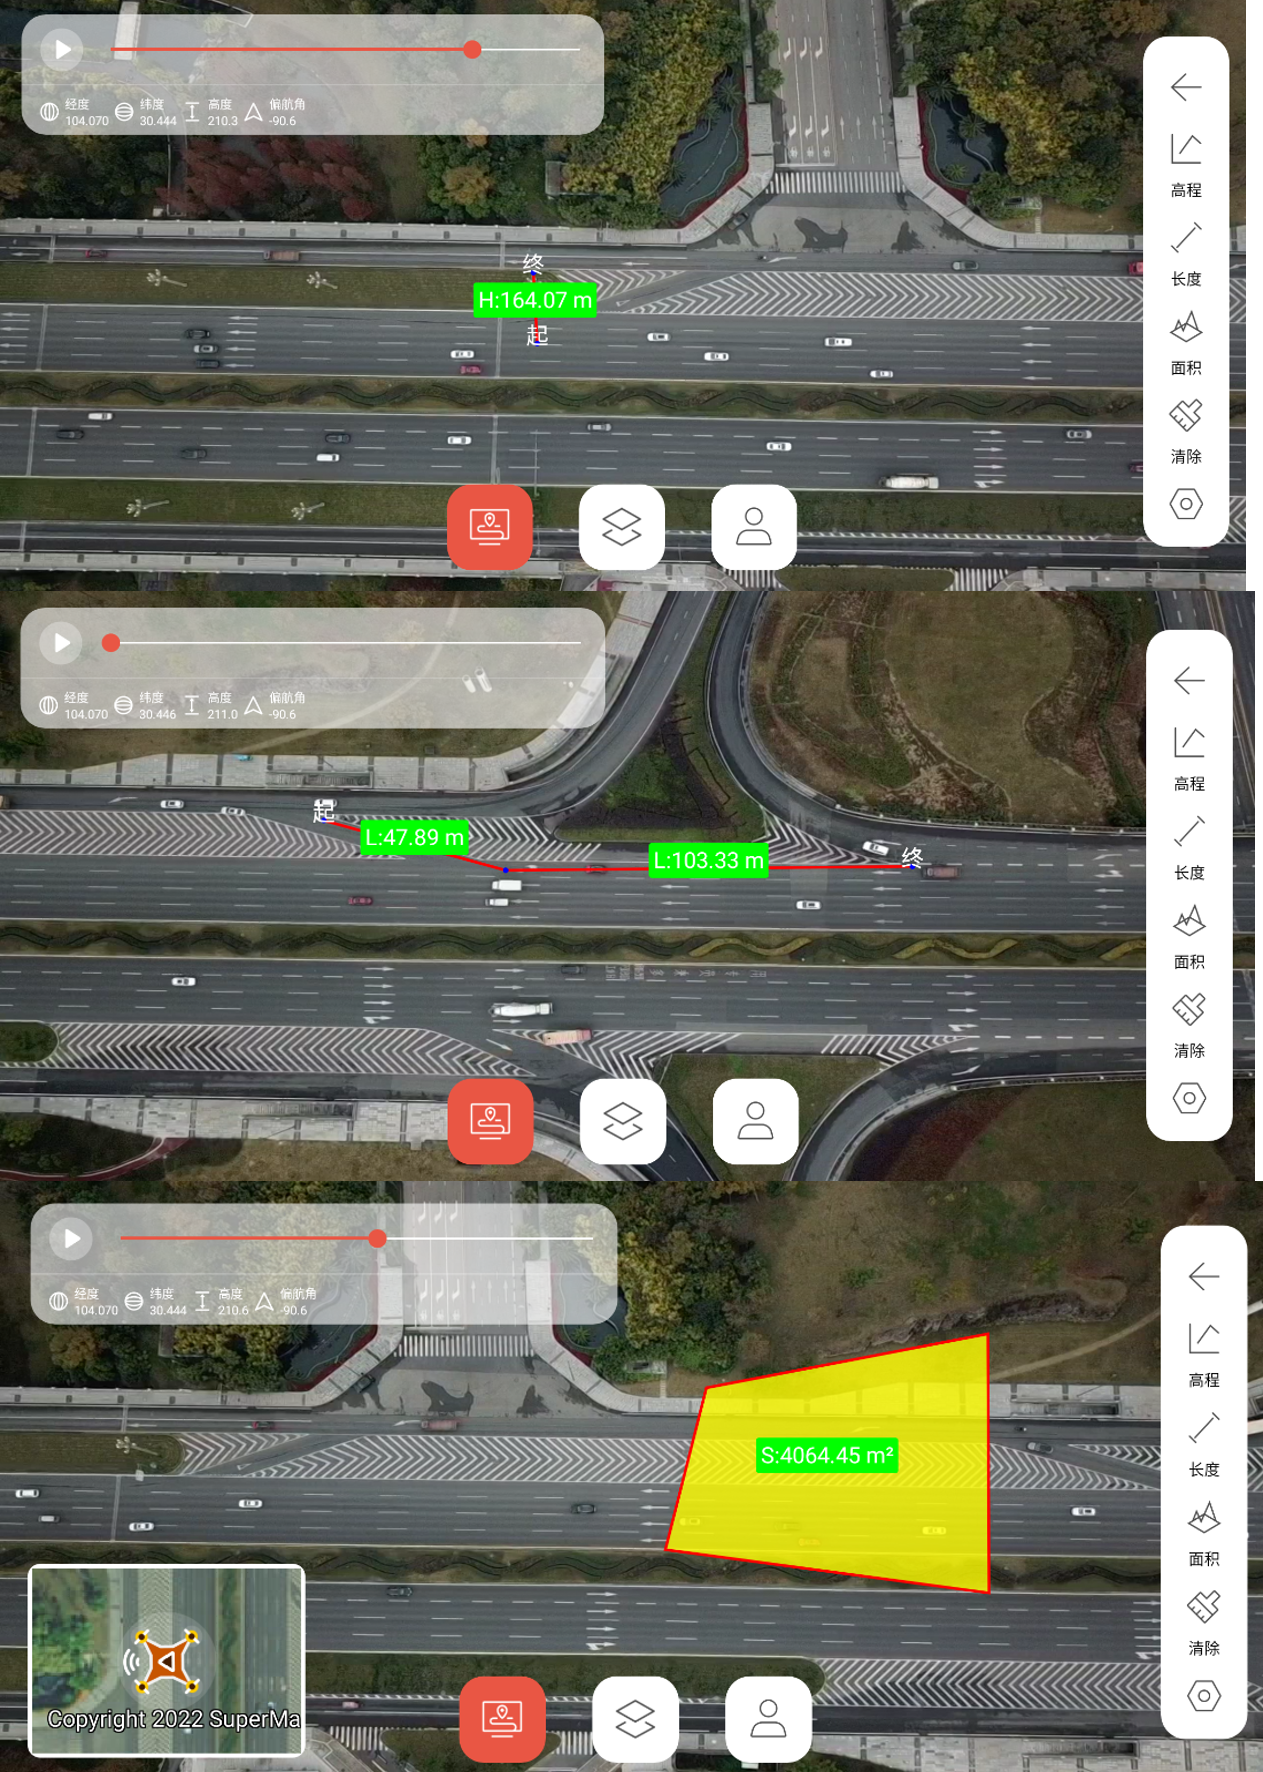 |
| Figure: The actual measurements of height, length and area |
Waypoint Mission
Regarding the realization of the waypoint task, here is divided into two parts: route planning and execution of flight missions.
Now you can use the following methods to plan the route and then execute the flight mission. You can also import the established waypoint set and use the waypoint set as the incoming parameter of the flight mission.
Route Planning
In the current version, route planning is mainly used to realize scenarios similar to aerial photography and multi-patch evidence.
Mapping aerial photography
The method of calculating waypoints by parameters such as flight altitude, lateral (sideways), longitudinal (direction) overlap rate, etc.
- Applicable scene
3D reconstruction of the photo shoot.
- Key methods
- Computes the set of waypoint coordinates that make up the route.
FlightPathHelper.calculateWayPoints(PathTaskParameter pathTaskParameter); - The route is calculated asynchronously based on the mission parameters.
FlightPathHelper.calculateWayPoints(PathTaskParameter pathTaskParameter, FlightPathHelper.OptimalSetting setting, PathResultCallback callback); - Computes the set of waypoint coordinates that make up the route.
FlightPathHelper.calculateWayPoints(Point3D a, Point3D b, Point3D c, float distance);
- Computes the set of waypoint coordinates that make up the route.
- Implementation steps
- Obtain the vertex set of the polygon (the scope of the graph) in an interactive way.
- Build the overlap parameter "OverlapParameter" (horizontal/side overlap ratio, flight height, camera horizontal/vertical field of view).
overlapParameter = new OverlapParameter(/*horizontal overlap rate*/0.8f,/*vertical overlap rate*/0.8f).setFov(/*horizontal FOV*/73.73f,/*vertical FOV*/53.17f); // Photo spacing (vertical non-overlapping distance) ySpaceDistance = overlapParameter.getCaptureSpacing(); //Route spacing (horizontal non-overlapping distance) xSpaceDistance = overlapParameter.getRouteSpacing(); - Build analysis parameters "PathTaskParameter" (heading, starting and ending point, path planning type).
DOUBLE_GRID Two-way grid, the main directions are perpendicular to each other GRID Grid-like (constructed in a parallelogram way) - Path calculation calculateWayPoints(PathTaskParameter pathTaskParameter).
FlightPathHelper.calculateWaypoints(new PathTaskParameter(PathPlanningType.GRID, ps,overlapParameter).setStartPosition(effectView.getCameraPosition()).setEndPosition(effectView.getCameraPosition()),FlightPathHelper.OptimalSetting.MIN_WAYPOINT,pathResult -> { //pathResult is the path result }); - Result parsing.
//Obtain the points that make up the route from the calculation result ArrayListpointList = pathResult.getPointList();
- Sample application
Based on the above interfaces, SuperMap UAVSurvey realizes the functions of waypoint/route planning, storage and selection. Details are as follows:
- Waypoint. Click to draw the waypoint to draw the waypoint, and save the task of changing the waypoint after submitting for selection during flight.
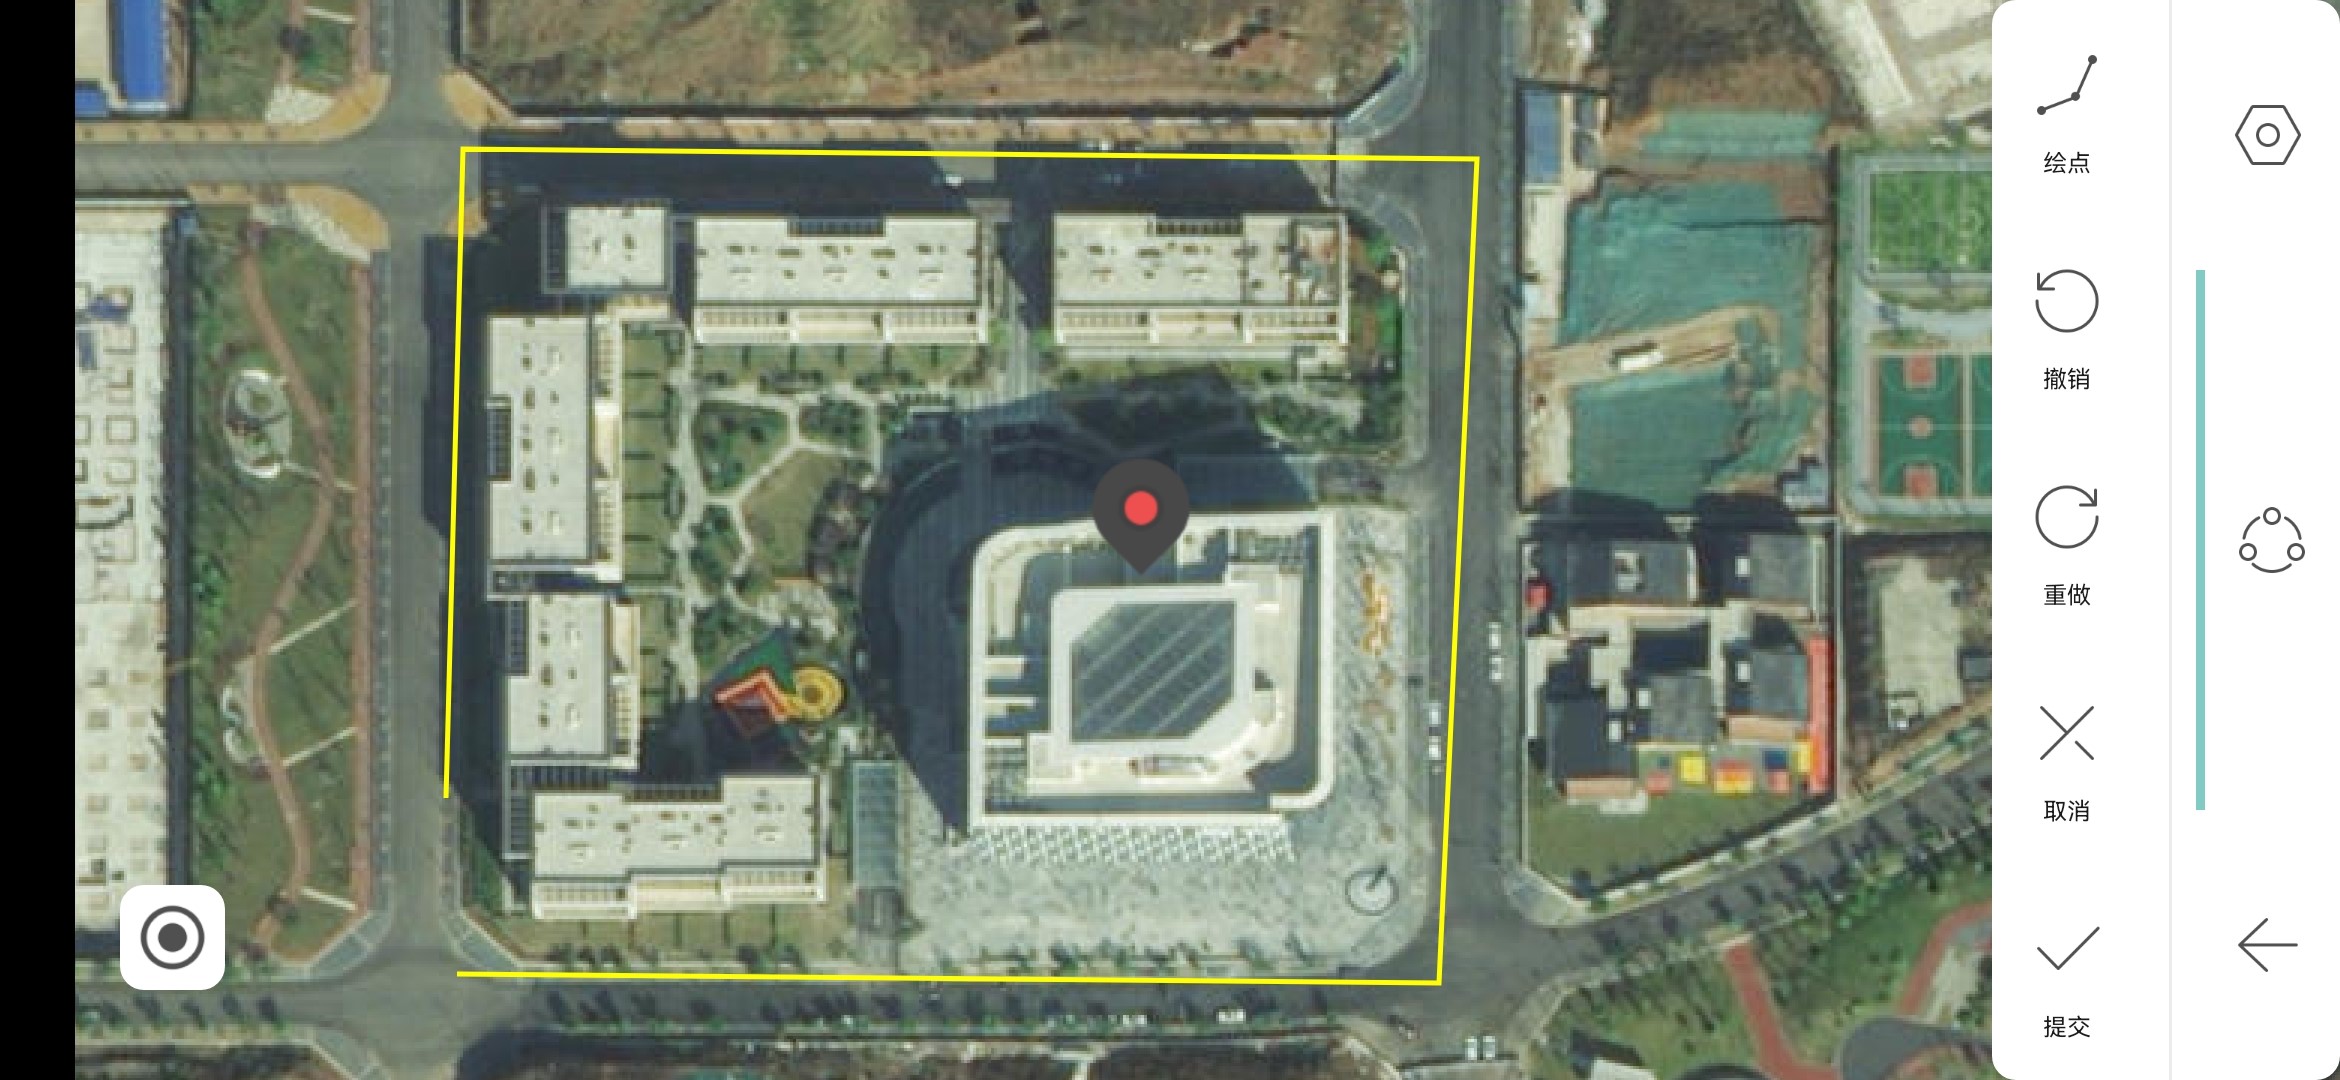
Figure: Save the task of changing the waypoint - Rectangle. Click to draw a point, and drag the rectangle until the size is appropriate. You can adjust various parameters of the route task in the settings on the right. Such as lateral/horizontal overlap rate, flight altitude, route type, etc.
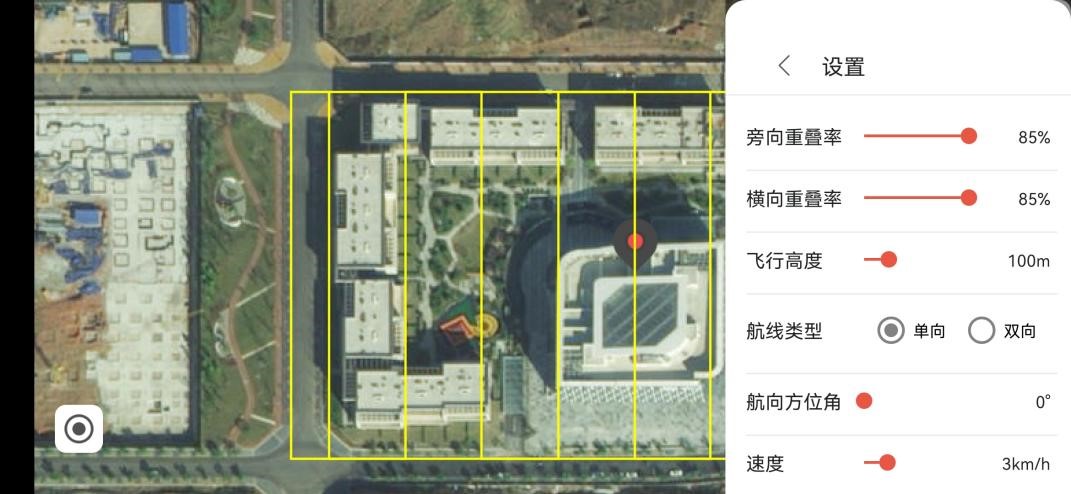
Figure: Adjust various parameters of the route task in the settings on the right - Polygon. Draw a point and click a single point to draw a polygon, and the others are consistent with the rectangle.
- Select. Select a saved waypoint or route mission, if the UAV is ready to take off or has already taken off when selecting, the UAV will automatically perform the flight mission after selection.
- Waypoint. Click to draw the waypoint to draw the waypoint, and save the task of changing the waypoint after submitting for selection during flight.
- Three-dimensional reconstruction
After the route is planned through the "Jiantu aerial photography" and the flight mission is taken, the obtained photos can be directly used for 3D reconstruction.
Take "GET3D Cluster" as an example, ContextCapture and PhotoScan are similar.
Specific steps are as follows:
- Data preparation. Export photos taken by airplanes. When using "Rebuild Master", the photos taken by the camera of the corresponding sortie need to be imported into the corresponding folder.
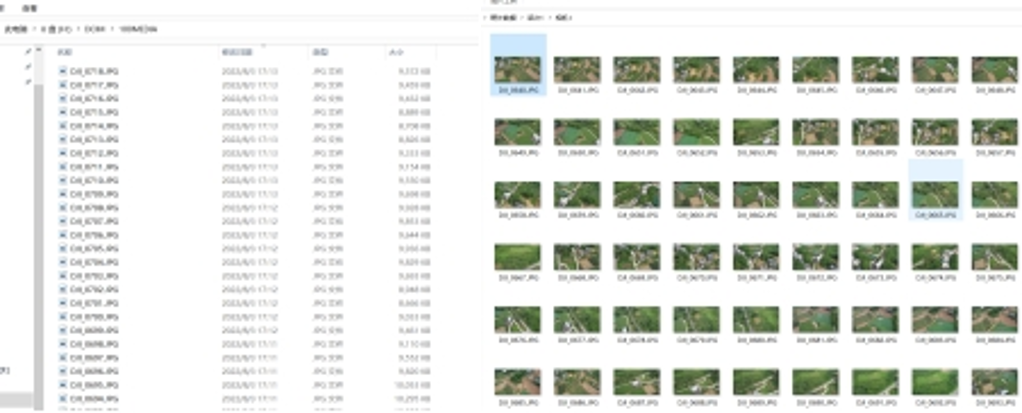
Figure: Data preparation - Import Data. Open GET3D Cluster->New Project->Import Picture->Select Location Type->EXIF (Note: Photos taken by DJI drones contain EXIF information).
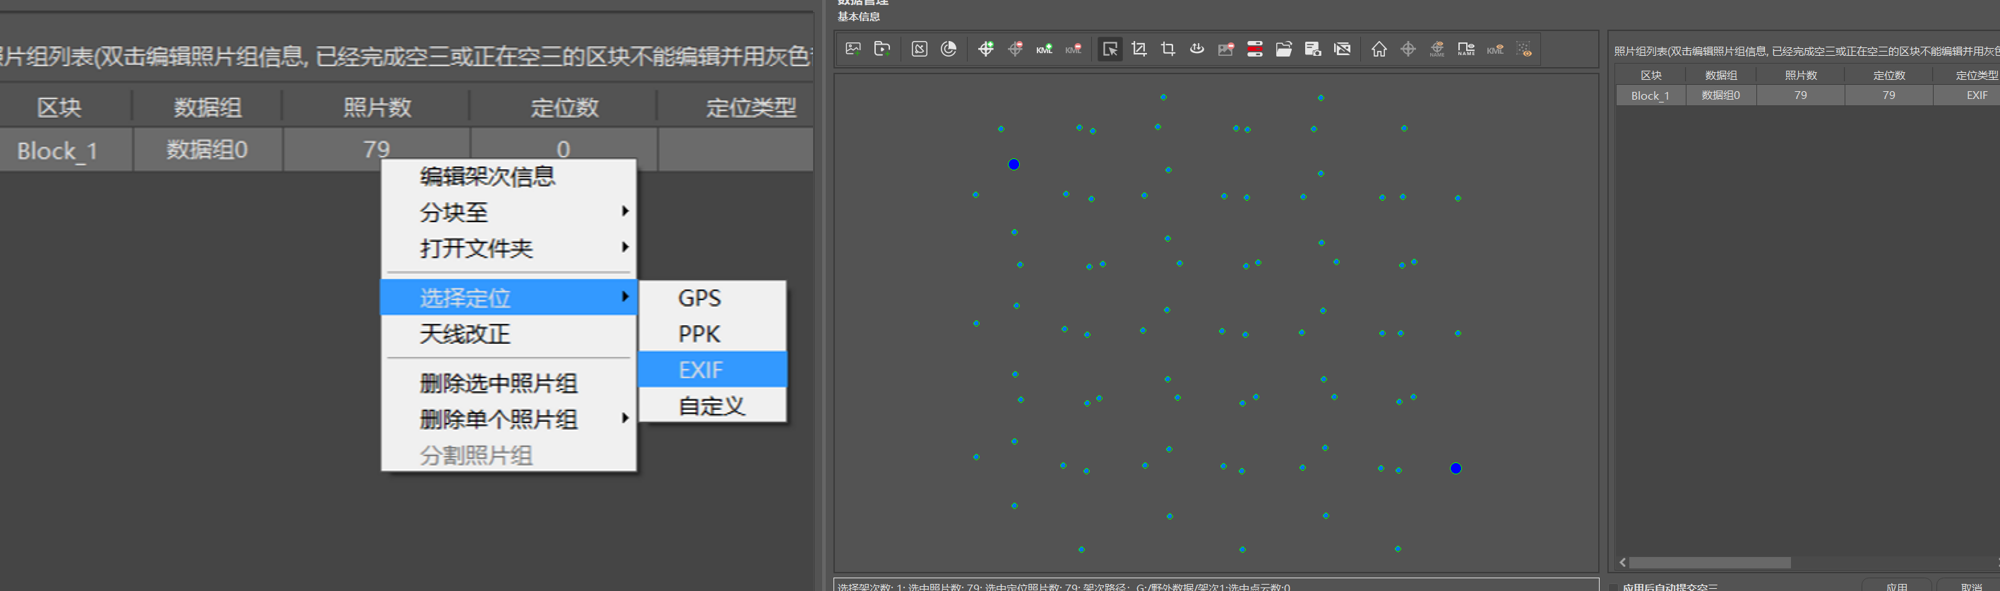
Figure: Import Data - Air triangulation calculation. Click Apply -> Start Local Engine -> Submit Air Triangulation.
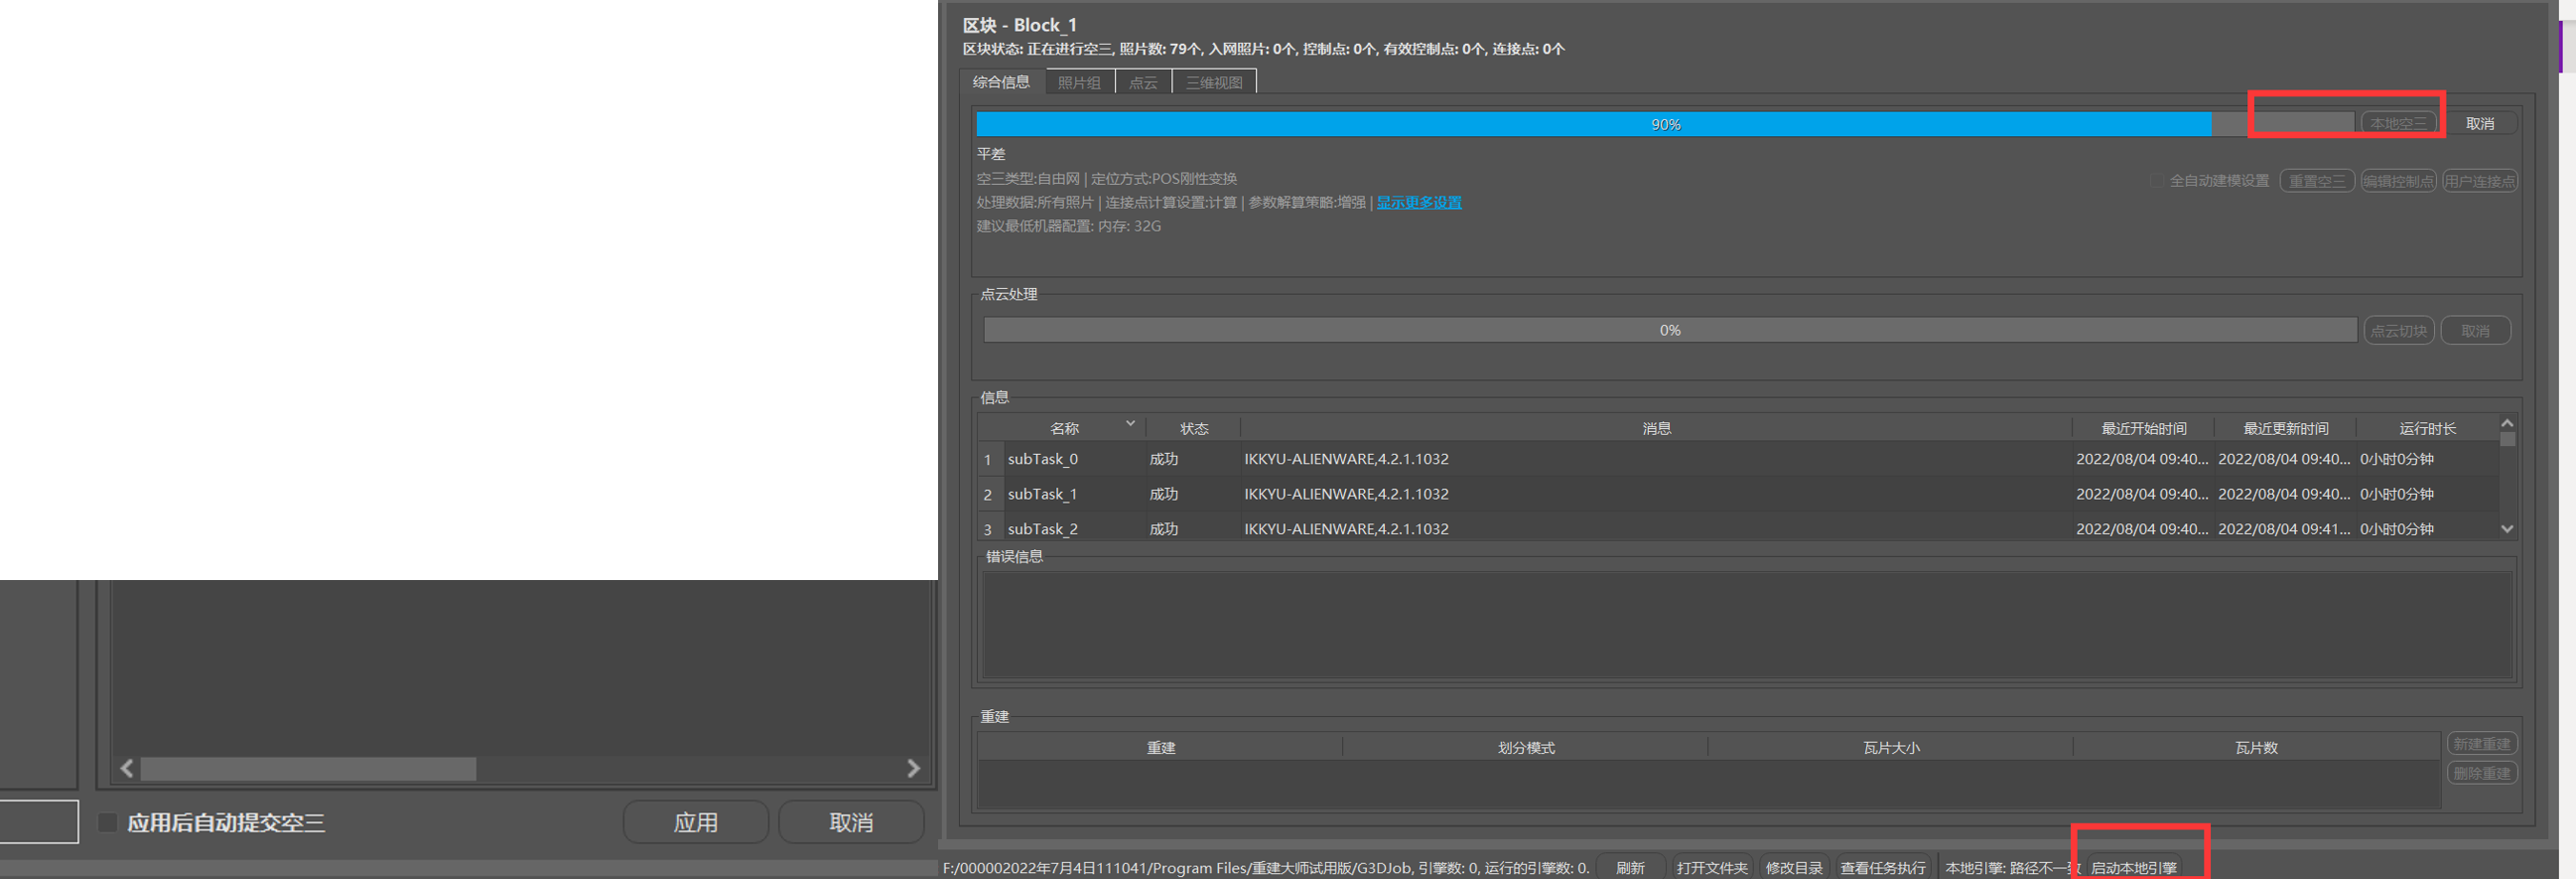
Figure: Air triangulation calculation Results are generated. Set rebuild parameters -> submit product.
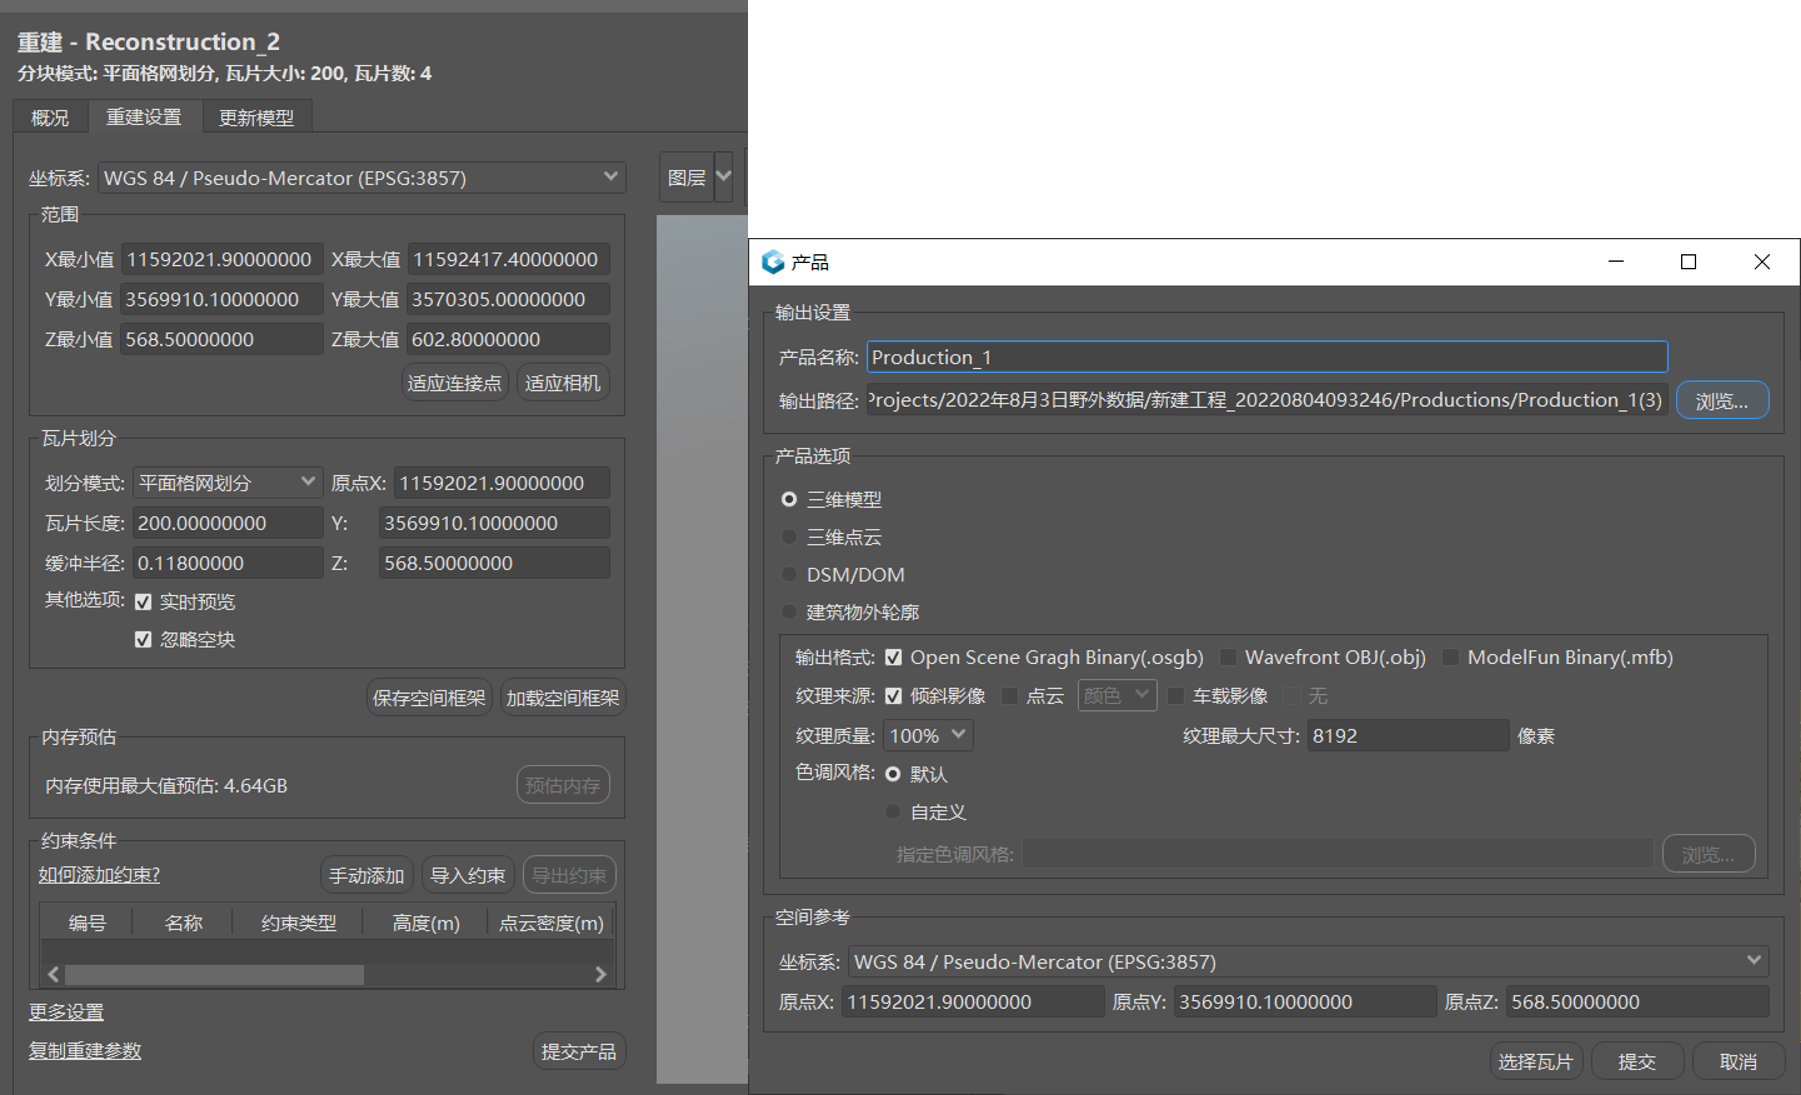
Figure: Results are generated - View results. View reconstruction results in DasViewer.
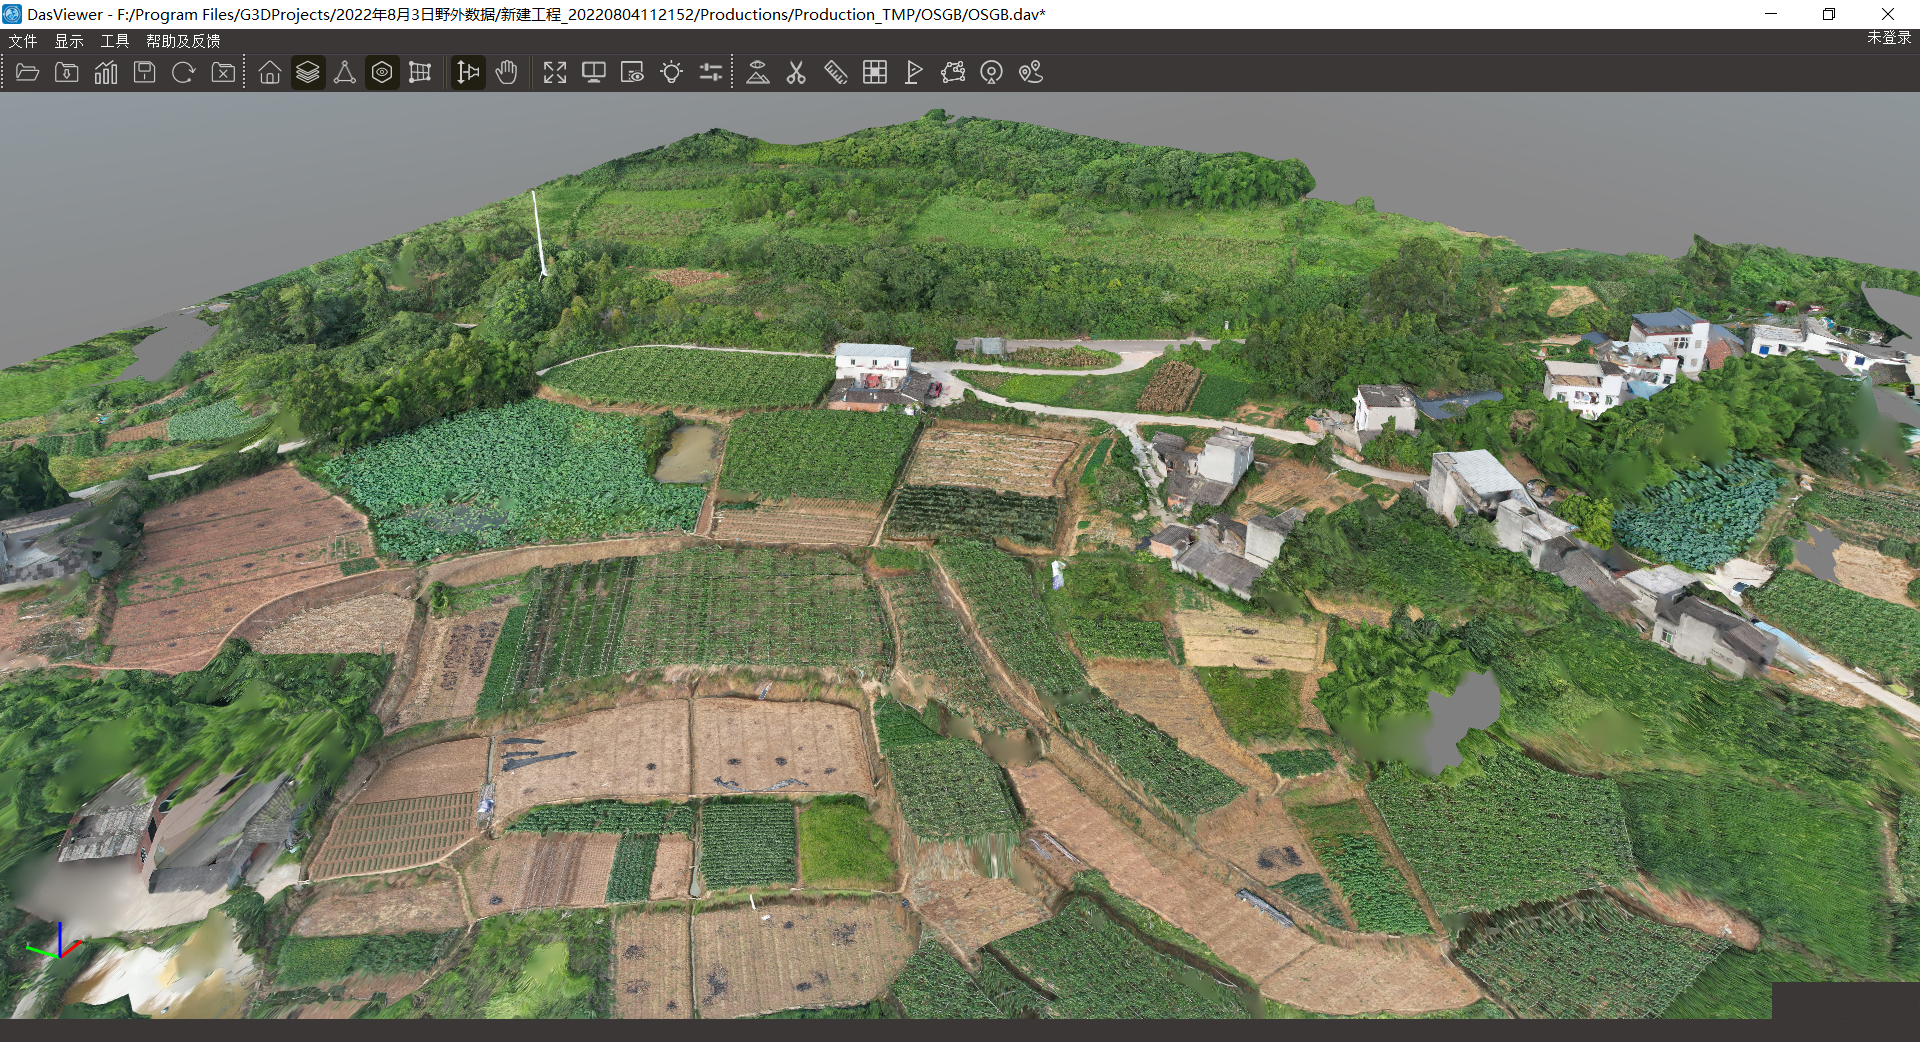
Figure: View results - SuperMap iDesktopX imports the reconstruction results.
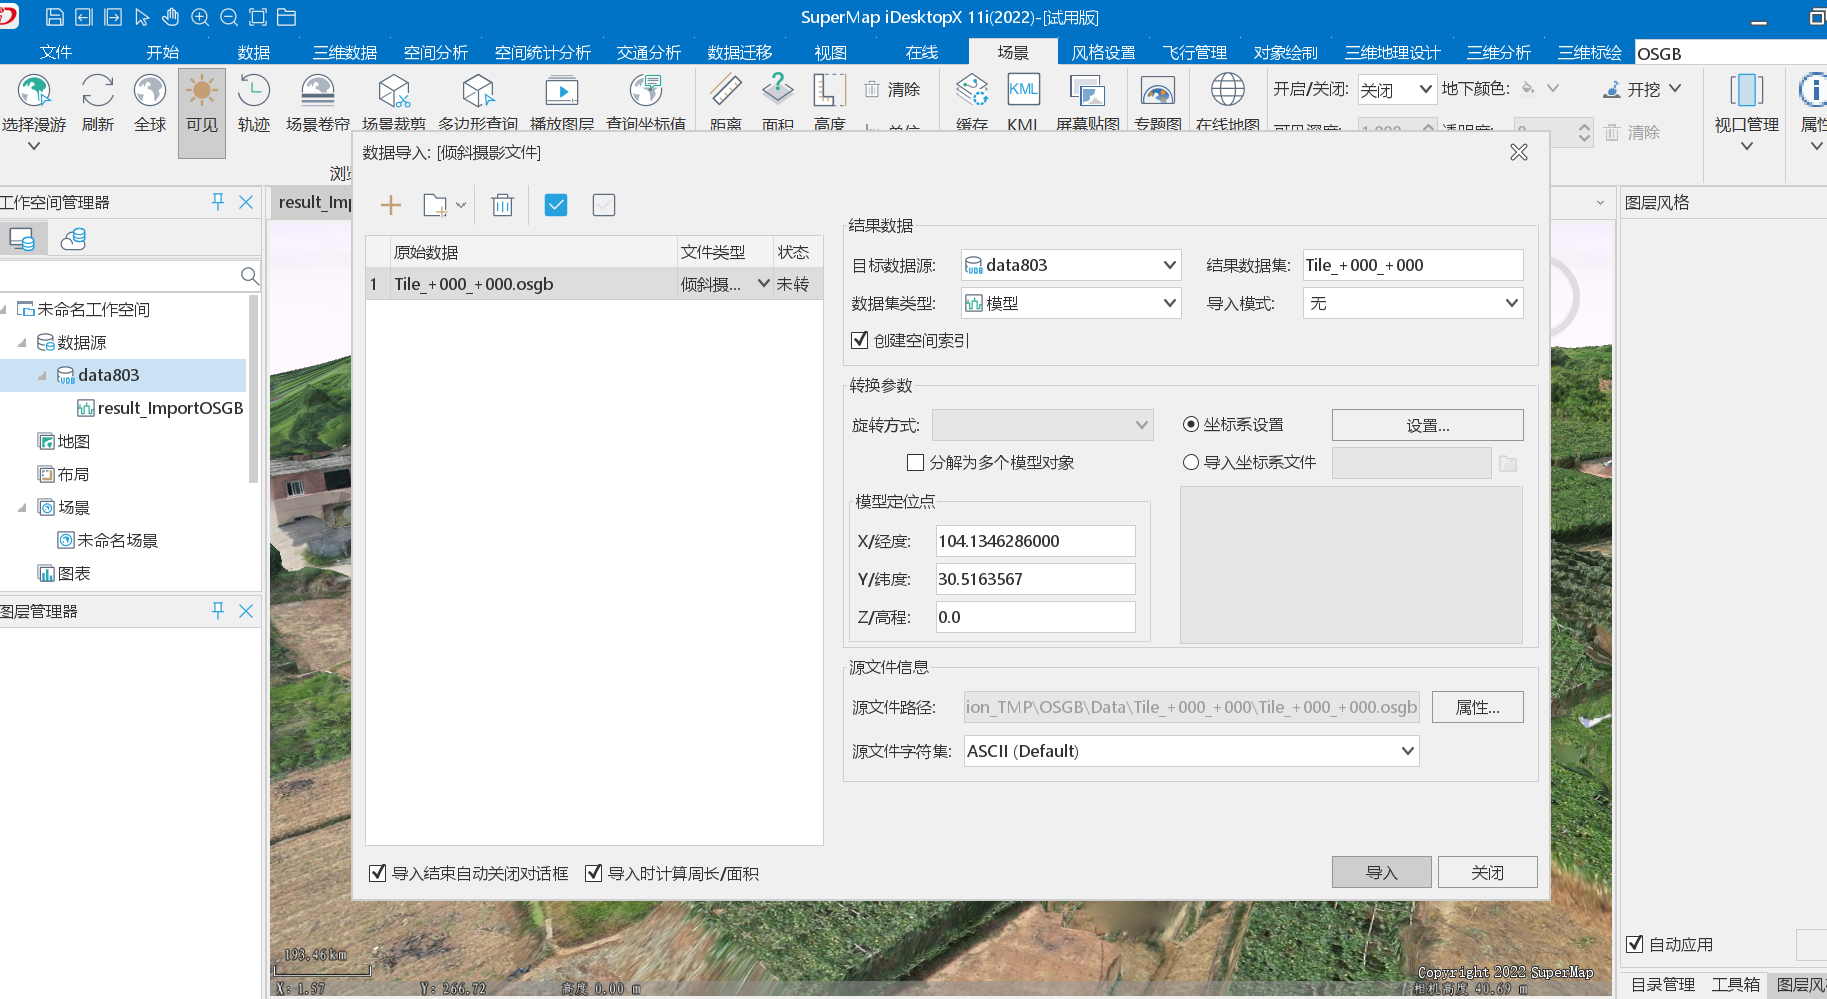
Figure: Imports the reconstruction results 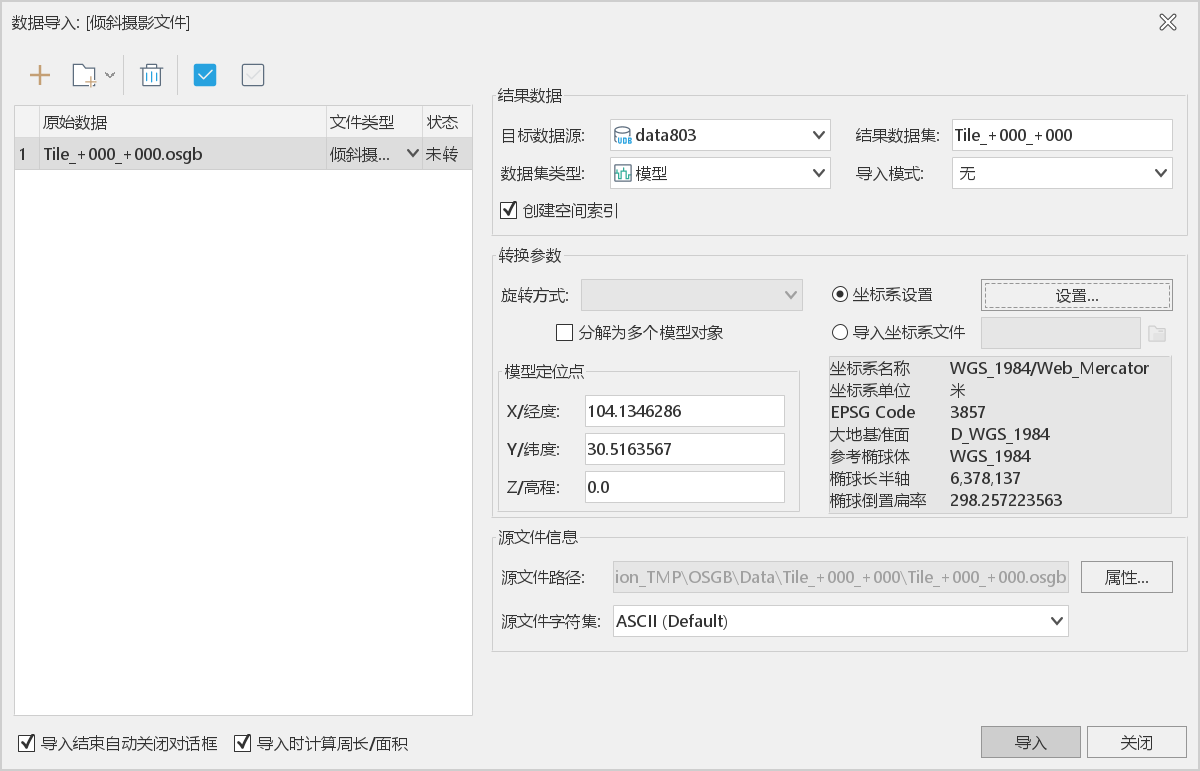
Figure: Imports the reconstruction results
- Data preparation. Export photos taken by airplanes. When using "Rebuild Master", the photos taken by the camera of the corresponding sortie need to be imported into the corresponding folder.
- Note
When using the following methods, the heading setting in PathTaskParameter is invalid.
calculateWaypoints(PathTaskParameter pathTaskParameter, FlightPathHelper.OptimalSetting setting, PathResultCallback callback);This method will automatically calculate an optimal heading according to FlightPathHelper.OptimalSetting.
div>MIN_DISTANCE Shortest distance MIN_WAYPOINT Minimum number of waypoints
Multi-patch evidence
Based on TSP analysis, calculate the optimal route after shooting all points.
- Applicable scene
Similar to multi-patch evidence, scenes that need to inspect multiple points and take pictures.
- Key methods
Computes the optimal route for proofing all vector patches from the current position.
calculateWayPointTask(DatasetVector datasetVector, Rectangle2D bounds, float height, float hFov, float vFov, Point2D currentPosition); - Implementation steps
- Take the region dataset A as patch data from the datasource.
Dataset dataset = mapControl.getMap().getLayers().get(0).getDataset(); DatasetVector datasetVector = (DatasetVector) dataset; - Constructs the query bounds rectangle2D.
- According to the rectangle2D, the waypoint task group that traverses and captures the range covered by all the patches in the bounds is generated.
WayPointTask[] wayPointTasks = FlightPathHelper.calculateWayPointTask(datasetVector, rectangle2D, /*flying height*/height, /*horizontal FOV*/73.73f, /*vertical FOV*/53.17f,/*current position of UAV*/position); - Parsing task group WayPointTask[].
CapturePose[] getCapturePose()  Get photo pose
Point2D getWayPoint()  Get waypoint coordinates
- Take the region dataset A as patch data from the datasource.
- Sample application
After setting the flight altitude and selecting the patch to prove, the route generated by the sample program is as follows:

Figure: The route generated by the sample program - Note
When the number of points is small, the global optimal solution can be obtained.
When the number of points is large, an approximate solution to the global optimum can be obtained.
Number of points threshold: 15.
Route Display
- Method to realize
Through "route planning", the coordinate position information (Point3D, Point2D) of the waypoint can be obtained, so that the route can be visualized in 2D maps, 3D scenes, and video screens.
- Sample application
Display the route on the 2D map, the sample effect is as follows:
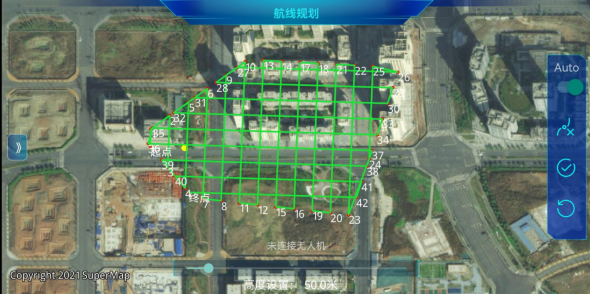
Figure: Display the route on the 2D map Display the route in the 3D scene, the sample effect is as follows:
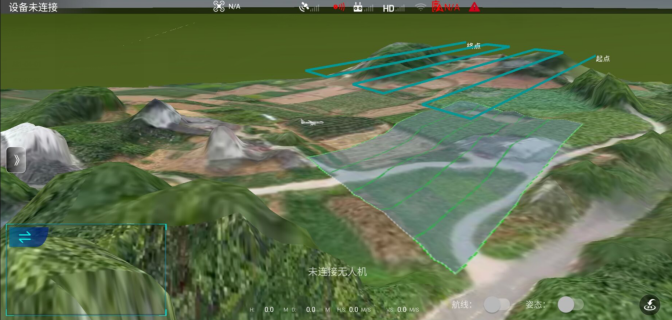
Figure: Display the route in the 3D scene Display routes in multiple windows, the sample effect is as follows:
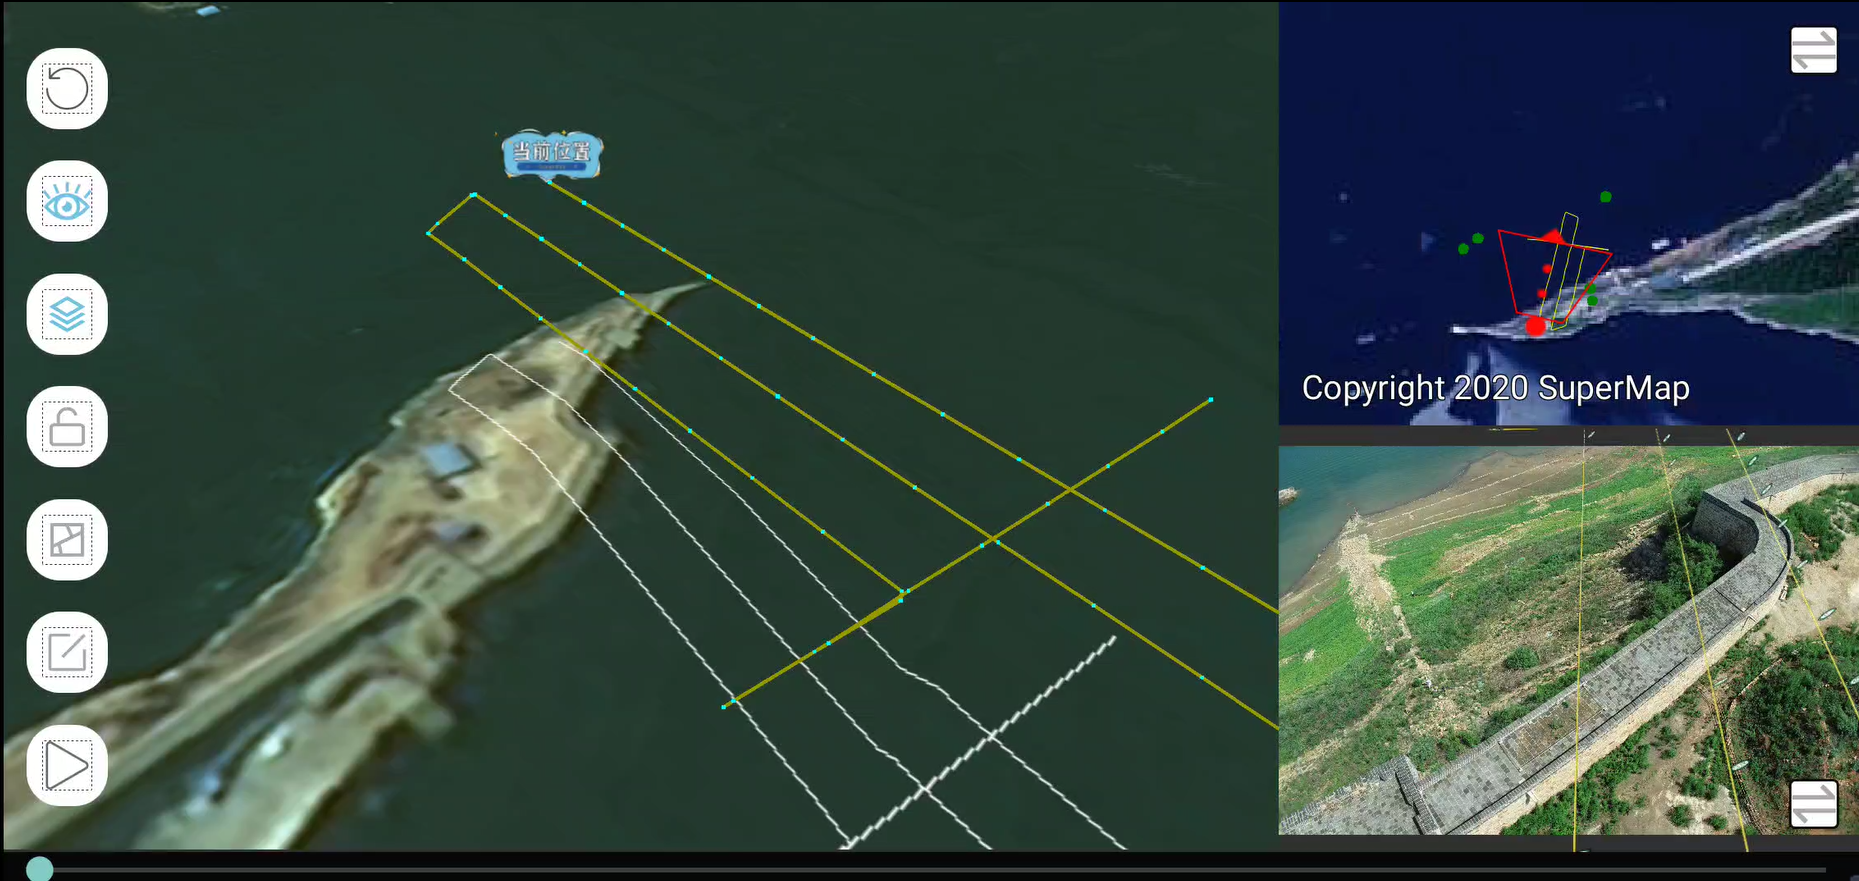
Figure: Display routes in multiple windows During the flight, the real-time display route example is as follows:
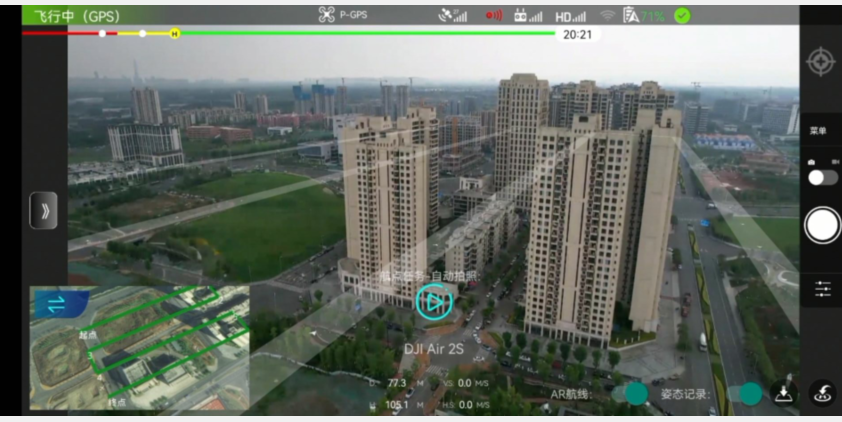
Figure: During the flight 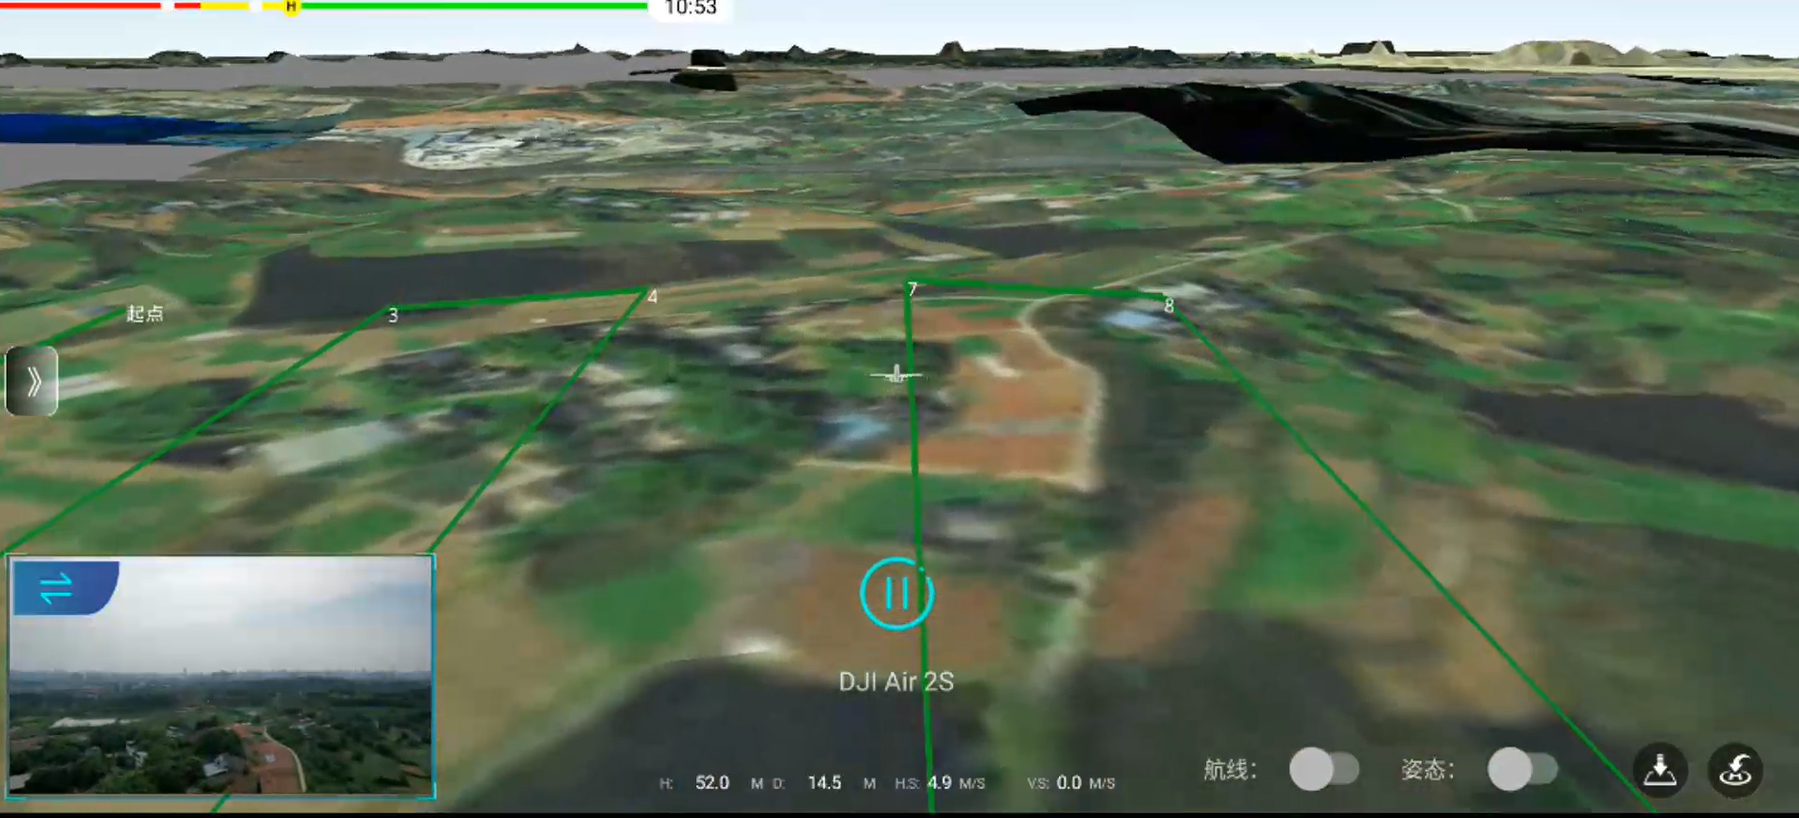
Figure: During the flight
Mission
SuperMap iMobile waypoint tasks
- Method to realize
Based on the DJI MSDK, the flight control data is sent continuously through the scheduled task.
- Scope of application
Compatible with all DJI drones that support Mobile SDK 4.16.x (including Mini, Mini SE, Mini 2, Air 2, Air2s).
- Sample application
exWaypointMissionManager = ExWaypointMissionManager.getInstance(); //Set waypoint set exWaypointMissionManager.setWaypointList(pointList) //Configuration tasks exWaypointMissionManager.configMission(effectView); //Start tasks exWaypointMissionManager.startMission(); - Task status
- Execute {ExWaypointMissionManager#configMission(ICommonControl)}, the state enters READY
- Execute {ExWaypointMissionManager#startMission()}, the state enters EXECUTING
- Execute {ExWaypointMissionManager#pauseMission()}, the state enters EXECUTING_PAUSE from EXECUTING
- Execute {ExWaypointMissionManager#continueMission()}, the state enters EXECUTING from EXECUTING_PAUSE
- Execute {ExWaypointMissionManager#stopMission()}, enter NO_ACTION from EXECUTING
- Status monitoring
Set the listening event through the setOnStateChangeListener method to monitor the state change. The example is as follows:
exWaypointMissionManager.setOnStateChangeListener(new ExWaypointMissionManager.OnStateChangeListener() {
  @Override
  public void onStateChange(ExWaypointMissionManager.Status status) {
    switch (status){
      case READY:
        //"task ready"
      break;
      case EXECUTING:
        // "task is executing"
      break;
      case EXECUTION_PAUSED:
        // "task pause"
      break;
      case NO_ACTION:
        //"Task not started or completed"
      break;
    }
  }
  @Override
  public void onSendData(float currentSpeed, float currentYaw, float currentAltitude) {
    //real-time data
  }
  /**
    * segment update
    * @param index Index of the corresponding waypoint
  */
  @Override
  public void onUpdateWaySegment(int index) {
  }
  @Override
  public void onStartMission() {
  }
  @Override
  public void onStopMission() {
  }
  @Override
  public void onFinishMission() {
  }
});
DJI Waypoint Mission
- Method to realize
Waypoint task interface based on DJI MSDK.
- Scope of application
Applicable to DJI MSDK models that support waypoint missions
Unsupported device models: device.
- Sample application
djiMissionManager = DJIWaypointMissionManager.getInstance();
WaypointMissionState currentState = djiMissionManager.getCurrentState();
if (currentState == WaypointMissionState.NOT_SUPPORTED){
  Toast.makeText(mActivity, "Flight device does not support", Toast.LENGTH_SHORT).show();
  return;
}
try{
  //Need to check here, like DJI Air 2s, DJI's MSDK does not support route planning
  wayPointMission = configWayPointMission();
  DJIError djiError = djiMissionManager.loadWayPointMission(wayPointMission);
  if (djiError==null){
    //successful mission
    status = true;
  }
}catch (IllegalArgumentException e){
    //...
}
public WaypointMission configWayPointMission(){
//desc- set waypoint
djiMissionManager.setWayPointList(waypoints);
//desc- cruise speed
djiMissionManager.setAutoFlightSpeed(autoSpeed);
djiMissionManager.setMaxFlightSpeed(maxSpeed);
//desc- the plane is always facing the forward direction
djiMissionManager.setHeadingMode(WaypointMissionHeadingMode.AUTO);
//after the task is completed, no action, hovering in place
djiMissionManager.setFinishedAction(WaypointMissionFinishedAction.NO_ACTION);
//desc- create waypoint mission
WaypointMission wayPointMission = djiMissionManager.configWayPointMission(getActivity());
DJIError djiError = wayPointMission.checkParameters();
if (djiError != null){
throw new IllegalArgumentException(djiError.getDescription());
}
  return wayPointMission;
}
DJI Timeline Events
- Method to realize
Based on DJI's TimelineEvent implementation.
- Scope of application
Since GoToAction still needs to use DJI's waypoint tasks, it is applicable to DJI MSDK models that support waypoint tasks. Unsupported device models: device.
- Sample application
djiTimeLineMissionManager = DJITimeLineMissionManager.getInstance();
float height = 50.0f;//flying height
for (int i = 0; i < point2DS.getCount(); i++) {
  Point2D item = point2DS.getItem(i);
  //Construct Action
  GoToAction goToAction = new GoToAction(new LocationCoordinate2D(/*lat*/item.getY(),/*lon*/item.getX()),/*alt*/height);
  goToAction.setFlightSpeed(autoSpeed);
  djiTimeLineMissionManager.addMissionAction(goToAction);
}
//configure tasks
djiTimeLineMissionManager.configTimeLineMission();
//Execute tasks
djiTimeLineMissionManager.startTimeline();
Video streaming
This involves not only video push streaming, but also data streaming services to push the real-time position, attitude and other information of the drone.
Data stream service
- Service configuration
Construct and configure the SuperMap iServer environment and enable the data stream service. It is designed to push the attitude parameters of the UAV. Users only need to configure service parameters (such as address, ip, port, etc.) on the mobile terminal.
For details, please refer to: SuperMapiServer11i(2022).
- Sample codes
//Service ws address, service ip address, service port, iServer account, iServer password MediaManager.setInfoPushService(wsAddress,ip,port,username,password); - Push results
The following is the reception situation on iServer after the real-time pose during the flight of the UAV is pushed.
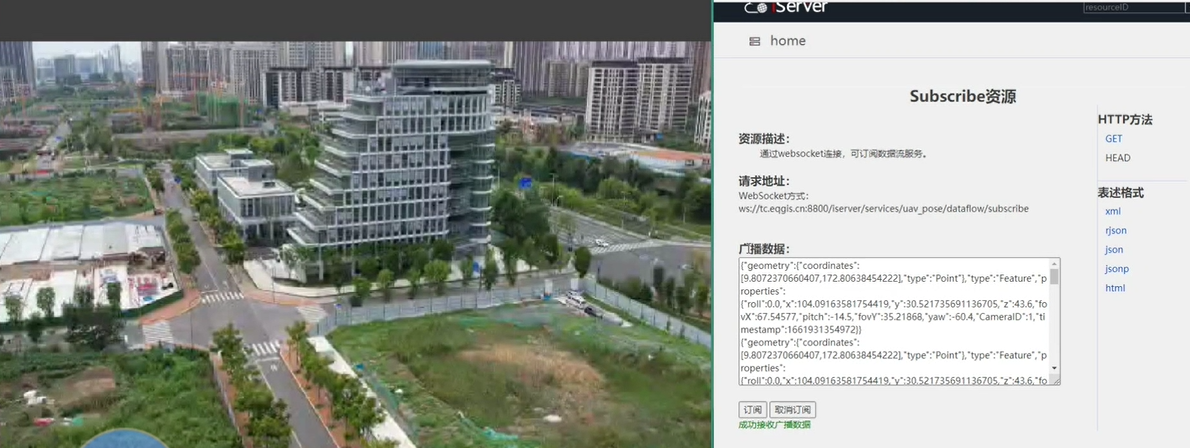
Figure: The reception situation on iServer
Video streaming service
- Configure service
Video push needs to build an open source rtsp service first, and easydrawin is used here.
Service configuration address: https://github.com/EasyDarwin/EasyDarwin.
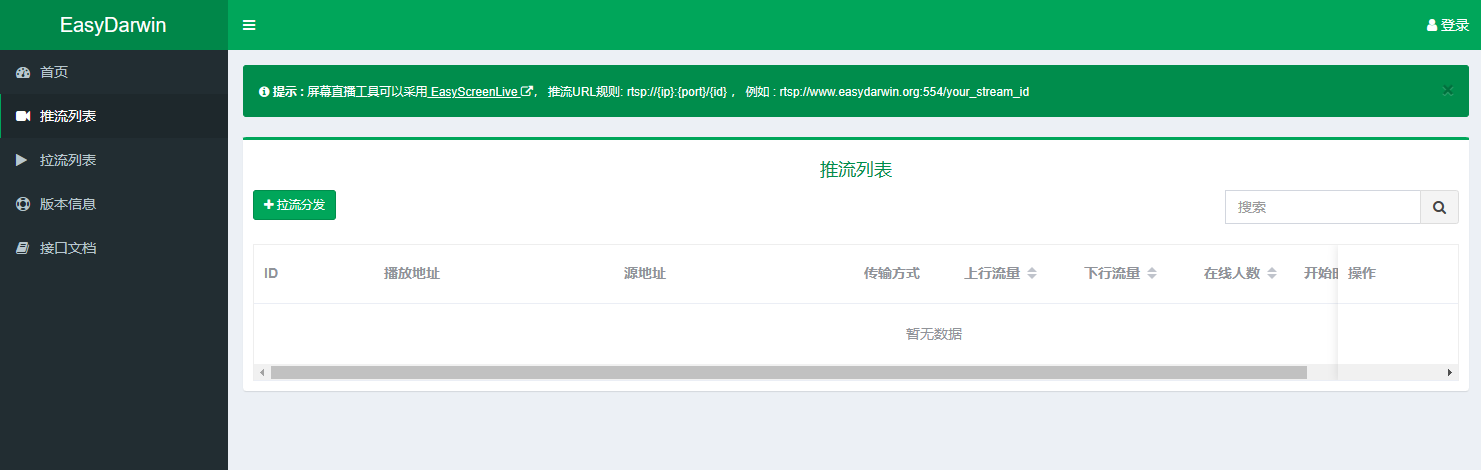
Figure: Configure service - Sample codes
//Drone view, rtsp server ip address, rtsp server port number, streaming id name, service registration callback MediaManager.setVideoPushService(effectView,ip, port, id, callback) MediaManager.startPush() //Start pushing video + gesture MediaManager.stopPush() //Stop push - Push result
View the real-time video streaming results on the mobile terminal.
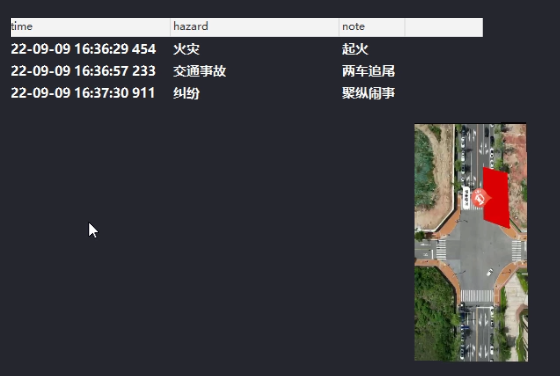
Figure: View the real-time video streaming results
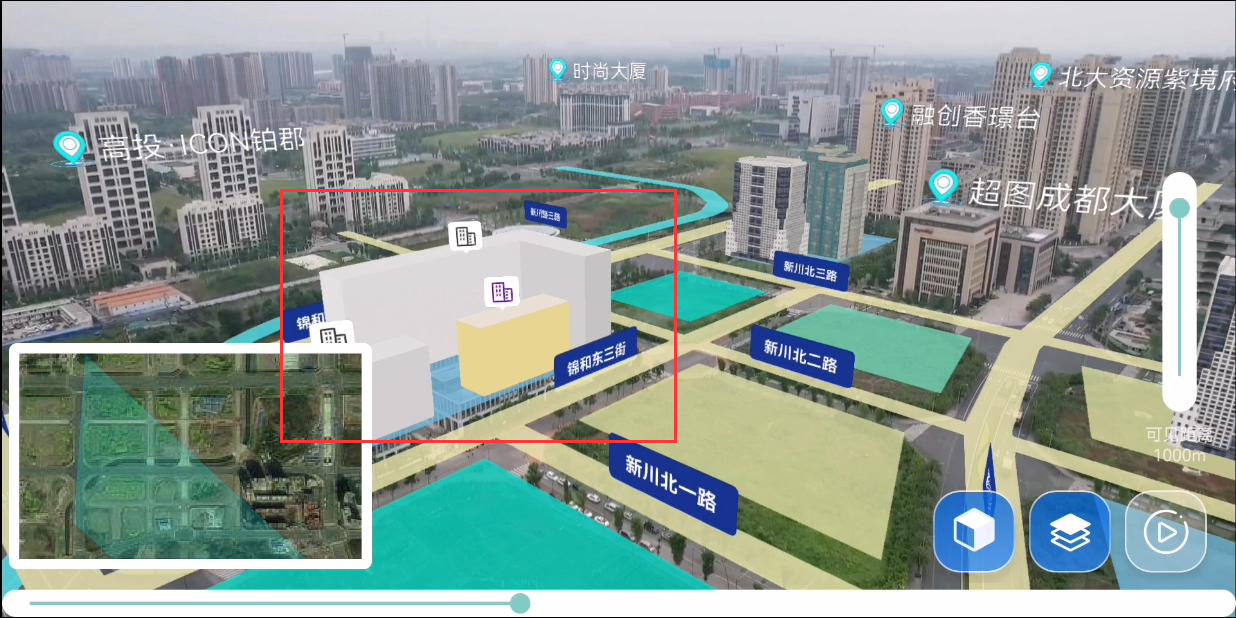
Cross terminal application
After pushing the real-time posture and video of the drone, it is more conducive to multi-terminal collaboration.
The screenshot of the case is as follows:
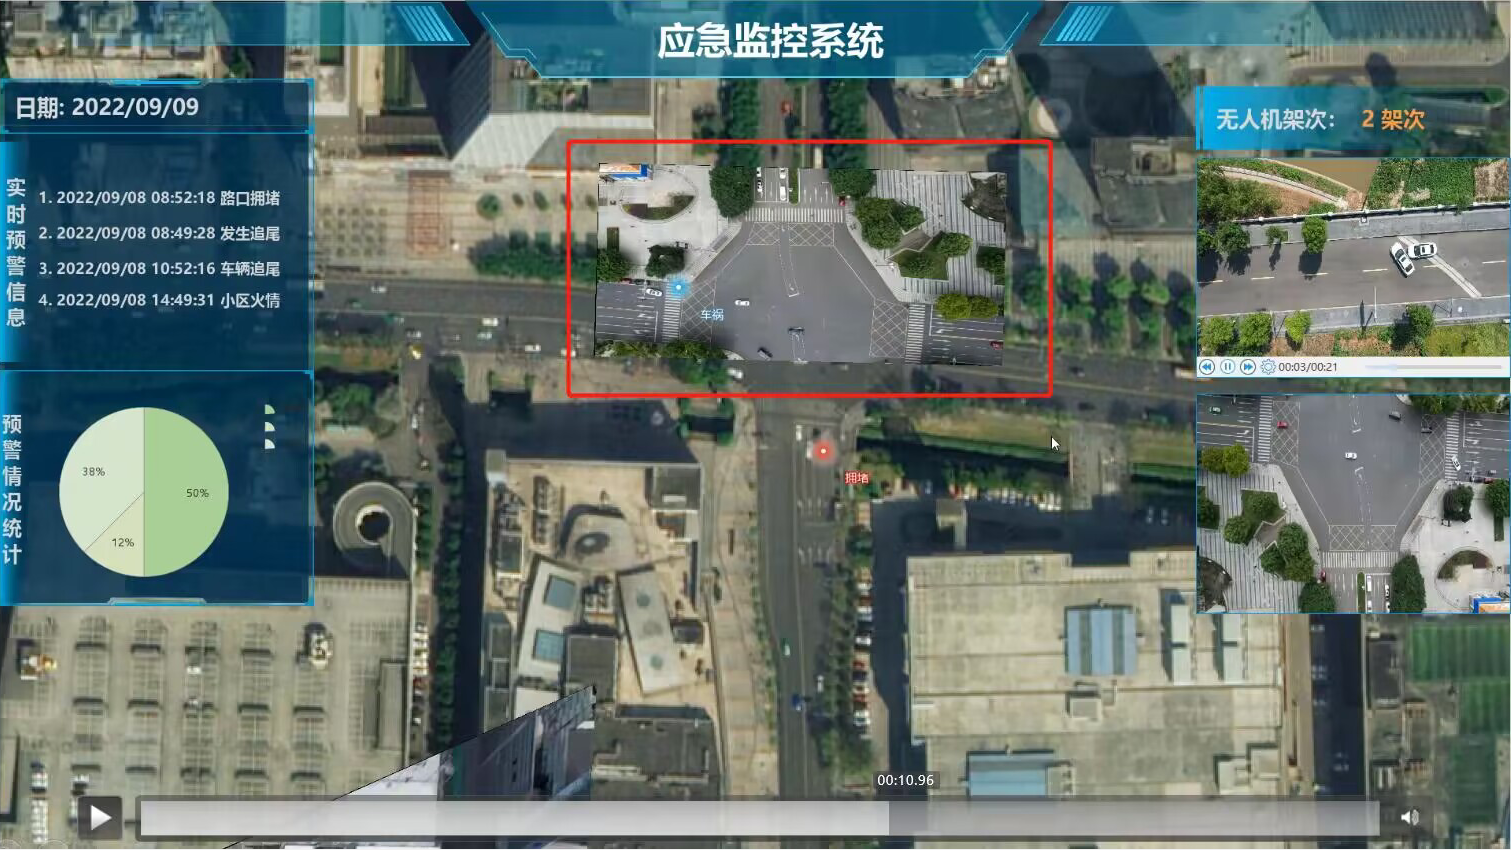 |
| Figure: The screenshot of the case |
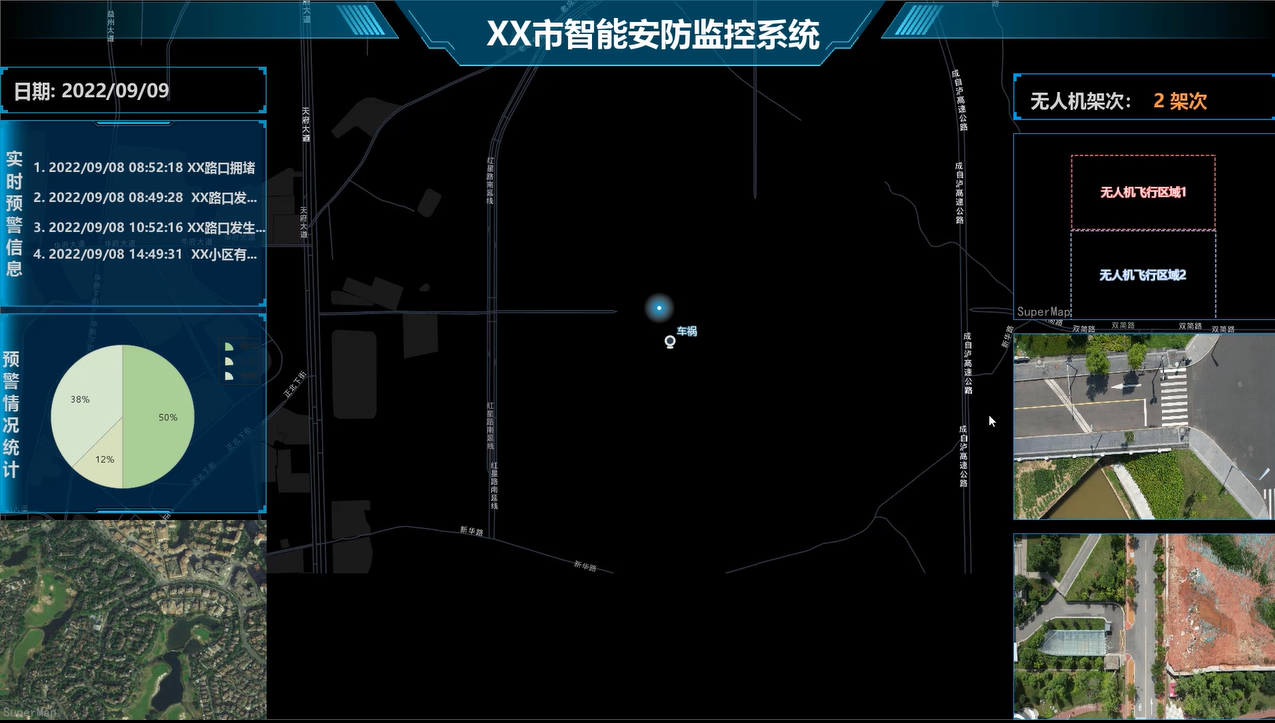 |
| Figure: The screenshot of the case |
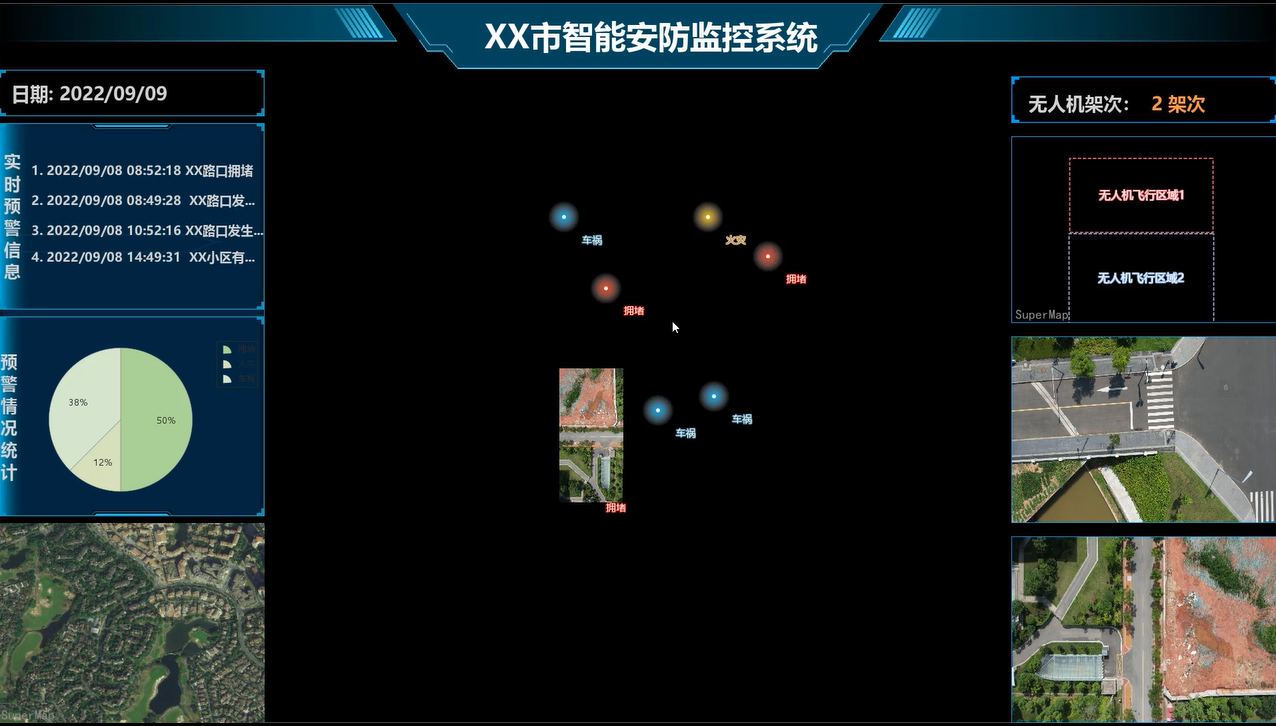 |
| Figure: The screenshot of the case |
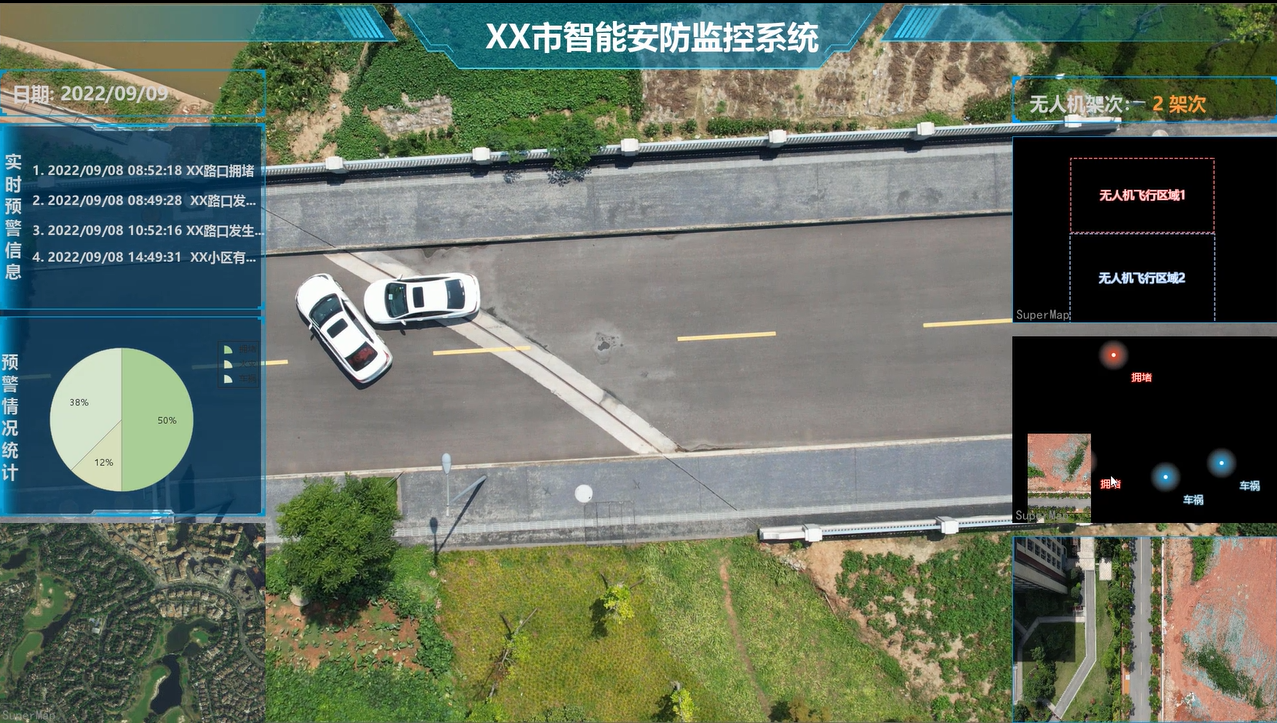 |
| Figure: The screenshot of the case |