


Create Scene
An indoor navigation model can organize data related to floors and buildings. To navigate between different floors, we need to create a relationship table to connect elevators, stairs, and escalators properly. SuperMap iDesktop provides visual tools to create relationships between floors. Loading an indoor navigation model into a scene, you can specify the running direction of each escalator conveniently.
Load an indoor navigation model
Before creating a relationship table, you need to load your indoor navigation model. iDesktop could add all indoor network datasets, floor datasets, indoor road net datasets, outdoor road net datasets, and outdoor network datasets together, resulting in a 3D navigation map automatically according to the relationship table.
Instructions:
- Click Traffic Analysis > Indoor Navigation > Build Stair Relation. The dialog box Load Indoor Navigation Model will appear where you can specify the following information.
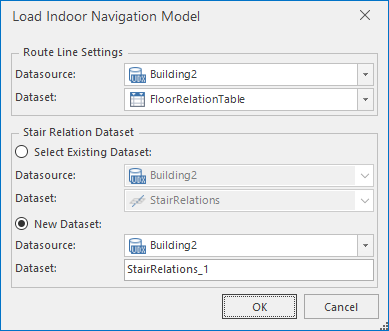
Figure: Load an indoor navigation model - Route Line Settings: specify the datasource, where your navigation model is saved, and a name for the resulting dataset.
- Stair Relation Dataset: this dataset is a 3D line dataset for elevators, escalators, and stairs connections. You could add an existing dataset or create a new one.
- After all, iDesktop will load all datasets in your navigation model and generate a 2D and 3D integrated navigation scene automatically. In the meanwhile, the dialog box Stair Relation Management pops up.
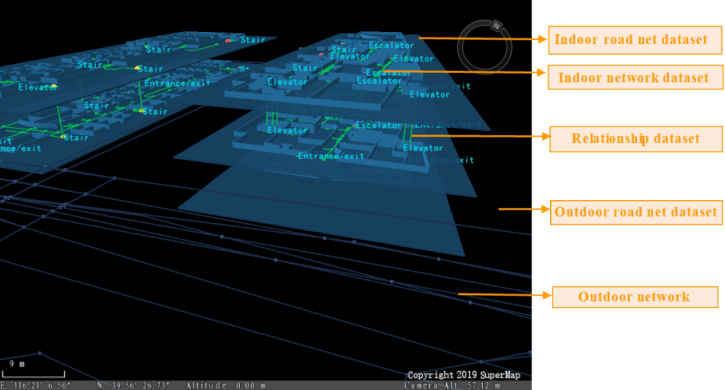 |
| Figure: 2D-3D-integration navigation scene |
2D-3D Integration Navigation Scene
The scene is created by iDesktop automatically through different style settings and thematic map processing. It can display the distribution of floors and buildings intuitively. Therefore, you can view the critical facilities of buildings by the scene conveniently.
The Layer Manager manages all floor data including indoor road net datasets, indoor network datasets, the label thematic map created from each network dataset, the unique thematic map created based on the type of each facility to distinguish them easily. If you have added outdoor network data, iDesktop will add both the outdoor network dataset and the outdoor road net dataset.
Note: it may take a bit long time to load an indoor navigation model which has massive data. Please be patient.
Relationship Management
Stair Relation Management organizes some features to manage facilities. You can check the type of each facility and specify the running direction of each facility. For example, you can specify that an elevator will go up or down.
- Floor: This dropdown button lists all floors involved in your indoor navigation model. You can select any one of them to check and manage all facilities on that floor.
- Type: This dropdown button lists all facility types including elevator, escalator, and stair. You can check an item like Elevator to check all elevators on the current floor.
- Relation: The dropdown button list all relationships that each facility can have including Connected and Unconnected. You can check any of them to filter facilities showing on the table.
 |
| Figure: Stair relation management |
Facility table: the table will list information of facilities on the currently specified floor including not only the ID, the type, and the direction of each facility, but also the ID and the number of the next floor where each facility will arrive. You can double click on a facility to highlight it on the 3D scene.
The ID of each facility is fixed. As we know, each facility like an elevator may go up or go down. Hence, we need to make two records to denote which floors that each facility can go. For example, an elevator on the first floor can go up to the second floor. Therefore, we should set Arrived Floor to 2 and Arrived ID to the second floor ID in one record. Since the given building has no floors underground, which means the elevator can not go down, we could set both Arrived ID and Arrived Floor to -- in another record.
Note: If the coordinates (x, y) of two facilities from two adjacent buildings are the same, iDesktop would create the relatioships between the two facilities automatically when loading your the indoor navigation model.
Create a relationship between facilities
iDesktop provides two methods to create a relatioship between facilities including Mouse Pickup and specifying the floor ID.
- Mouse Pickup: Select the facility point you want from the facilty table and click on the icon button Mouse Pickup. Move your mouse onto the scene and select the facility point to arrive. And then iDesktop will connect the two points resulting in a 3D line and record related information.
- Specify Floor ID: click on the item Arrived ID and select the ID of the floor to arrive.
The following pictures show the contrast before and after creating relatioships among facilities.
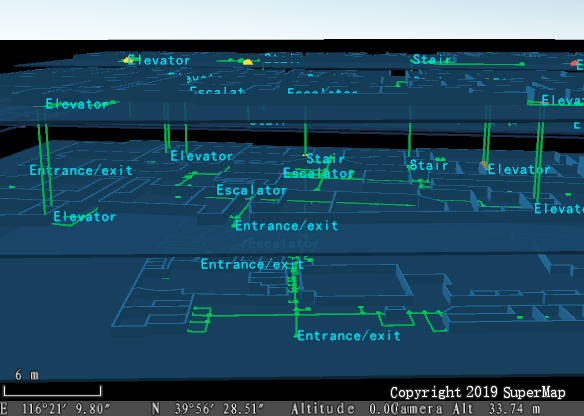 |
| Figure: The contrast before and after creating a relatioship |
Create Caches
To display 3D scene smoothly on a mobile device, please use 3D caches.
Step 1: Create 3D caches
In the Workspace Manager, right click on your scene and select Create Scene Cache.
Before generating scene caches, please determine whether to save the changes of your scene.
In the dialog box Generate Scene Cache, select all datasets and set Compressed Type to "ETC" for Android and "PVRTC" for iOS.
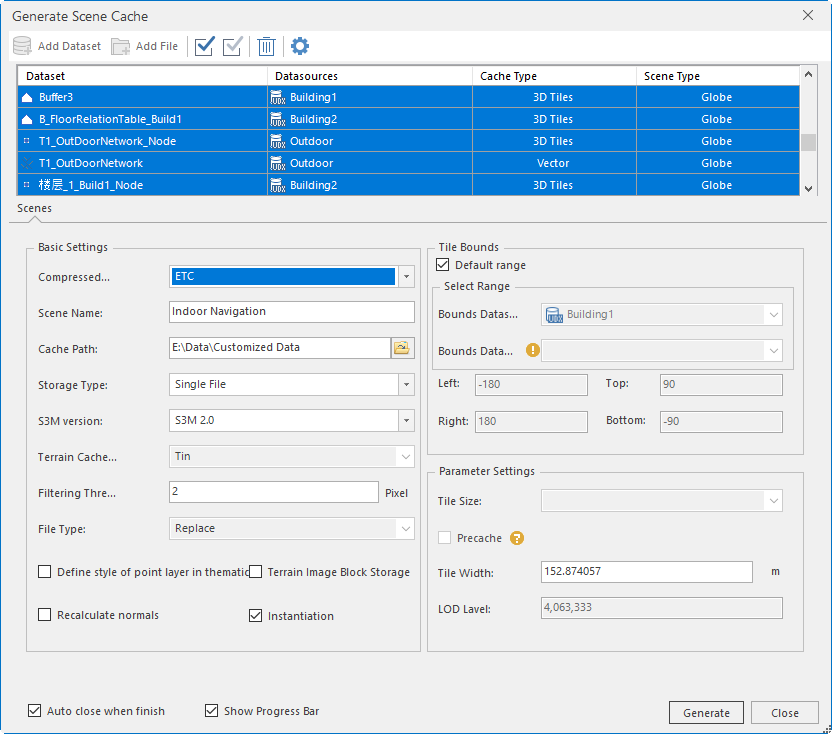 |
| Figure: Settings for cache generation |
Step 2: Re-adjust data structure
Close the current workspace;
After the generation, the application will generate a new workspace. And then open it.
Copy and paste navigation datasource to the same folder as the workspace.
In the Workspace Manager, right click Datasources > Datasources > Open File Datasource to open the datasource.
Click Start > Workspace > Save to save the workspace.
So far, we finishied the creation of 3D indoor navigation data.
 |
| Figure: 3D indoor navigation data |
Application of loading 3D indoor navigation data
Please take the following codes as a reference to implement the indoor navigation.
Open workspace and initialize the navigation module
//Open workspace
m_workspace = new Workspace();
WorkspaceConnectionInfo info = new WorkspaceConnectionInfo();
info.setServer(sdcard+"/SampleData/IndoorNavigation0526/IndoorNavigation.sxwu");
info.setType(WorkspaceType.SXWU);
boolean result = m_workspace.open(info);
if (!result) {
	System.out.println("Failed to open the workspace");
	return;
}
m_sceneView= (SceneView)findViewById(R.id.scene_control);
m_sceneControl= m_sceneView.getSceneControl();
m_sceneControl.sceneControlInitedComplete(new SceneControlInitedCallBackListenner() {//the callback listener of scene-control initialization
	@Override
	public void onSuccess(String arg0) {
		// TODO Auto-generated method stub
		//Open scene
		m_scene = m_sceneControl.getScene();
		m_scene.setWorkspace(m_workspace);
		String mapName = m_workspace.getScenes().get(0);
		m_scene.open(mapName);
		m_navigation3D = m_sceneView.getNavigation();		//Get the navigation module
		m_navigation3D.setUpdateDataMode(true);
		m_navigation3D.setDatasource(m_workspace.getDatasources().get("kaide_mall"));
		m_sceneControl.setNavigationControlVisible(true);	//Set the navigation bar visible
		//Initialize FloorList
		m_floorListView3D = (FloorListView3D)findViewById(R.id.floor_list_view_3d);
		m_floorListView3D.setVisibility(View.VISIBLE);
		m_floorListView3D.setNavigation3D(m_navigation3D);
		m_floorListView3D.linkScenepControl(m_sceneControl, m_workspace);
		//Set the 3D scene control
		m_navigation3D.setSceneControl(m_sceneControl);
		//Set the gesture recognizer, and so users can add navigation points with gestures
		m_sceneControl.setGestureDetector(new GestureDetector(m_sceneControl.getContext(), mSceneGestrueListener));
		//Add the listener of updating navigation guide information
		m_navigation3D.addNaviInfoListener(new NaviListener() {
			@Override
			public void onStopNavi() {
				//After the navigaiton, close the navigation status
				m_naviState = NAVI_STATE.STATE_NULL;
				m_navigation3D.cleanPath();
				System.out.println("Stop the navigation");
			}
			@Override
			public void onStartNavi() {
			}
			@Override
			public void onPlayNaviMessage(String message) {
			}
			@Override
			public void onNaviInfoUpdate(NaviInfo naviInfo) {
			}
			@Override
			public void onAdjustFailure() {
			}
			@Override
			public void onAarrivedDestination() {
				//Arrive the destination, and then close the navigation status
				m_naviState = NAVI_STATE.STATE_NULL;
				m_navigation3D.cleanPath();
				System.out.println("Arrive the destination");
			}
		});
	}
});
Add Navigation Points
//Set starting point: you can set continuously, but only the last one will be kept.
m_navigation3D.setStartPoint(pt3d.getX(), pt3d.getY(), pt3d.getZ());
//Set end point: you can set continuously, but only the last one will be kept
m_navigation3D.setDestinationPoint(pt3d.getX(), pt3d.getY(), pt3d.getZ());
//Set waypoints: you can set continuously without number limitation. Note: waypoints cannot be added when there is no start point and end point
m_navigation3D.addWayPoint(pt3d.getX(), pt3d.getY(), pt3d.getZ());
Path Analysis
//Path Analysis
boolean bResult = m_navigation3D.routeAnalyst();
if(bResult){
	Toast.makeText(m_sceneControl.getContext(), "The analysis is successful", Toast.LENGTH_SHORT).show();
}
else{
	Toast.makeText(m_sceneControl.getContext(), "The analysis is failed.", Toast.LENGTH_SHORT).show();
	return;
}
Navigation
//Start to navigate  0: Real navigation; 1: Navigation simulation; 2: Cruise; 3: Navigation for walking
if(!m_navigation3D.startGuide(1)){
	Toast.makeText(m_sceneControl.getContext(), "Failed to enable navigation", Toast.LENGTH_SHORT).show();
	return;
}