


Creates 2D indoor navigation data
The procedure of creating 2D indoor navigation data includes: creating map-display data, navigation path data, range data, attribute data and settings of line symbol library. Following contents detail the five operations.
Creating map-display data
Import datasets
Import original datasets including point, line, region datasets.
Basic steps:
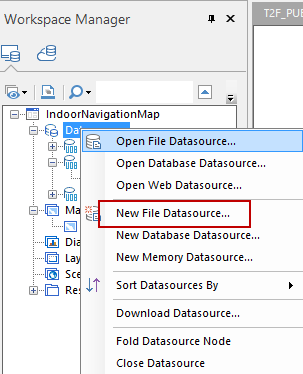
Step 1: create a datasource. In the workspace manager, right click "Datasources" node and then select "New File Datasource..." and navigate to an appropriate folder and enter a name. Click "Save" to complete the creation of a datasource.
Step 2: Import datasets. Right click the datasource you created, and then select "Import Dataset...". In the pop-up dialog box, click to import files. Note: the point datasets involved in the navigation cross floors like stairs, elevators, and so on, need renaming as "Tfloor number_CON_INFO", for example "T7_CON_INFO".
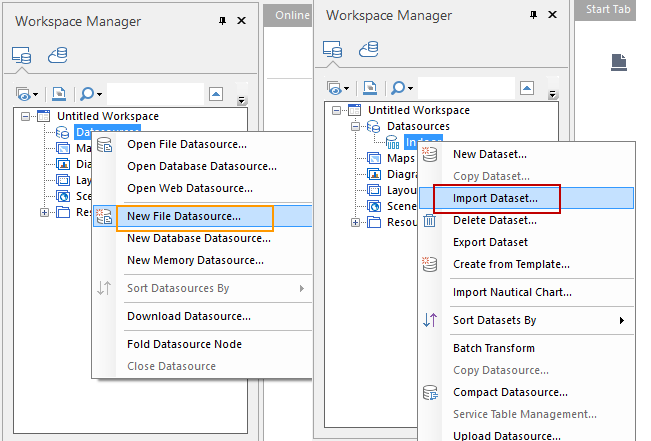 |
| Figure: New a datasource(left) and import datasets (right) |
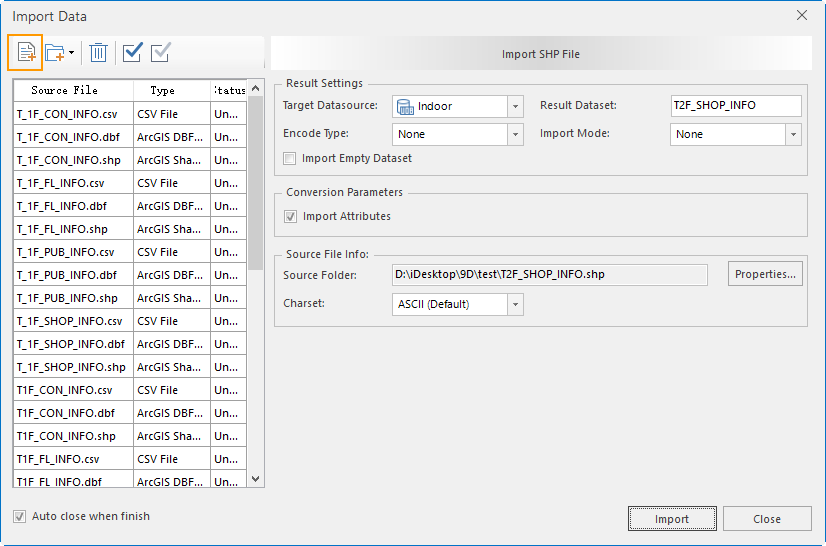 |
| Figure: Add files |
In case of missing data, you should save your workspace all the time.
Note: after importing data, you need to convert its coordinate system to a geographic coordinate system.
Layer groups
When all datasets are prepared, you need to organize data as layer groups to make one layer group include data of one floor.
Basic steps:
Step 1, create layer groups. Create layer groups for all floor data, and one group manages one floor data. Add datasets into the map window (that is opening your datasets in iDesktop), and then in the Layer Manager, click icon to create a new group.
Note: the name of the first-level group must be "indoor" (case sensitive).
Step 2: Add the indoor dataset into the current map window, and then put its layer to the corresponding group.
 |
| Figure: Layer Structure |
Creating region data
Region data must have following attributes which can not be changed
| Attribute | Name and implication | Type |
|---|---|---|
| FloorID | FL_ID (can not be changed) is used for floor display, road analysis, and navigation. Each floor has one ID, and all features in a floor have the same floor ID. | Wide character |
| Type | CO_TYPE is used for creating unique-value thematic map, and according to a type displays a color. The type value can be set based on different attributes of features like stores, washrooms, restaurants. | Wide character |
| Name | FT_NAME_CN is used for creating label thematic maps to show names on a map. | Wide character |
Step 1: Add attribute items. If your dataset does not have attributes mentioned above, you need to add them manually.
Right click your region dataset, and then select "Properties" to open the "Properties" dialog box, and click icon in the Attribute Table tab to add attribute items. Note: After all items are added, you should click Apply button to save them.
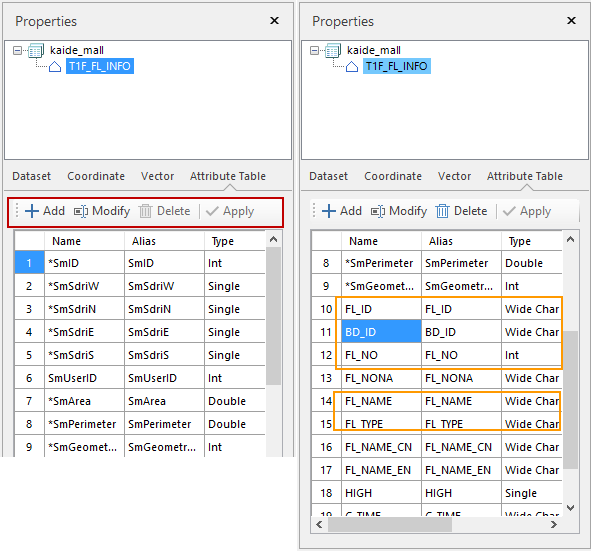 |
| Figure: The result of adding items |
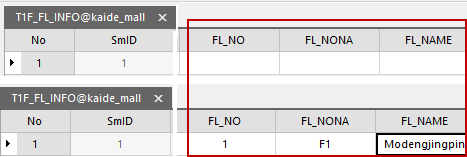
Step 2: add attribute values.
Click your region dataset and select "Browse Attributes" to open its attribute table, and then double click the item you want to change and then enter its value (the fields with * are system fields and you can not edit them)
 |
| Figure: The attribute table |
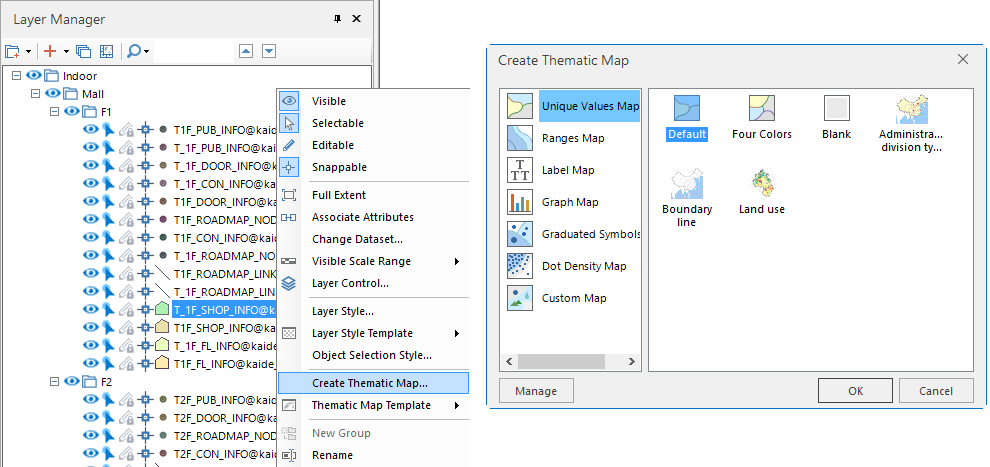
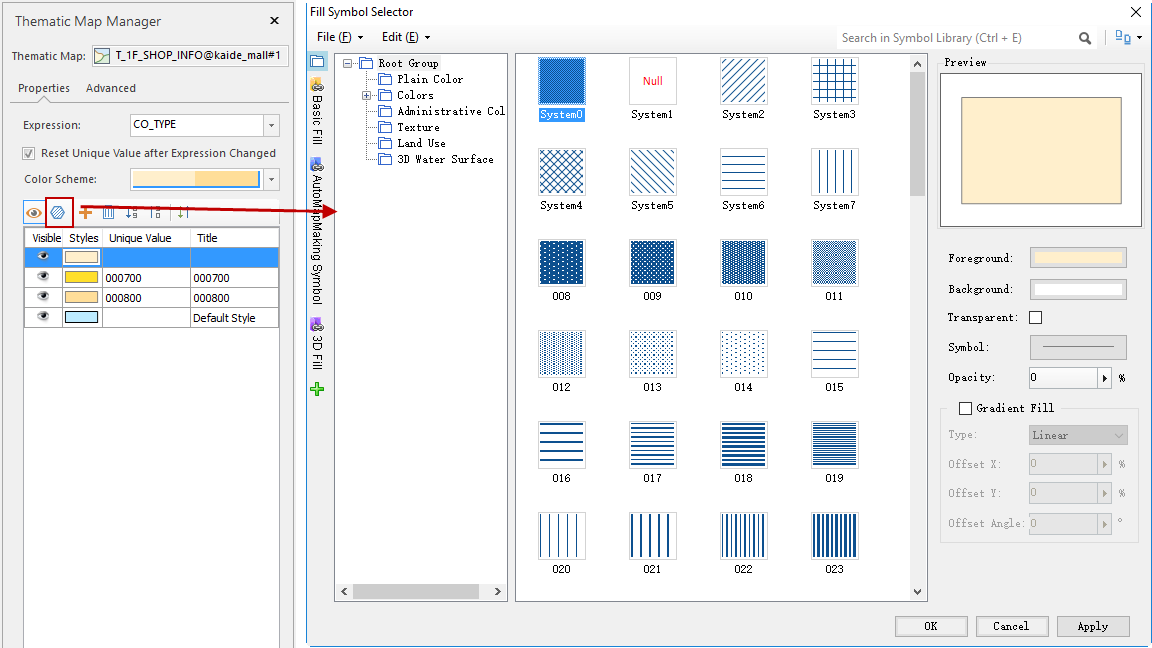
Step 3: Create a unique-value thematic map.
In the layer manager, right click your region layer and select "Create Thematic Map...". In the pop-up dialog box, select "Unique Values Map"> "Default". In the "Thematic Map Manager" dialog box, set the Expression as "CO_TYPE" and select an appropriate color scheme or you can click any item in the column Styles to set a color
 |
| Figure: Create a thematic map |
 |
| Figure: Setting the thematic map |
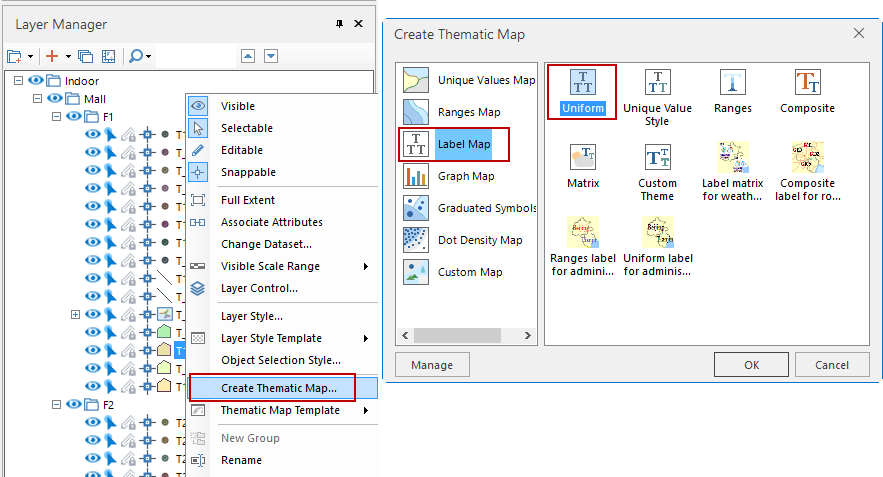
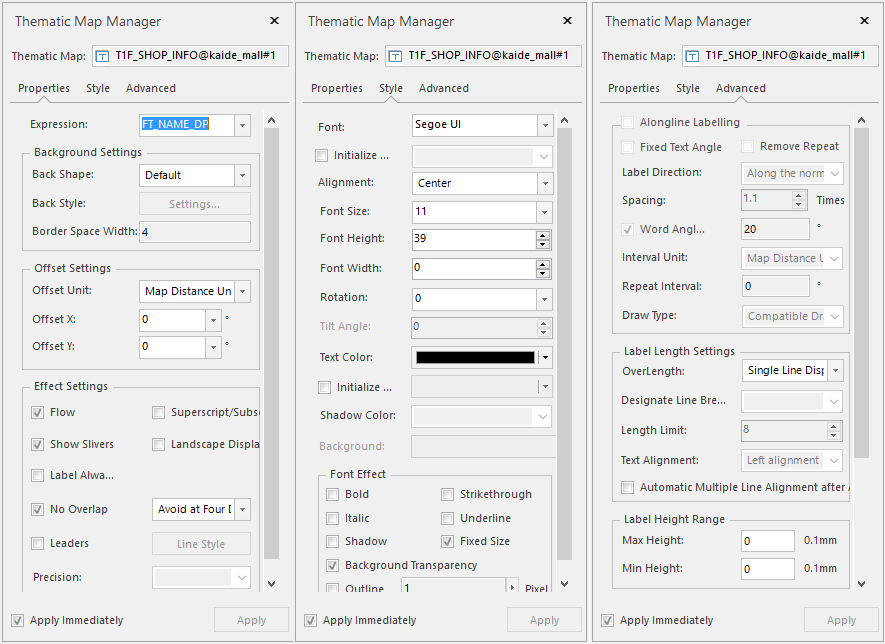
Step 4: Create a label thematic map to show names on your map
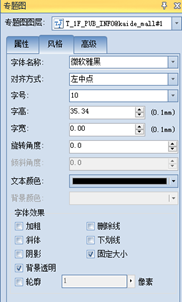
In the layer manager, right click your region layer and select "Create Thematic Map...". In the pop-up dialog box, select "Label Map" > "Uniform". And then in the thematic map manager, specify Expression as "FT_NAME_CN", and you can do some other settings in the Properties, Style, Advanced panels.
 |
| Figure: Create a label thematic map |
 |
| Figure: Set the label thematic map |
Creating point data
Step 1: Add attribute items. You can refer to how to add attribute items for your region dataset.
| Attribute | Name and implication | Type |
|---|---|---|
| Floor ID | FL_ID (can not be changed) is used for floor display, road analysis, and navigation. Each floor has one ID, and all features in a floor have the same floor ID. | Wide character |
| Type | CO_TYPE is used for creating unique-value thematic map, and according to a type displays a color. The type value can be set based on different attributes of features like stores, washrooms, restaurants. | Wide character |
| Name | FT_NAME_CN is used for creating label thematic maps to show names on a map. | Wide character |
Besides attributes mentioned above, stairs data should has following attribute items:
| Attribute | Name and implication | Type |
|---|---|---|
| Stairs ID | FT_ID: The stairs of each floor has an ID, and an elevator has different ID in a different floor ID. | Wide character |
| Stairs type | FT_TYPE, that is the "Type" row in the upper table. | Wide character |
| Reached floor | TO_CON format is "#reached-floor#next-stairsID", for example: reached the second floor, and the attribute of the stairs whose ID is 138690310200334 is #2#138690310200334. Each stairs corresponds with the next stairs like the attribute value of the first stairs(1) is the second stairs (2). And the attribute value of the top stairs is null. | Wide character |
Please refer to how to add attribute items for a region dataset to add attribute items for a point dataset
Step 2: Add attribute values (please refer to add attribute values for a region dataset).
Step 3: Create a unique-value thematic map.
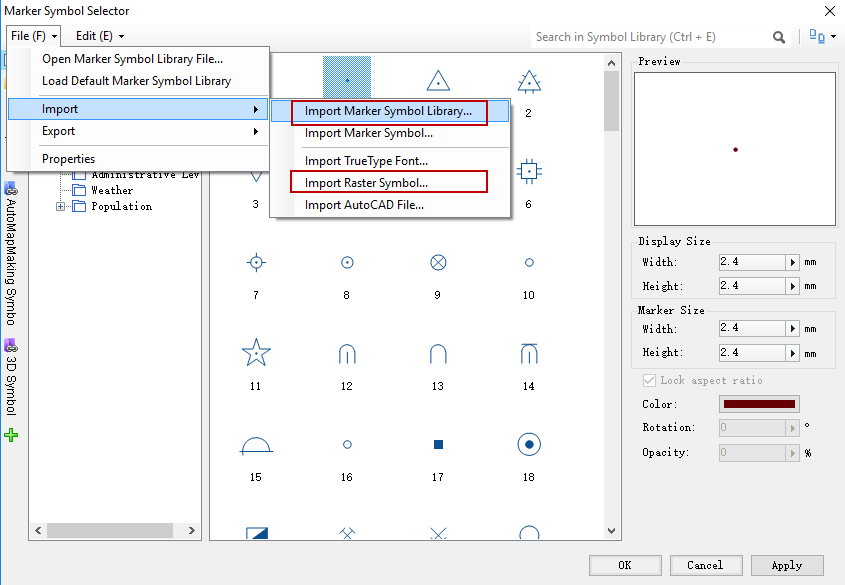
You can click icon to open the Marker Symbol Selector dialog box where you can select any marker symbols.
If there are no markers meeting your requirements in the marker symbol selector, you can import a *.sym symbol library or a raster symbol file to import the symbol you want.
 |
| Figure: Import a symbol |
Step 4: Create a label thematic map (on detail operations, please refer to how to create a thematic map for a region dataset).
Creating navigation path data
Path data is mainly used for navigation. In the indoor data, path data is required which is saved in a line dataset. You need to build route net.
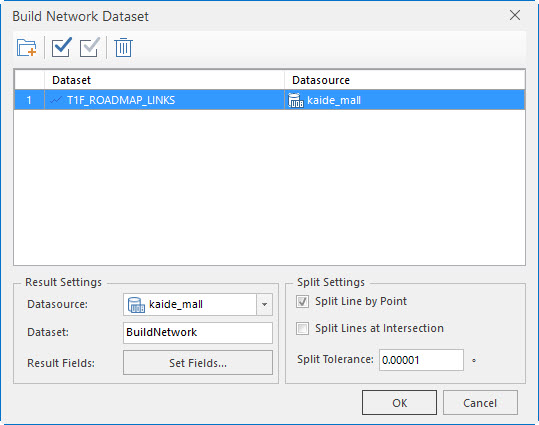
Click "Traffic Analysis" > "Network Analysis" > "Network by Topology" > "Structure 2D Network" to open the "Build Network Dataset" dialog box. Select the dataset you want to construct, check "Split line by line", enter the name of the output dataset, and click OK to finish the operation.
 |
| Figure: Construct 2D network dataset |
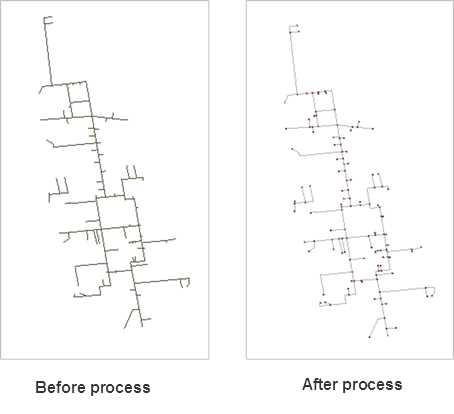 |
| Figure: The comparison before and after constructing data |
Creating range data
The size of range data is equal or slightly bigger than the size of indoor range for controlling the display and hide of floor controls. Range data is a datasource whose name is bounds and there is a region dataset whose name is "building" and only has one object.
Basic steps:
Step 1: create a datasource whose name is bounds. Its storage path is the same with the path of indoor datasource.
In the workspace manager, right click "Datasources" node and then select "New File Datasource..."
 |
| Figure: Create a datasource |
Step 2: Create a region dataset and set its name as building.
In the workspace manager, right click "bounds" datasource and then select "New Dataset..."
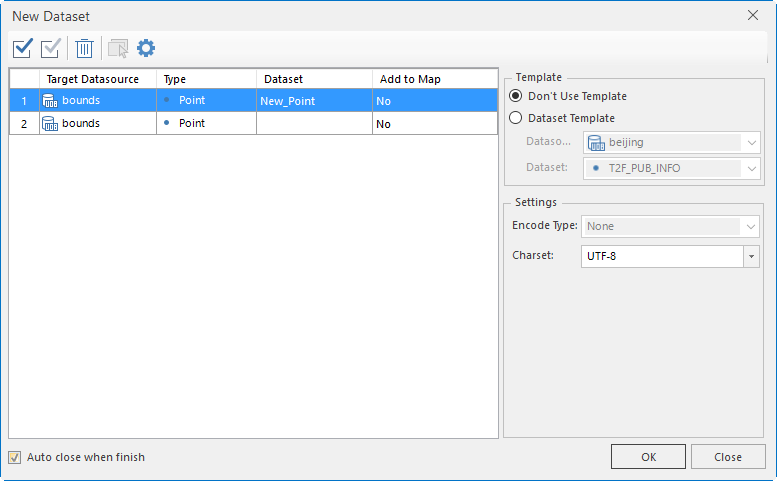 |
| Figure: New a region dataset |
Step 3: Add a region object and its area must be equal or larger than the indoor map area and its position must be the same with the indoor data position.
- Open the building dataset.
- Set the dataset editable. In the layer manager, click the edit control to make the "building" layer editable or right click the "building" layer and select "Editable".
- Draw a region object: Click "Object Operations" > "Drawing" > "Region".
If there is a region dataset in the original indoor data which can represent the whole range of indoor, you can make a copy of the dataset and name it "building".
In the workspace manager, right click your dataset and select "Copy Dataset..." to open the "Copy Dataset" dialog box where you can set the target datasource as "bounds" and the target dataset name as "building".
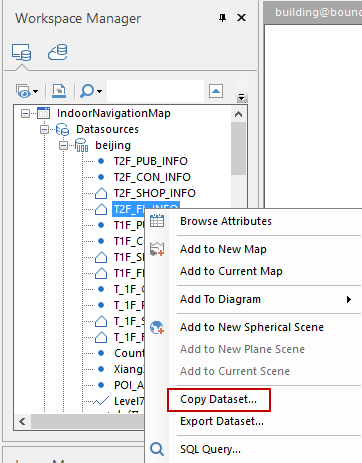 |
| Figure: Copy a dataset |
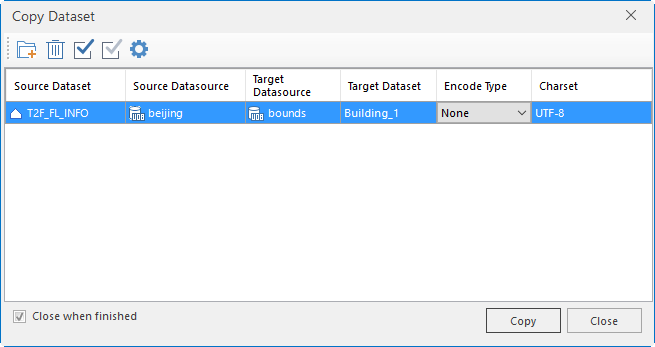 |
| Figure: The "Copy Dataset" dialog box |
Step 4: Add two attribute items for building dataset: LinkName, LinkDataSource.
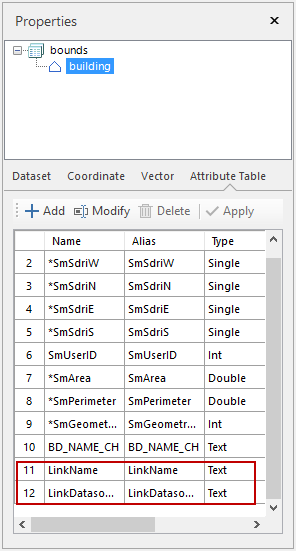 |
| Figure: Add "LinkName" and "LinkDataSource" for the attribute table |
Step 5: Add attribute values.
 |
| Figure: Add attribute values "LinkName" and "LinkDataSource" |
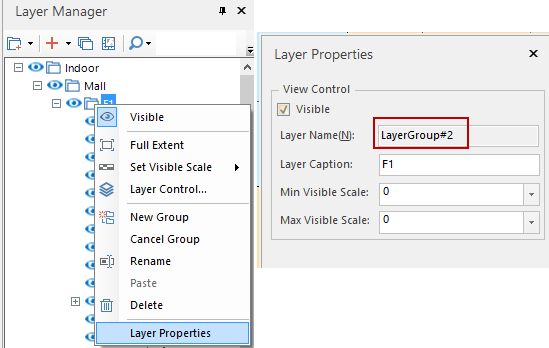
The value of LinkName is the the layer name of layer group which is the parent group of floor group in the layer manager. You can right click the layer group and select Layer Properties and then in the pop-up dialog box find its name.
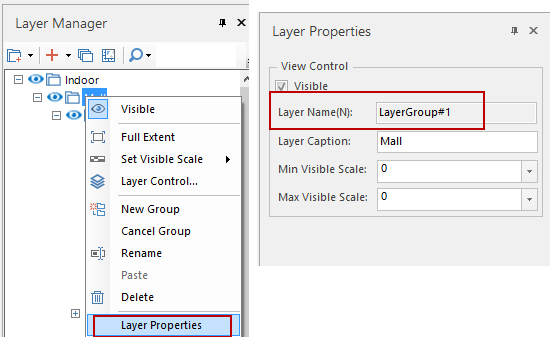 |
| Figure: The way of obtaining the value of LinkName |
The value of "LinkDataSource" is the name of the datasource where the original navigation data is located in.
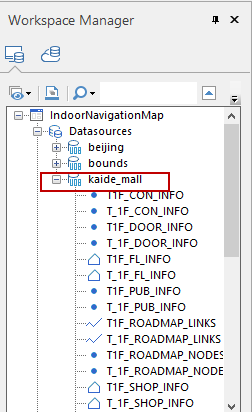 |
| Figure: The way of obtaining the value of "LinkDataSource" |
Creating attribute data
Attribute data play an important role in the procedure of navigation and it includes following attribute items:
| Attribute item | Name and implication | Type |
|---|---|---|
| Layer name | LayerName: the name of each floor in the layer manager | Text |
| Floor ID | FL_ID: coincides with the floor ID of each feature in every floor. | Text |
| Names of path files | NetworkName: The name of dataset where path data of every floor is located in | Text |
| Floor name | FloorName: names to be shown on the switching-floor control. | Text |
| Floor index | FloorIndex: The index value of each floor | Int 32 |
Basic steps:
Step 1: Create an attribute dataset (name: FloorRelationTable) which is saved into the datasource where original indoor data is located in.
In the workspace manager, right click the datasource and then select "New Dataset..."
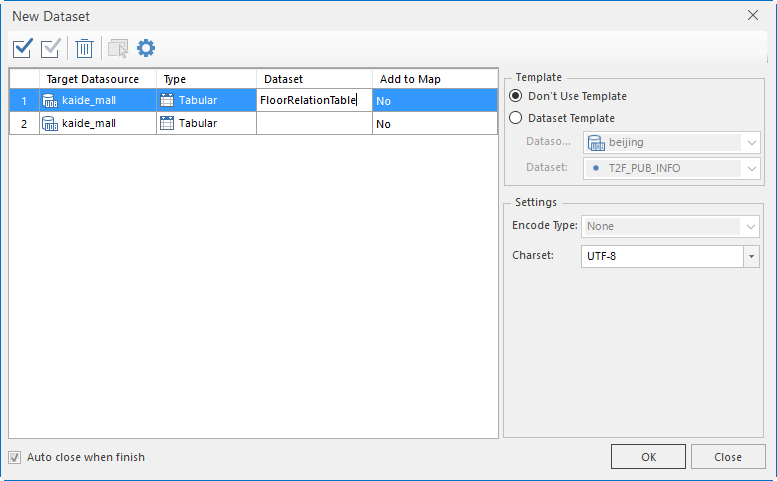 |
| Figure: New an attribute table |
Step 2: add attribute items
Right click FloorRelationTable dataset, and then select "Properties" to open the "Properties" dialog box, and click to add attribute items. Note: Item names must be unique, and you should click "Apply" button to save them.
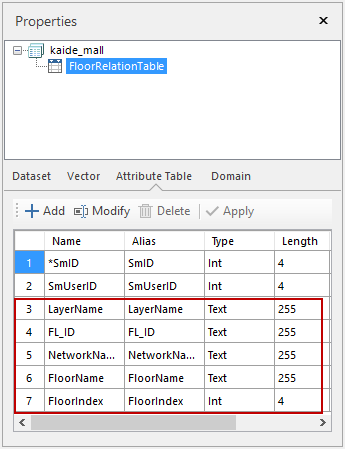 |
| Figure: Add attribute items |
Step 3: Add attribute values
Right click "FloorRelationTable" dataset and select "Browse Properties" to open. Click Add Record in the Edit group to add rows, and then double click any items to enter values.
 |
| Figure: Add rows for "FloorRelationTable" |
Values of "LayerName" are layer names corresponding with floors.
 |
| Figure: How to obtain a layer name |
Each value of "FL_ID" is the ID of corresponding floor.
Each value of "NetworkName" is the name of path navigation data corresponding with each floor.
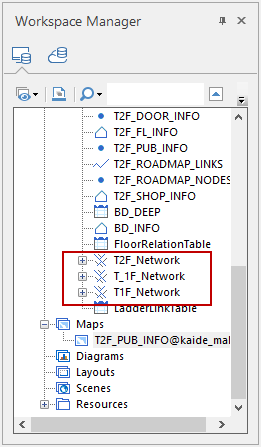 |
| Figure: How to obtain the name of a path file |
The value of "FloorName" is the floor name shown on the floor-operation control.
Each value of "FloorIndex" is the index of every floor, for example, for the underground 1st floor, its value is -1, and for the 1st floor, its value is 1.
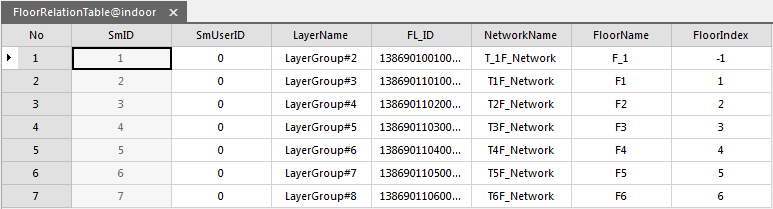 |
| Figure: The result attribute table |
Setting the line symbol marker
After the path analysis in mobile end, the drawn navigation paths can be set by the line symbol library.
In the workspace manager, click Resource node and then double click Line Symbol Library to open the "Line Symbol Library" dialog box. In the dialog, click File > Import to import a line symbol or a line symbol library.
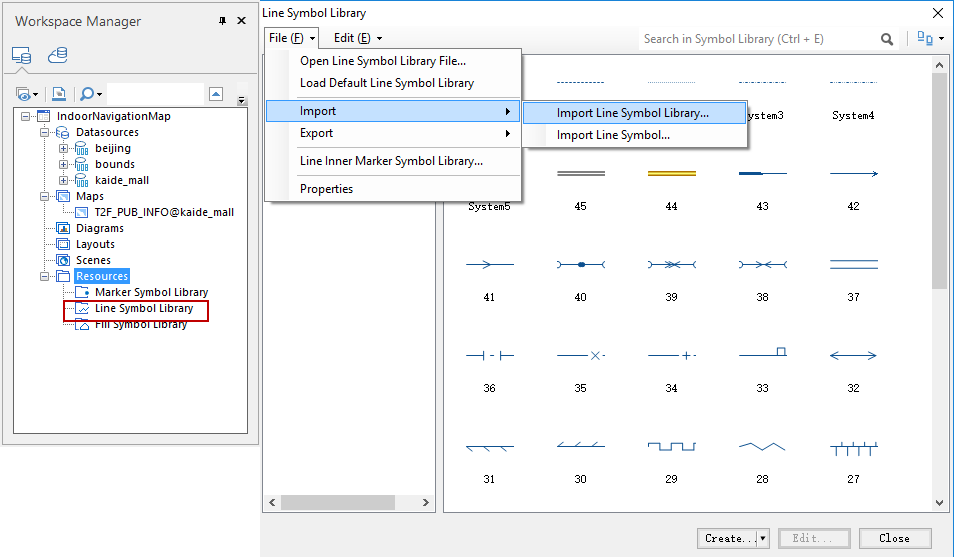 |
| Figure: Import a line symbol or a line symbol library |
Or, you can click Edit > Create Symbol > Create 2D Line Symbol to create a line symbol.
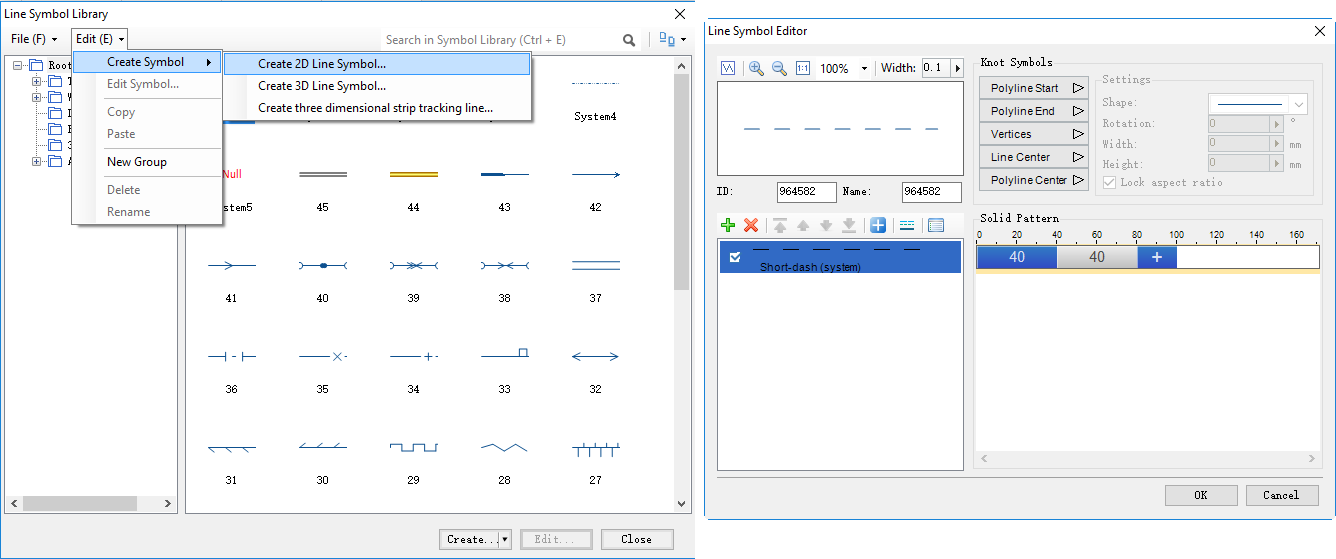 |
| Figure: The operation of creating a line symbol |
Outdoor data (optional)
You can overlay a city map as a base map to integrate indoor and outdoor data.
Application of 2D indoor navigation data
The indoor navigation feature is achieved by codes:
Loads a map
//Set license path
Environment.setLicensePath(sdcard + "/SuperMap/license/");
//The object features Environment must be initialized to call
Environment.initialization(this);
setContentView(R.layout.activity_main);
//Open a workspace
Workspace m_workspace = new Workspace();
WorkspaceConnectionInfo info = new WorkspaceConnectionInfo();
info.setServer(sdcard+"/SampleData/IndoorNavigationData/indoornavigation.smwu");
info.setType(WorkspaceType.SMWU);
m_workspace.open(info);
//Relate to map display controls and the workspace
m_mapView = (MapView)findViewById(R.id.mapView);
m_mapControl =  m_mapView.getMapControl();
m_mapControl.getMap().setWorkspace(m_workspace);
//Open maps in the workspace. Parameter 0 represents the first map
String mapName = m_workspace.getMaps().get(0);
m_mapControl.getMap().open(mapName);
//Set to use full screen drawing mode, show points, words and common layers at the same time
m_mapControl.getMap().setFullScreenDrawModel(true);
//Refresh map
m_mapControl.getMap().refresh();
Note:
- You can refer to online help or developing guide for how to create a project and environment configuration. To navigate indoor, you must add the analysis library (com.supermap.analyst.jar) and navigation library (com.supermap.navigation.jar)
- About how to apply a license, please refer to online help or developing guide.
- According to detail situation, set the paths of license and data.
Initialize the navigation module
m_NavigationEx = m_mapControl.getNavigation3();
m_floorListView = (FloorListView)findViewById(R.id.floor_list_view);
m_floorListView.linkMapControl(m_mapControl);
Add navigation points
//Set a starting point: only the last point will be kept
m_NavigationEx.setStartPoint(pt.getX(), pt.getY(), mCurrentFloorID);
//Set an end point: only the last one point you set will be kept
m_NavigationEx.setDestinationPoint(pt.getX(), pt.getY(), mCurrentFloorID);
//Set passing points: You can set a lot of passing points. Note: A starting point and an end point are required before setting passing points
m_NavigationEx.addWayPoint(pt.getX(), pt.getY(), mCurrentFloorID);
Path analysis
//Determine whether the indoor map is open
String currentFloorID = m_floorListView.getCurrentFloorId();
if (currentFloorID == null) {
    Toast.makeText(m_mapControl.getContext(), "Please open the indoor map first", Toast.LENGTH_SHORT).show();
	return;
}
//Determine whether the indoor map has been loaded successfully
Datasource datasource = m_floorListView.getIndoorDatasource();
if (datasource == null) {
    Toast.makeText(m_mapControl.getContext(), "Failed to load the indoor map datasource", Toast.LENGTH_SHORT).show();
    return;
}
//Set the datasource where the indoor map is located in
m_NavigationEx.setDatasource(datasource);
//Path analysis
boolean bResult = m_NavigationEx.routeAnalyst();
if(bResult){
    Toast.makeText(m_mapControl.getContext(), "Successful analysis", Toast.LENGTH_SHORT).show();
}
else{
    Toast.makeText(m_mapControl.getContext(), "Failed to analyze, please confirm whether the navigation points have been added", Toast.LENGTH_SHORT).show();
    return;
}
Navigation
//Start to navigate  0: real navigation, 1: simulation navigation, 2: cruise, 3: pedestrian navigation
if(!m_NavigationEx.startGuide(1)){
    Toast.makeText(m_mapControl.getContext(), "Failed to start the navigation", Toast.LENGTH_SHORT).show();
    return;
}
More specific sample codes are provided in the product package (except the green packet), and the storage path is "../SampleCode/SampleCode_ADT(SampleCode_AndroidStudio)/IndoorNavi".