Object editing
Select
Single selection
The single-selected Action "SELECT" selects geometric objects by clicking on the object with a single finger. The single-select operation requires the operation layer to be an optional layer.
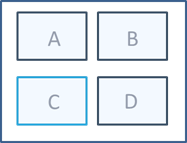 |
| Figure: Single selection |
Implementation steps:
Step 1: Prepare before selection
// Set the layer to select, true, to indicate that the vector layer is optional, false, to indicate that the vector layer cannot be selected.
layer.setSelectable(true);
Step 2: Set the selection status
//Set object operation type as a single option
mapControl.setAction(Action.SELECT);
Multiple selection
Multi-selected Action "MULTI_SELECT" is multi-selected by clicking each geometric object with one finger. The multi-select operation requires the operation layer to be an optional layer.
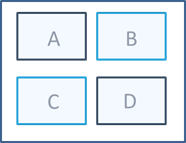 |
| Figure: Multiple selection |
Implementation steps:
Step 1: Prepare before selection
//Set the layer to be selected, true, means that the vector layer is selectable, false, means that the vector layer cannot be selected.
layer.setSelectable(true);
Step 2: Set the selection status
// Set the object operation type to multiple selection
mapControl.setAction(Action.MULTI_SELECT);
Box selection
The box-selected Action "SELECT_BY_RECTANGLE", by touching the screen with one finger, without lifting the finger to slide, along the finger sliding the trajectory as a diagonal rectangular range for geometric object selection. The box selection operation requires that the operation layer is optional and cannot be edited. .
 |
| Figure: Box selection |
Implementation steps:
Step 1: Settings before selecting
//Set the layer to be selected, true, means that the vector layer is selectable, false, means that the vector layer cannot be selected.
layer.setSelectable(true);
// Set the layer not to be editable, true, means that the vector layer can be edited, false, indicating that the vector layer cannot be edited.
layer.setEditable(false);
Step 2: Set the selection status
//Set the object operation type as a box selection
mapControl.setAction(Action.SELECT_BY_RECTANGLE);
Move
Move Action "MOVE_GEOMETRY" In the editable layer in the map window, move the selected geometric object to the new location.
 |
| Figure: Move |
Implementation steps:
Step 1: Set before translation
//Set the layer to display, true, indicating that the layer can be displayed, andfalse, indicating that the layer is not displayed.
Layer. setVisible (true);
//Set the operation layer editable, true, indicating that the vector layer is editable, andfalse, indicating that the vector layer is not editable.
layer.setEditable(true);
//Set the operation layer to be selected, true, indicating that the vector layer is selectable, andfalse, indicating that the vector layer is not selectable.
layer.setSelectable(true);
//Set object operation type translation object
mapControl.setAction(Action.MOVE_GEOMETRY);
Step 2: Interactive translation objects on the device
Select a geometric object in the editable layer of the map window, hold down the geometric object, drag it to the appropriate position, and raise your finger to complete a translation operation.
Step 3: Submit operation
mapControl.submit();During the operation, other geometric objects can be selected, and the selected objects can still perform translation operations until the user performs a "submit" operation and the translation object state will not end.
Delete
In the editable layer of the map window, delete the single- and multi-selection geometric objects.
 |
| Figure: Single-selection deletion |
 |
| Figure: Multi-select Deletion |
Implementation steps:
Step 1: Action Layer Settings
//set that the layer can be displayed, true, which means that the layer can be displayed, and false means that the layer is not displayed.
Layer. setVisible (true);
// Set the operation layer to edit, true, to indicate that the vector layer is editable, false, to indicate that the vector layer is not editable.
layer.setEditable(true);
// Set the operation layer to select, true, to indicate that the vector layer is optional, false, to indicate that the vector layer is not optional.
layer.setSelectable(true);
Step 2: Set the object operation type to single-choice or multi-select
//Set object operation type as a single option
mapControl.setAction(Action.SELECT);
// Set the object operation type to select
//mapControl.setAction(Action.MULTI_SELECT);
Step 3: Set the object operation type to delete the current geometric object
//Set the object operation type to delete the current geometric object
mapControl.deleteCurrentGeometry();
Step 4: Perform interactive actions on the device and submit
Trigger a single-choice or multi-select action, click one or more geometric objects in the editable layer of the map window, raise your finger, and trigger the deletion action.
Step 5: Submit Action
mapControl.submit();Node editing
Add nodes
Add the Action "VERTEXADD" of the node, click on the online or surface geometry object to add the node.
 |
| Figure: Add nodes |
Implementation steps:
Step 1: Action Layer Settings
//set that the layer can be displayed, true, which means that the layer can be displayed, and false means that the layer is not displayed.
Layer. setVisible (true);
// Set the operation layer to edit, true, to indicate that the vector layer is editable, false, to indicate that the vector layer is not editable.
layer.setEditable(true);
// Set the operation layer to select, true, to indicate that the vector layer is optional, false, to indicate that the vector layer is not optional.
layer.setSelectable(true);
Step 2: Set the object action type to a single-choice
//Set object operation type as a single option
 mapControl.setAction(Action.SELECT);
Step 3: Set the object operation type to add node
//Set object operation type to add nodes
mapControl.setAction (Action. VERTEXADD);
Step 4: Interactively add nodes on the device
Click a geometric object in the editable layer in the map window, display the object node, click in the appropriate position of the geometric object, and lift your finger to complete the operation of adding nodes once.
Step 5: Submit an edit
mapControl.submit();Nodes can only be added to one geometric object at a time. After the state of adding nodes ends, the "submit" operation can be completed before other geometric objects can be selected for node editing.
Edit nodes
Edit the Action "VERTEXEDIT" of the node, and adjust the position of the line or surface geometric object node by dragging the node.
 |
| Figure: Edit nodes |
Implementation steps:
Step 1: Action Layer Settings
//set that the layer can be displayed, true, which means that the layer can be displayed, and false means that the layer is not displayed.
Layer. setVisible (true);
// Set the operation layer to edit, true, to indicate that the vector layer is editable, false, to indicate that the vector layer is not editable.
layer.setEditable(true);
// Set the operation layer to select, true, to indicate that the vector layer is optional, false, to indicate that the vector layer is not optional.
layer.setSelectable(true);
Step 2: Set the object action type to a single-choice
//Set object operation type as a single option
mapControl.setAction(Action.SELECT);
Step 3: Set the object operation type to an edit node
//Set object operation type edit node
mapControl.setAction(Action.VERTEXEDIT);
Step 4: Interactive editing nodes on the device
Select a geometric object in the editable layer in the map window to display the object node. Press and hold a node of the geometric object with one finger. Drag it to the right position, lift your finger to complete the node editing.
Step 5: Submit an edit
mapControl.submit();You can only edit nodes for one geometric object at a time. After the state of the editing node is terminated, the "submit" operation is completed, and other geometric objects can be selected for node editing.
Delete nodes
Delete the "VERTEXDELETE" of the node and delete the node by clicking the node on the geometric object.
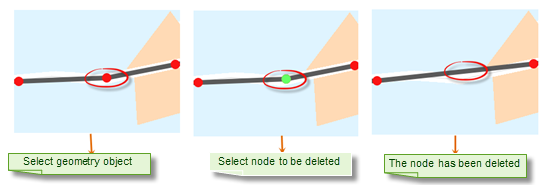 |
| Figure: Delete nodes |
Implementation steps:
Step 1: Operate the layer settings
// Set the layer to be displayed, true, which means that the layer can be displayed, false, indicating that the layer is not displayed.
Layer. setVisible (true);
// Set the operation layer to be editable, true, indicating that the vector layer can be edited, false, indicating that the vector layer cannot be edited.
layer.setEditable(true);
// Set the operation layer is optional, true, which means that the vector layer is optional, and false, which means that the vector layer is not selectable.
layer.setSelectable(true);
Step 2: Set the object operation type as a radio selection
// Set the object operation type to radio
 mapControl.setAction(Action.SELECT);
Step 3: Set the object operation type to delete the node
//Set the object operation type to delete the node
 mapControl.setAction(Action. VERTEXDELETE);
Step 4: Interactively delete nodes on the device
Select a geometric object in the editable layer in the map window, display the object node, and click a node of the geometric object to delete the node.
Step 5: Submit Editing
mapControl.submit();Only one geometric object can be deleted at a time. After the deletion node state terminates, the "submit" operation can be completed before other geometric objects can be selected for node deletion.
Topological editing
iMobile provides a variety of topology editing and capture to facilitate accurate editing of graphic objects.
To implement topological editing, the required class libraries include com.supermap.data.jar, com.supermap.mapping.jar, com.supermap.analyst.jar, so libraries include libimb2d.so, libgnustl_shared.so, libQt5Core.so, libQt5Gui.so, libQt5Svg.so, libQt5Widgets.so.
The key categories and methods are as follows:
| Class | Method |
|---|---|
| MapControl | setSnapSetting()、setAction()、undo()、redo() |
| SnapSetting | openAll()、openDefault() |
| snapClose | closeAll() |
| TopoBuild | topoBuildRegion() |
Combination surface
Action "COMPE_REGION" of the composite surface function is to combine the selected surface objects in the current layer into a composite object.
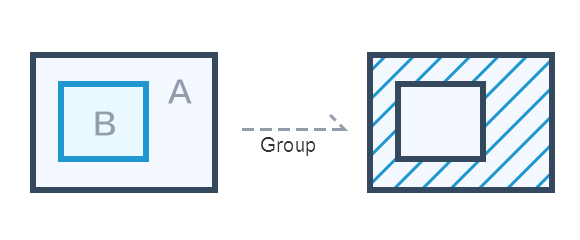 |
| Figure: Combination surface |
- Combine two or more surface objects to generate a new composite object, which supports the combination of surface objects in the opposite layer and CAD composite layer.
- The property information of the newly generated composite object is obtained through the callback function.
- When the number of overlapping surfaces of objects is even, the area is displayed as white after combination, which is part of the result data.
Implementation steps:
Step 1: Operate the layer settings
// Set the layer to display, true, means that the layer can be displayed, false, means that the layer is not displayed.
Layer. setVisible (true);
// Set the operation layer to be editable, true, which means that the vector layer can be edited, and false, it means that the vector layer cannot be edited.
layer.setEditable(true);
// The setting operation layer is optional, true, which means that the vector layer is optional, false, which means that the vector layer is not selectable.
layer.setSelectable(true);
Step 2: Set the object operation type to the combination surface
//Set the object operation type to the combination surface
 mapControl.setAction(Action. COMPOSE_REGION);
Step 3: Interactive operation on the device and
Trigger the "combination surface" action, click to select two or more face objects in turn, and after submission, you can view the combination results.
Step 4: Submit operation
mapControl.submit();- When there is an inclusion relationship between the combined face objects, it is treated as the hole polygon, and the result is also consistent with the hole polygon result.
- After the combination operation in the surface layer, the two superimposed parts of the surface object are white, which is part of the result and is not missing.
Consolidated surface
Action "UNION_REGION" of the merge surface supports the merger of face objects in the opposite layer and the CAD composite layer.
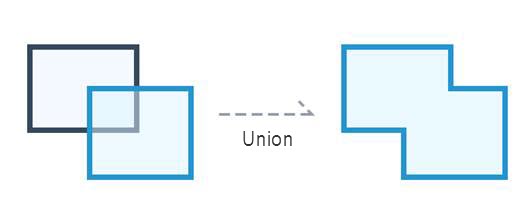 |
| Figure: Consolidated surface |
Description:
- If the surfaces involved in the operation intersect with points, these surface objects are merged into a complex surface object (as shown below, a complex surface object with two sub-objects is generated).
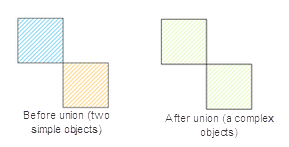 |
| Figure: Point intersection and merge |
- If the faces involved in the object operation intersect with the line, the adjacent edges between these face objects will disappear and be merged into a simple surface object.
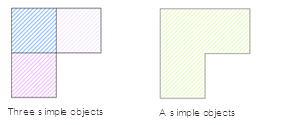 |
| Figure: Lines intersect and merge |
- If the surface of the participating object operation intersects, it will be merged into a simple surface object.
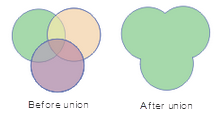 |
| Figure: Face-to-face merge |
- If the faces involved in the object operation do not intersect and are not adjacent to each other, a complex surface object will be generated after the merger (the figure below shows the generation of a complex surface object with three child objects).
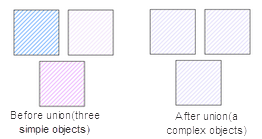 |
| Figure: Faces do not intersect and merge |
Implementation steps:
Step 1: Operate the layer settings
// Set the layer to display, true, means that the layer can be displayed, false, means that the layer is not displayed.
Layer. setVisible (true);
// Set the operation layer to be editable, true, which means that the vector layer can be edited, and false, it means that the vector layer cannot be edited.
layer.setEditable(true);
// The setting operation layer is optional, true, which means that the vector layer is optional, false, which means that the vector layer is not selectable.
layer.setSelectable(true);
Step 2: Set the object operation type to merge surface
//Set the object operation type to the merge surface
 mapControl.setAction(Action.UNION_REGION);
Step 3: Interactive operation on the device
Trigger the "merge surface" action, click two or more face objects in a row, and after submission, you can view the merge results.
Step 4: Submit operation
mapControl.submit();Erasing surface
The Action "ERASE_REGION" of the erase face is used to delete the overlapping part of the target object (the erased object) with the erase object.
 |
| Figure: Erasing surface |
- The erase function is only available when the line object or face object is selected.
- The erase function is suitable for surface layers and CAD layers.
- The erased object and the erased object cannot be the same object.
- The erased object can be multiple face objects, but the erase object must be a face object.
Implementation steps:
Step 1: Action Layer Settings
//set that the layer can be displayed, true, which means that the layer can be displayed, and false means that the layer is not displayed.
Layer. setVisible (true);
// Set the operation layer to edit, true, to indicate that the vector layer is editable, false, to indicate that the vector layer is not editable.
layer.setEditable(true);
// Set the operation layer to select, true, to indicate that the vector layer is optional, false, to indicate that the vector layer is not optional.
layer.setSelectable(true);
Step 2: Set the object operation type to an eraser
//Set the object operation type to a wipe surface
mapControl.setAction(Action.ERASE_REGION);
Step 3: Perform interactive actions on the device
Trigger the "Ease Surface" action to draw the erase surface on the surface object that needs to be erased. After submission, you can view the erase result.
Step 4: Submit an edit
mapControl.submit();Intersect surface
Action "INTERSECT_REGION" of intersection. The intersection operation can obtain the common part of two or more objects. Through the intersection operation, the common area of two or more surface objects can be operated to create a new object. The public area of multiple objects is retained and the rest is deleted.
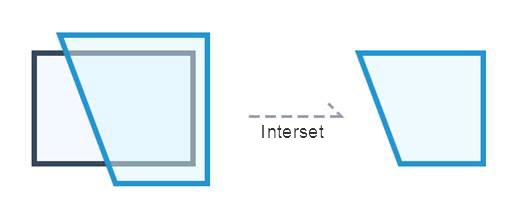 |
| Figure: Intersect surface |
Description:
- If the intersection of all face objects involved in the object operation is not empty, a simple object for the intersection of all objects will be generated.
 |
| Figure: Intersect surface(The intersection is not empty) |
- If the intersection of all face objects involved in the operation is an empty set, after the intersection, false is returned, and the intersection operation cannot be performed and a new object will not be generated.
 |
| Figure: Intersect surface(The intersection is empty) |
Implementation steps:
Step 1: Action Layer Settings
//set that the layer can be displayed, true, which means that the layer can be displayed, and false means that the layer is not displayed.
Layer. setVisible (true);
// Set the operation layer to edit, true, to indicate that the vector layer is editable, false, to indicate that the vector layer is not editable.
layer.setEditable(true);
// Set the operation layer to select, true, to indicate that the vector layer is optional, false, to indicate that the vector layer is not optional.
layer.setSelectable(true);
Step 2: Set the object operation type to find the intersection
//Set the object operation type to find the intersection
mapControl.setAction(Action.INTERSECT_REGION);
Step 3: Perform interactive actions on the device
Trigger the "intersection" action and click on two or more face objects in a row. After submitting, you can view the crossover results.
Step 4: Submit Action
mapControl.submit();Line-cutting surface
Action "SPLIT_BY_LINE" of the line-cutting surface divides geometric objects by drawing temporary dividing lines.
 |
| Figure: Line-cutting surface |
Implementation steps:
Step 1: Operate the layer settings
// Set the layer to be displayed, true, which means that the layer can be displayed, false, indicating that the layer is not displayed.
Layer. setVisible (true);
// Set the operation layer to be editable, true, indicating that the vector layer can be edited, false, indicating that the vector layer cannot be edited.
layer.setEditable(true);
// Set the operation layer is optional, true, which means that the vector layer is optional, and false, which means that the vector layer is not selectable.
layer.setSelectable(true);
Step 2: Set the object operation type to the line segmentation surface
// Set the object operation type to the line segmentation surface
mapControl.setAction(Action.SPLIT_BY_LINE);
Step 3: Interactive operation on the device
Trigger the "line segmentation surface" action, and draw a line across the surface object on the surface object to be segmented. After submission, you can view the results.
Step 4: Submit Operation
mapControl.submit();- Only when the temporary dividing line completely passes through the editable surface geometry object will the geometric object be divided, as shown in the schematic diagram below.
- A temporary dividing line can only cut one face object at a time.
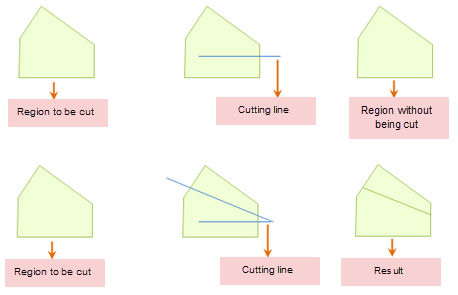 |
| Figure: Line-cutting surface |
Face cut
Action "SPLIT_BY_REGION" of the surface segmentation surface, which cuts the geometric objects of the surface by drawing the temporary partition surface.
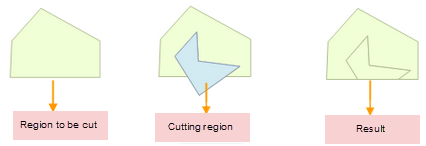 |
| Figure: Face cut |
Implementation steps:
Step 1: Action Layer Settings
//set that the layer can be displayed, true, which means that the layer can be displayed, and false means that the layer is not displayed.
Layer. setVisible (true);
// Set the operation layer to edit, true, to indicate that the vector layer is editable, false, to indicate that the vector layer is not editable.
layer.setEditable(true);
// Set the operation layer to select, true, to indicate that the vector layer is optional, false, to indicate that the vector layer is not optional.
layer.setSelectable(true);
Step 2: Set the object operation type to the surface segmentation surface
//Set object operation type to face-section
mapControl.setAction(Action.SPLIT_BY_REGION);
Step 3: Perform interactive actions on the device
Trigger the "surface segmentation" action, draw a temporary segmentation object on the surface object to be segmented, and the results can be viewed after submission.
Step 4: Submit Action
mapControl.submit();Guardhole
Generate guide holes
The Action "COMPOSE_HOLLOW_REGION" that generates the guide hole is used to select two or more surface objects for the operation of generating island holes.
 |
| Figure: enerate guide holes |
Description:
- Island hole polygons are used in surface layers or CAD layers.
- Select two or more surface objects to perform the island hole polygon operation, and there are several situations:
- If the selected surface objects do not intersect with each other, a complex object will be generated.
 |
| Figure: Intersecting island cave |
- If the selected surface objects intersect points or lines, these surface objects are merged into a complex object.
 |
| Figure: Point/line intersection hole |
- If the selected face object intersects with the face but does not coincide, when the number of face objects is odd, the intersection part of the face object is retained, resulting in a complex object; when the number of face objects is even, the intersected part of the face object is deleted, and a complex object is obtained.
 |
| Figure: Parity guide hole |
Implementation steps:
Step 1: Operate the layer settings
// Set the layer to be displayed, true, which means that the layer can be displayed, false, indicating that the layer is not displayed.
Layer. setVisible (true);
// Set the operation layer to be editable, true, indicating that the vector layer can be edited, false, indicating that the vector layer cannot be edited.
layer.setEditable(true);
// Set the operation layer is optional, true, which means that the vector layer is optional, and false, which means that the vector layer is not selectable.
layer.setSelectable(true);
Step 2: Set the object operation type to generate an island hole
// Set the object operation type to generate an island hole
mapControl.setAction(Action.COMPOSE_HOLLOW_REGION);
Step 3: Interactive operation on the device
Trigger the "Generate Island Cave" action, click and select multiple face objects that intersect but do not overlap. After submission, you can view the results.
Step 4: Submit Operation
mapControl.submit();Hand-painted guide hole
Action "DRAW_HOLLOW_REGION" of the hand-painted guide hole draws the island object by superimposing the drawing surface on the face object.
 |
| Figure: Hand-painted guide hole |
Implementation steps:
Step 1: Manipulate Layer Settings
// Set that the layer can be displayed, true, mean that the layer can be displayed, false, mean that the layer is not displayed.
Layer. setVisible (true);
// Set the operation layer to edit, true, to indicate that the vector layer is editable, false, to indicate that the vector layer is not editable.
layer.setEditable(true);
// Set the operation layer to select, true, to indicate that the vector layer is optional, false, to indicate that the vector layer is not optional.
layer.setSelectable(true);
Step 2: Set the object operation type to a hand-drawn island hole
//Set object operation type hand-painted island hole
mapControl.setAction(Action.DRAW_HOLLOW_REGION);
Step 3: Interactively hand-drawn island holes on the device
Trigger the "Hand-painted Island Hole" action and draw a face object that intersects but does not overlap on the surface object. After submission, you can view the results.
Step 4: Submit Action
mapControl.submit();Fill the guide hole
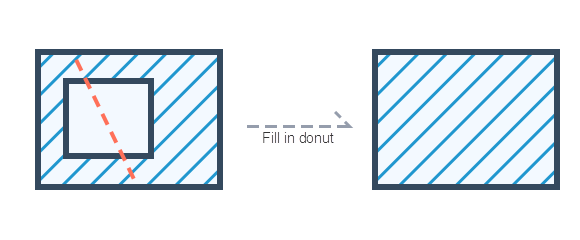
The Action "FILL_HOLLOW_REGION" of the guide hole fills the island hole object into a simple surface object by drawing a line across the island hole on the island hole to be filled.
 |
| Figure: Fill the guide hole |
Implementation steps:
Step 1: Action Layer Settings
//set that the layer can be displayed, true, which means that the layer can be displayed, and false means that the layer is not displayed.
Layer. setVisible (true);
// Set the operation layer to edit, true, to indicate that the vector layer is editable, false, to indicate that the vector layer is not editable.
layer.setEditable(true);
// Set the operation layer to select, true, to indicate that the vector layer is optional, false, to indicate that the vector layer is not optional.
layer.setSelectable(true);
Step 2: Set the object operation type to fill the island hole
//Set the object operation type to fill the island hole
mapControl.setAction(Action.FILL_HOLLOW_REGION);
Step 3: Interactively fill the island hole on the device and submit
Trigger the "Fill Island Hole" action, draw a line across the island hole on the island hole object to be filled, and you can view the results after submission.
Step 4: Submit Action
mapControl.submit();Supplemental guide hole
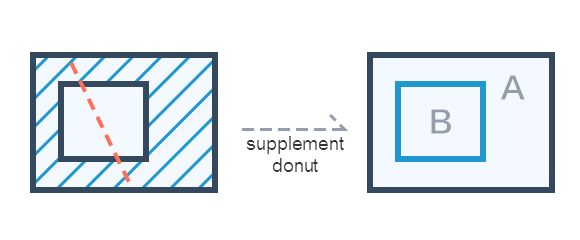
The action "PATCH_HOLLOW_REGION" of the supplementary guide hole, draw a new surface object to supplement the missing part of the island hole by drawing a line across the island hole on the island hole to be added.
 |
| Figure: Supplementary guide hole |
Implementation steps:
Step 1: Action Layer Settings
//set that the layer can be displayed, true, which means that the layer can be displayed, and false means that the layer is not displayed.
Layer. setVisible (true);
// Set the operation layer to edit, true, to indicate that the vector layer is editable, false, to indicate that the vector layer is not editable.
layer.setEditable(true);
// Set the operation layer to select, true, to indicate that the vector layer is optional, false, to indicate that the vector layer is not optional.
layer.setSelectable(true);
Step 2: Set the object operation type to supplement the island hole
//Set the object operation type to supplement the island hole
mapControl.setAction(Action.PATCH_HOLLOW_REGION);
Step 3: Interactively replenish the island hole on the device
Trigger the "Supplement Island Hole" action and draw a line across the island hole on the island cave object to be added. After submitting, you can view the results.
Step 4: Submit Action
mapControl.submit();Public edges
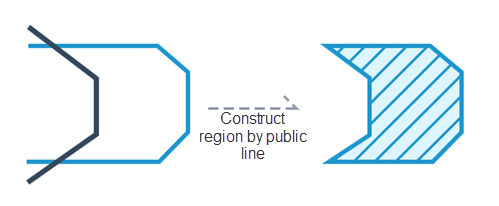
Action "CREATE_POSITIONAL_REGION" of the common edge surface.
 |
| Figure: Public side structure |
Implementation steps:
Step 1: Operate the layer settings
// Set the layer to be displayed, true, which means that the layer can be displayed, false, indicating that the layer is not displayed.
Layer. setVisible (true);
// Set the operation layer to be editable, true, indicating that the vector layer can be edited, false, indicating that the vector layer cannot be edited.
layer.setEditable(true);
// Set the operation layer is optional, true, which means that the vector layer is optional, and false, which means that the vector layer is not selectable.
layer.setSelectable(true);
Step 2: Set the object operation type to the public edge
// Set the object operation type to the public edge
mapControl.setAction(Action.CREATE_POSITIONAL_REGION);
Step 3: Interactive operation on the device and submit
Trigger the "public edge construction" action, and draw a temporary construction area in the designated area of the edge of the original surface object of the public edge construction surface. After submission, you can view the results.
Step 4: Submit Operation
mapControl.submit();Polygonal filling hole
Action "PATCH_POSOTIONAL_REGION" of the polygon filling hole is used to supplement the closed space formed by multiple surface objects.
 |
| Figure: Polygonal hole |
Implementation steps:
Step 1: Action Layer Settings
//set that the layer can be displayed, true, which means that the layer can be displayed, and false means that the layer is not displayed.
Layer. setVisible (true);
// Set the operation layer to edit, true, to indicate that the vector layer is editable, false, to indicate that the vector layer is not editable.
layer.setEditable(true);
// Set the operation layer to select, true, to indicate that the vector layer is optional, false, to indicate that the vector layer is not optional.
layer.setSelectable(true);
Step 2: Set the object operation type to a multi-object patch
//Set the object operation type to a multi-object patch
mapControl.setAction(Action.PATCH_POSOTIONAL_REGION);
Step 3: Perform interactive actions on the device
Trigger the "multi-object filling hole" action, draw a temporary surface object containing a closed space surrounded by multiple objects at the position to be added. After submitting, you can view the results.
Step 4: Submit Action
mapControl.submit();Coordinated editing
The Action "MOVE_COMMON_NODE" coordinated editing realizes the simultaneous adjustment of the shape of two or more objects with common side objects by adjusting the nodes on the common edge of two or more surface objects.
 |
| Figure: Coordinate editing |
Implementation steps:
Step 1: Operate the layer settings
// Set the layer to display, true, means that the layer can be displayed, false, means that the layer is not displayed.
Layer. setVisible (true);
// Set the operation layer to be editable, true, which means that the vector layer can be edited, and false, it means that the vector layer cannot be edited.
layer.setEditable(true);
// The setting operation layer is optional, true, which means that the vector layer is optional, false, which means that the vector layer is not selectable.
layer.setSelectable(true);
Step 2: Set the object operation type to a single-choice
// Set the object operation type to radio
mapControl.setAction(Action.SELECT);
Step 3: Set the object operation type to coordinate editing
// Set the object operation type to coordinate editing
mapControl.setAction(Action.MOVE_COMMON_NODE);
Step 4: Interactive operation on the device and submit
Trigger the "select" action, click one of the two or more face objects to be coordinated and edited in the editable layer in the map window, raise your finger, select the node to be adjusted, drag the node to adjust the shape of the surface object, and view the results after submission.
Step 5: Submission Operation
mapControl.submit();For the above topological editing, please refer to the sample code TopoDataprocess.


