GIS Cloud Suite
Service Instances Management
GIS Cloud Suite supports to manage service instances, users can view the service instance details, batch authorize service instances, edit the configuration of service instance, and specify which service node to running on. The content below is going to introduce the manage functions on the service instance list page and details page.
Service Instance List
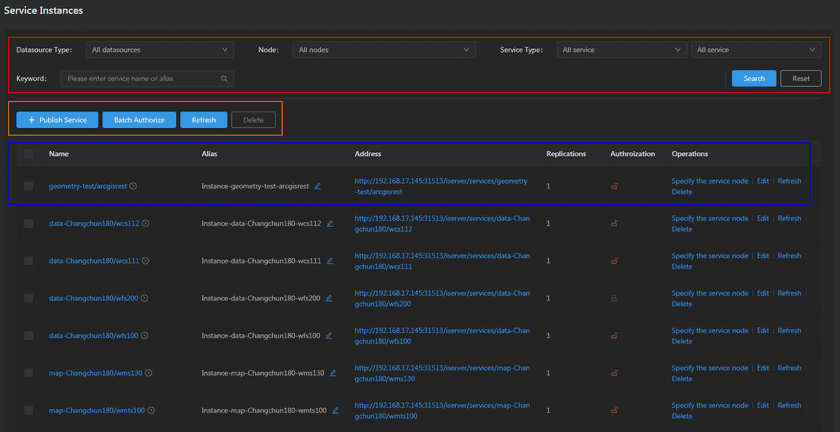
Clicks Service Management > Service Instances on the left navigation to enter the service instance list page.
The functions in the red box of the screenshot is for service instances searching, you can filter the sercice instances by datasource, service node, service type, and keywords. Click on Reset to clean all options.
The functions in the orange box of the screenshot above are:
- Publish Service: Used for publishing services, please refer to GIS Cloud Suite >Service Management > Service Instances > Publish Service.
-
Batch Authorize: Set access permission for multiple service instances.
- Visitors can visit: No access permission limited, all visitors can visit the service instance.
- Login users can visit: The users in GIS Cloud Suite can visit the service instance after loging in.
- The specified roles can visit: Specify access permission to roles, users associated with the specified roles can visit the service instance.
Notes:
- The details introduction of access permission please refer to SuperMap iServer Documentation.
- The introductions of Users and Roles in GIS Cloud Suite please refer to Security.
- Refresh: Batch update selected service instances. If you have updated the datasource and wanted to update the service instance as well, you can use the refresh function. The service instances will keep working during updaing.
- Delete: Batch delete selected service instances(click the boxes on the left of the list could select/unselect the service instances).
The functions in the blue box of the screenshot above are:
- Name: The name of the service instance, clicks to enter the service details page. Clicks on the icon on the right of the name to see the service nodes that carry the service instance, and scaling the service nodes.
- Alias: Set a alias name for service instance.
- Address: The address of service instance, clicks to view the iServer REST Service.
- Replications: The number of service instance replications.
- Authorization: Set access permission for service instance.
-
Operations:
- Specify the service node: Specify which service nodes are the service instance running on. You can also create a new node to carry the service instance.
- Edit: Edit the service instance configuration.
- Refresh: Update the service instance. If you have updated the datasource and wanted to update the service instance as well, you can use the refresh function. The service instances will keep working during updaing. What’s more, you can add the environment variable in the YAML file of service node to achieve automatic refresh, please refer to Appendix > FAQ > Question 13 for more details.
- Delete: Delete the service instance.
Service Details
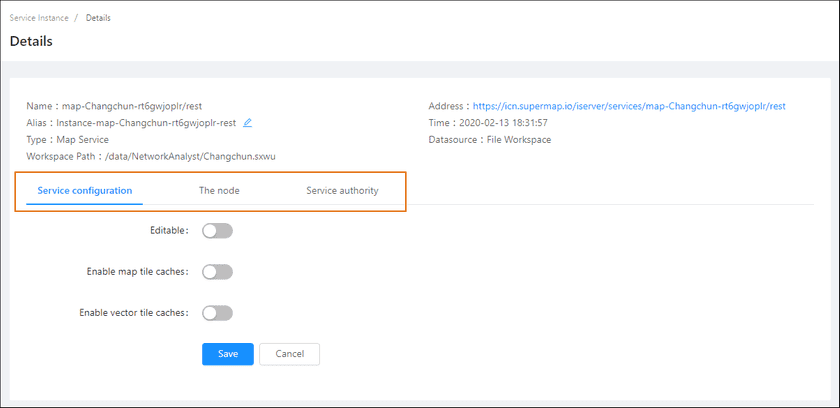
Clicks on the name of the service instance to enter the service details page.
The service details page shows the name, address, alias, creation time, service type, and datasource of the service instance. There are more functions in the orange box of the screenshot above:
-
Service configuration: Modify the configuration of service instance.
- Editable: If the service configuration is editable, the visitors allow to modify the service configuration.
- Enable map tile caches: The system will tiling the map automatically.
- Enable vector tile caches: The system will tiling the map to vector data automatically.
- Choose datasets to be published: Specify the datasets to be published.
- The node: View the service node information which is carrying the service instance.
- Service authorization: Set the visitor access permission.

