GIS Cloud Suite
Publishing DM Workspace
GIS Cloud Suite supports to publish SuperMap Workspaces as GIS services. SuperMap workspace is user’s working environment, which saves all the datasources and organizational relations of maps into a project.
Dameng Dependency Installation
Before publishing DM Wrokspace, follow the steps below to install the dependency of Dameng database in related images:
All the
ispeco-dashboard-apiimage and the images starting withgisapp-*need to install Dameng dependency according to the steps below.
-
Enter the container, please execute:
docker exec -i -t <container name> /bin/bash -
Obtain the path of
UGO_HOME, please execute:echo $UGO_HOME - Copy the following
.sofiles from the[Dameng Database Installation Path]/bindirectory to the path ofUGO_HOME.
libcrypto.so
libdmcalc.so
libdmcfg.so
libdmclientlex.so
libdmcomm.so
libdmcpr.so
libdmcvt.so
libdmcyt.so
libdmdcr.so
libdmdpi.so
libdmdta.so
libdmelog.so
libdmfldr.so
libdmmem.so
libdmmout.so
libdmnci.so
libdmoci.so
libdmos.so
libdmstrt.so
libdmutl.so
Notes:
libdmfldr.sois the required file in the ARM environment.- If the
libdmoci.sofile does not exist in the[Dameng Database Installation Path]/bindirectory, please contact the Dameng database provider to obtain the file.
Execute the following command to copy the file:
docker cp <filename> <container name>:<UGO_HOME path>-
Check whether the database dependency is complete, please execute:
ldd -r libSuEngineDMCI.soIf it prompts that there are missing dependencies after executing the above command, you need to add the corresponding dependencies according to the specific prompts.
-
Create new images based on the container above.
docker commit <container name> <new image name> -
Replace the old images by the new images, please execute:
docker push {new image name} - Modify the images used by the service node(
gisapplication) andispeco-dashboard-apias new images.
Publish DM Workspace
Please follow the steps to publish DM Workspace:
-
Log in to GIS Cloud Suite, clicks on iManager Home > System Management; clicks Service Management > Service Instances on the left navigation bar; clicks on + Publish Service on the page of Service Instances. Selects DM Workspace and clicks on Next.
- Advanced Options(Used for customize configuration): Customize the configuration to build services, more details please refer to SuperMap iServer Documentation. To extent services please refer to Service Management > Service Extension. To migrate services from iServer please refer to Appendix > iServer Services Migration.
-
Fills out the datasource information.
- Server name(Required): The DM server name or address.
- Workspace name(Required): The workspace name of the database.
- Database name: The name of the database.
- User name(Required): The username of the database.
- Password(Required): The password of the database.
- Select the service type. Please refer to the relationship table in GIS Cloud Suite >Service Management > Service Instances > Publish Service.
-
Configure the service.
When the service types are REST-Map Service, REST-Data Service, REST-Vector Tiles Service, WMS1.1.1 Service, WMS1.3.0 Service, WMTS1.0.0 Service, WMTS-CHINA Service, WFS1.0.0 Service, WFS 2.0.0 Service, WCS1.1.1 Service, WCS1.1.2 Service, ArcGIS REST Map Service, ArcGIS REST Feature Service, Baidu REST Map Service, and Google REST Map Service, select whether the service configuration is Editable. If the service configuration is editable, the visitors allow to modify the service configuration.
When the service types are REST-Data Service, WFS1.0.0 Service, WFS 2.0.0 Service, WCS1.1.1 Service, WCS1.1.2 Service, and ArcGIS REST Feature Service, you can enable Choose datasets to be published to specify the datasets to be published, or the system will publish all the datase
When the service type is REST-Addressmatching Service, please fill out the following parameters:
- Address dictionary(Required): The path of address dictionary file(.dct). The Address Dictionary file provides the Chinese characters segmentation rules, it cuts the Chinese characters into meaningful words, for example, 我是一个学生, the result is: 我/是/一个/学生. An Address Dictionary is a set of these meaningful words. GIS Cloud Suite povides internal Address Dictionary, users can also customize dictionaries for the data through SuperMap iObject Java.
- Data source(Required): Select the datasource for address matching.
- Dataset(Required): Select the dataset for address matching.
- Search field(Required): Select the search field for address matching, the address is combined by the field values.
Example:
Select the search field “province, city, county”, the address name should be “Sichuan province ChengDu City ShuangLiu County”.- Index directory(Required): When publishing a workspace as Addressmatching service, this parameter is used to specify the output path of the generated address index file. During publishing, the sytem will build index according to the specified fields of the dataset being used, and segment words to them based on the input dictionary. Here you can also input an existing index file to publish address matching service.
- Search radius(Required): Search radius is used for GeoDecoding, users will get the results in the specify radius after setting the search radius. The unit of search radius should be as same as datasets. While the unit of datasets in degrees, the default value of search radius is 0.01 degree. While in meters, it is 500 meters.
- Max return count: The maximum return count of the results.
- Grid Distance: Set grid distance while creating index, the unit should consistents with dataset. ‘-1’ means to use the default value.
- Update index regularly: Wether to update the address matching index regularly.
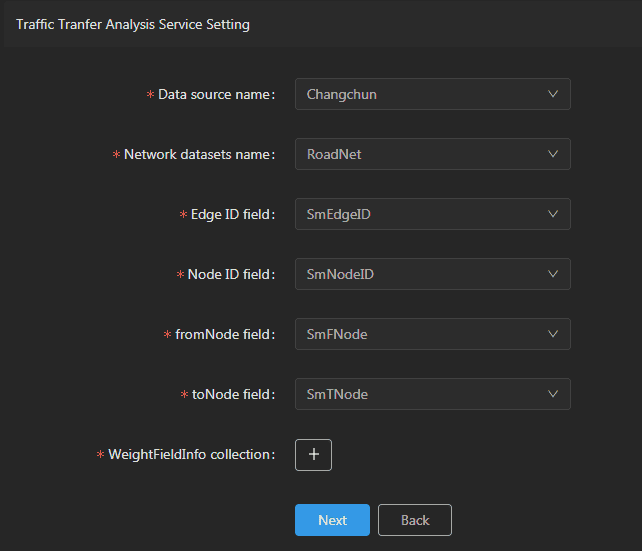
When the service type is REST Transportation Analysis Service, please configure the following parameters:
- Data source name(Required): The datasource name of the network dataset used for traffic network analysis.
- Network dataset name(Required): The name of the network dataset used for traffic network analysis.
- Edge ID field(Required): The field that identify the ID of the network arc. The value is SmID by default.
- Node ID field(Required): The field that identify the ID of the network node.
- fromNode field(Required): The field that identify the starting node ID in the network dataset.
- toNode field(Required): The field that identify the final node ID in the network dataset.
- WeightFieldInfo collection: Add one field as the weight field.
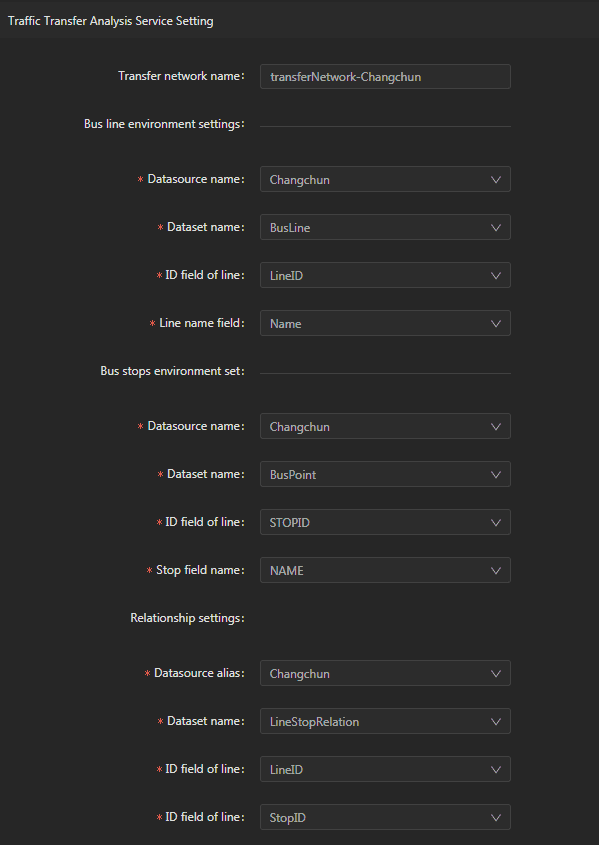
When the service type is REST Transfer Analysis Service, please configure the following parameters:
- Transfer network name: The transfer network name. The prefix is “transferNetwork-” by default.
-
Bus line environment settings:
- Datasource name(Required): The name of the bus line datasource used for traffic transfer analysis.
- Dataset name(Required): The name of the bus line dataset used for traffic transfer analysis.
- ID field of line(Required): The field of the transfer line ID.
- Line name field(Required): The field of the transfer line.
-
Bus stops environment set:
- Datasource name(Required): The name of the datasource holding the transfer stops participating the traffic transfer analysis.
- Dataset name(Required): The name of the dataset for transfer stops participating the traffic transfer analysis.
- ID field of stop(Required): The field of the transfer stop ID.
- Stop field name(Required): The field of the transfer stop.
-
Relationship settings:
- Datasource alias(Required): The datasource holding the dataset for the relationship between the stops and lines.
- Dataset name(Required): The dataset for the relationship between the stops and lines.
- ID field of line(Required): The field of the transfer line ID.
- ID field of stop(Required): The field of the transfer stop ID.
When you only select one kind of service type to publish, you can define the name of service instance:
- Service Name: Define the name of service instance. The service name will be generated according to datasource and service type automatically if you do not define.
-
Select the service node.
- New node: Create a service node to carry the service instance. If this is your first time to publish service, you need to create a service node.
- Existing nodes(Recommend): Select the existing service nodes to carry the service instance. If the existing service nodes do not have the license permission, please create a new one.
- Clicks on Publish and wait for the prompt.

