Tutorial
OpenStack Additional Configuration
After the establishment of OpenStack environment (composed of controller nodes and compute nodes) is completed, the following configuration needs to be added. Once configured, SuperMap iManager can run on this cloud computing platform.
Installing Additional Parts
If your OpenStack environment does not have Ceilometer and Nova quotas parts installed, you need to install the Ceilometer and Nova quotas components, and other required components.
Creating Tenants and Users
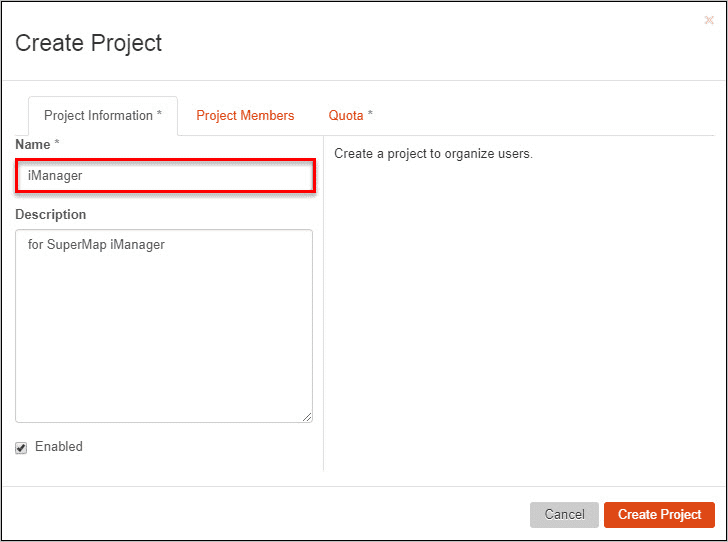
Access the OpenStack Admin interface (http://<IP>/horizon/), on the Identity tab, click “Project”, enter the project management page, click the “Create Project” button on the page, fill in the relevant information for the project, then you can create a tenant for SuperMap IManager and the project name is tenant name.
For example, the tenant created in the following figure for the project “iManager” under the OpenStack platform, the “Tenant Name” should be “iManager” while Creating GIS Server for example.
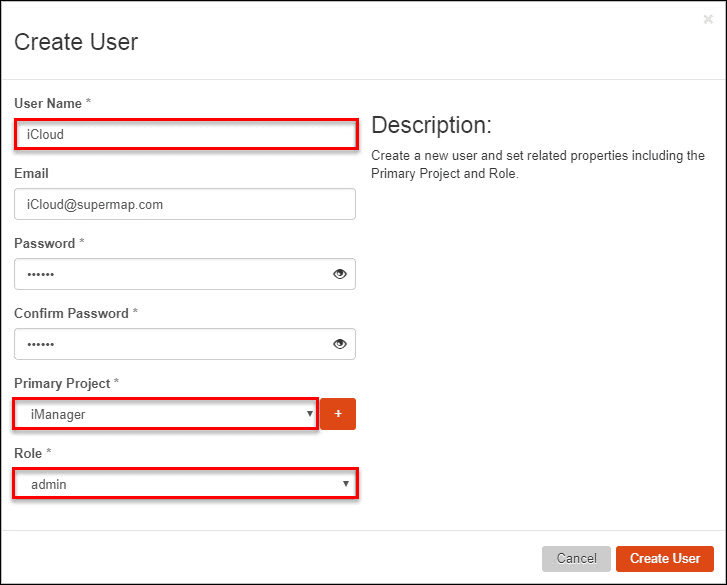
On the Identity tab, select Users, enter the User Management page, click on the “Create User” button on the page, fill in the user’s information, then you can create a login account for SuperMap iManager for the cloud computing platform. In the Create User dialog box, you need to fill in the user name, e-mail, and password, and the primary project should be set to the tenant that you created.
Set Role to admin.
For example, the user created under the OpenStack platform, the “Login User” and “Login Password” should be the corresponding “Username” and “Password” in the figure, and the login account to login into http://<server>/horizon/ should also be the “Username” and “Password”. Note that here you need to select the primary project. By default is unspecified. If not specified, there may be errors such as not being able to get network information in iManager.
Configuring Network
OpenStack offers a wide range of network types, including Vlans, GRE, Flat, and so on. Here we take Flat is an example. First, we create a new Flat type and enable DHCP network. If you have a OpenStack environment with such a network, you do not need to create a new network. You only need to perform the second step, that is, creating subnets.
Creating Network
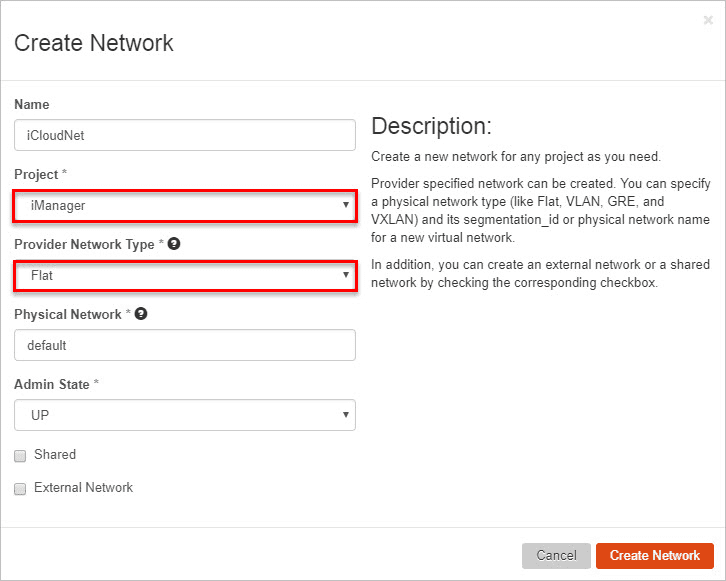
Click Manager>System>Network>Create Network, and input the network information.
While SuperMap iManager is managing virtual platform, you need to set Network Name as the network name you input. As shown in the following figure, you should choose iCloudNet.
Where them, the project should be selected as the project you created above, the network management type should be selected as selection Flat. Keep the physical network by default. If your physical network name is not the default name, you need to input according to demand.
Creating Subnets
Enter the detailed information page of your created network, and create subnets for the network. IP network segments need to be set up according to network plan, DHCP should be enabled, and IP segments used by SuperMap iManager need to be set.
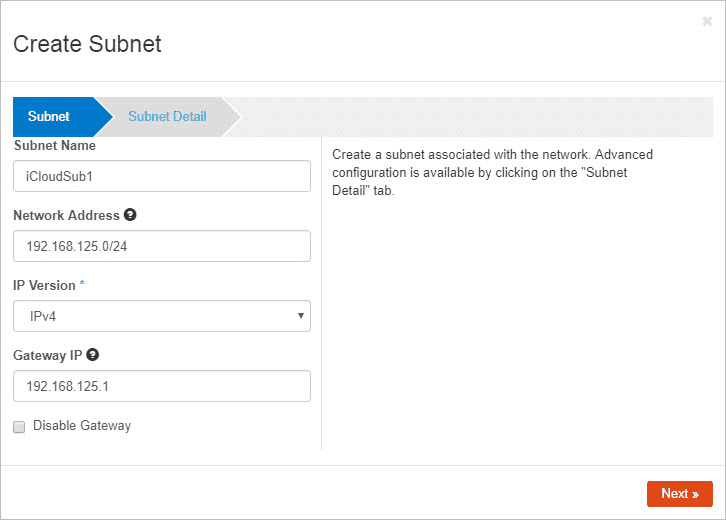
Here we take creating the 192.168.125.0/24 segment as an example.
Click Create Subnets, input the name, IP segment, gateway for subnets.
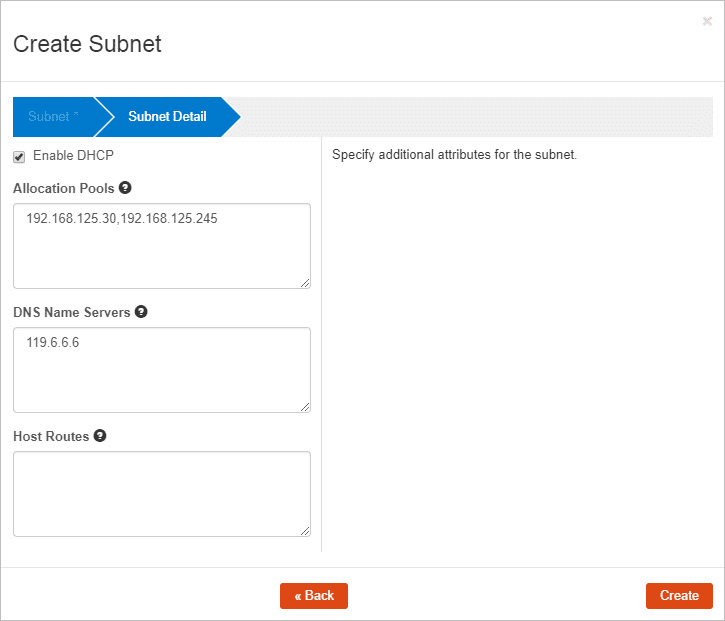
When finished inputting “Subnet” information, click “Next” to input “Subnet Details” information, such as IP segment, DNS server.
Check Enable DHCP to enable DHCP.
IP segment specified here will be used for virtual machine creation of SuperMap iManager.
While performing IP configuration in SuperMap iManager, the configured IP resources should be included in the IP segment input here.
Floating IP
OpenStack has fixed IPs and floating IPs. The fixed IPs will be distributed to created instances and will no longer change, floating IPs are IP addresses that can be dynamically bound to instances and released. While initializing SuperMap iManager, choose whether to use floating IP. After initialization, you can modify whether to use the floating IP under virtual platform management.
Note: If you want to use floating IP in SuperMap iManager, deploy network modules in the Self-service networks method while installing OpenStack.
Configuring Load Latency and Dynamic Scaling
Modify Monitoring Interval
Modify the /etc/ceilometer/pipeline.yaml file for all OpenStack nodes (all Controller and Compute nodes) and modify the interval (interval value) of all monitoring items to 20.
Notes:
All nodes in the OpenStack environment need to be modified, and all interval values in the pipeline.yaml file must be modified to 20.
Add Parameters
Modify the /etc/ceilometer/pipeline.yaml file for all OpenStack nodes (all Controller and Compute nodes), and add parameter bandwidthupdateinterval = 20.
Enable Services
All Controller nodes need to restart the following services:
service ceilometer-api restart
service ceilometer-agent-central restart
service ceilometer-collector restart
All Computer nodes need to restart the following services:
service ceilometer-agent-compute restartNotes:
When restarting the services, there will be a prompt as shown in the figure. If not, it indicates that some configuration are not configured properly yet, and you need to configure according to error prompts.
Import GIS Mirror
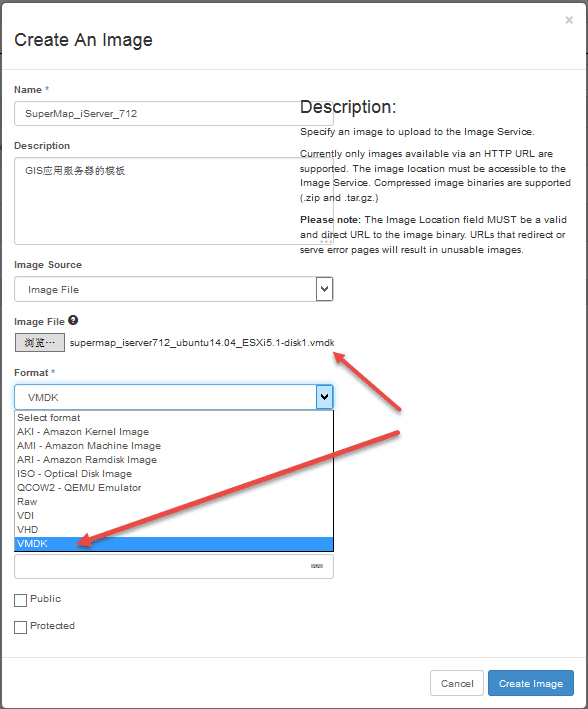
In order to successfully create a GIS environment, the image file of the GIS environment needs to be imported into the cloud computing platform. The Mirror Type should be consistent with the file type of the imported mirrored file while importing the mirrori type. Specific import process is as follows:
- Access OpenStack Admin Interface (
http://<IP>/horizon/), on the Admin tab, click “System”, click “Images”, enter the image management page, click the “Create Image” button to enter the page for adding the mirror. - In the Create An Image dialog box, input the related information for the mirror. Name is required. While associating the template in iManager, the Name value input here will be selected for Associated Template Name. Description is optional. While managing the templates in iManager, the Description value input here will be selected for Template Description in Template List.
- If the mirror file is local, select the local file in image Source. If the mirror file is non-local file, fill in the address and file name of the remote access in Image Location, such as
http://example.com/image.vmdk. - When you select Format, the type that you choose should be consistent with the type of the mirrored file. For example, in the following figure, the file type of the mirrored file for the imported GIS application server (SuperMapiServer) is .vmdk, then you should choose VMDK for SelectFomat. If the type of “Setectfomat” is not consistent with the imported mirrored file, it will cause error while iManager is creating the GIS environment.
- You can leave Architecture empty. “Minimum Disk” and “Minimum RAM” should be input according to actual needs, or left empty. “Public” and “Protected” should be selected according to the actual situation, or left not selected.
Setting Security & Access
In order to enable us to access the virtual machines created in the OpenStack platform, we need to set up Security & Access, that is, to add TCP rules and ICMP rules to both the import and export networks, with a total of four rules.
Within the Security group under the Security & Access option, modify the default security group, that is, add TCP rules and ICMP rules to the default security group. Steps are as follows: Project->Compute->Access&Security->Security Groups->default->Manager Rules->Add Rule. Rules are added in the Add Rule dialog box.
Two rules are explained separately below:
Add TCP Rules
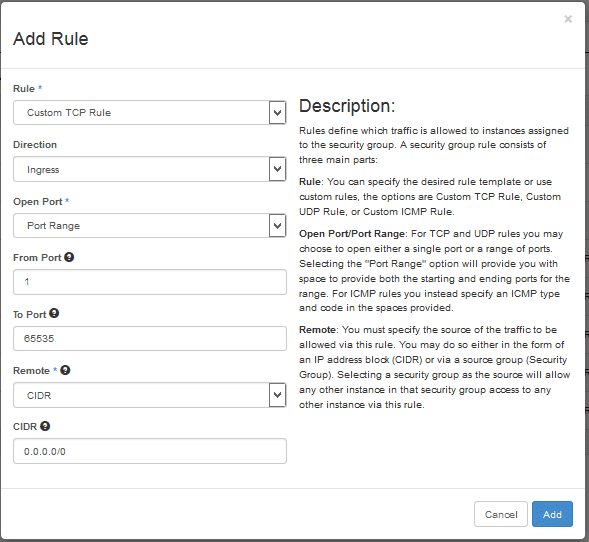
The rules for adding the entry direction for the TCP protocol are configured as follows:
In the Add Rule dialog box, select Custom TCP Rule for Rule, Ingress for Direction, Port Range for Open Port. Please fill in the minimum port number for From Port, such as” 1 ”; fill in the maximum port number for To Port, such as” 65535 “. Keep default values for Remote and CIDR. After filling out all the options, click the Add button, as shown in the following figure.
Similarly, when you add a rule for the export direction for the TCP protocol, please select Egress for Direction, keeping the rest of the options the same as the Ingress.
Add ICMP Rules
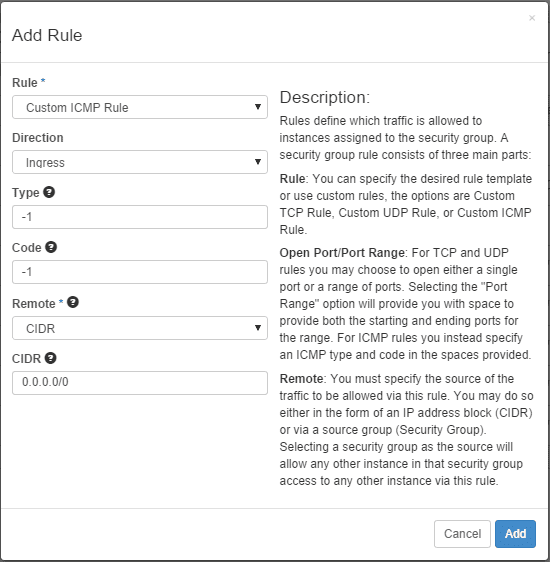
The rules for adding the entry direction for the ICMP protocol are configured as follows:
In the Add Rule dialog box, select Custom TCP Rule for Rule, Ingress for Direction, -1 for Type, -1 for Code. Keep default values for Remote and CIDR.
After filling out all the options, click the Add button, as shown in the following figure.
Similarly, when you add a rule for the export direction for the ICMP protocol, please select Egress for Direction, keeping the rest of the options the same as the Ingress.
Problems & Solutions
-
What if no valid host was found error occurs during instance creation?
A: You can check the following three steps:
- You should check whether there are too many instances that causes lack of space.
- Check the system information in the Nova-compute state in the OpenStack environment, if it is down, it might be because the network is different. You need to perform cold start for Compute node (If it is in shutdown state, press the power key to start).
- Check the network added in the network configuration, check the whether status of compute:dhcp and admin status are down. If the admin status is down, you can edit the port and set it to up. After a period of time, if the status is still down, You can delete and rebuild network. If the admin status is up and status of compute:dhcp is down, you can rebuild the network.
-
In the process of GIS environment creation, if the failure of the execution appears in Task Management page, and the “IP * * * * * * * is not available. Please check the network configuration information and retry” prompt display. How to handle this problem?
A: The first possibility of such an error is that the network configuration information is incorrect. Secondly, it might be because it is impossible to get an IP address from DNSmasq. The simplest way is to turn off all the DNSmasq processes on the machine and reboot nova-work.
Specific steps are as follows:
- Step 1: Check the network configuration information and the configuration information of the virtual platform. When you confirm the network is available, click the “Retry” button for the task. After retry, if the task is successful, you do not need the following steps.
- Step 2: If the same prompt still exist after checking the network configuration information and retrying, you need to configure the OpenStack Controller node (DNSMASQ host machine). The configuration method is to perform “killall dnsmasq” and “service neutron-dhcp-agent restart” at the Controller node (the DNSMASQ machine).
- Step 3: After restarting the Controller node, on the iManager Task Management page, click the “Retry” button for the task.
