Tutorial
Load Balancer
SuperMap iManager provides the ability to create and configure load balancers, supports one-click deployment of load balancers, or imports external load balancers. The load balancer is supported by the Nginx software, which provides a guarantee for the load balancing function. Load balancers allocate service requests according to the load balancing strategy, such as polling method, weighted polling method, IP Hashi/Weighted IP hash method, minimum connection method/Weighted minimum connection method, etc.
Load balancing can enhance the GIS environment performance, therefore acquiring important data in a fast way and solving the high concurrency problem. Load balancers are added by Super managers and can be used by all users. After you log into SuperMap iManager, in the iManager interface, click Load Balancer under Load Balancing to enter the Load Balancer Management page.
In Docker, iManager will automatically deploy built-in load balancers, which will be primarily used for HA Strategy. In addition to the built-in load balancers, you can add a load balancer on your own. You can either add a new load balancer, or import an external load balancer. Here we will introduce the two ways:
Notes:
If the virtual platform you are using is Docker, you can only import an externally available load balancer. For details, please refer to Use iManager > General Load Balancing and HA Strategy > for Docker.
Create a New Load Balancer
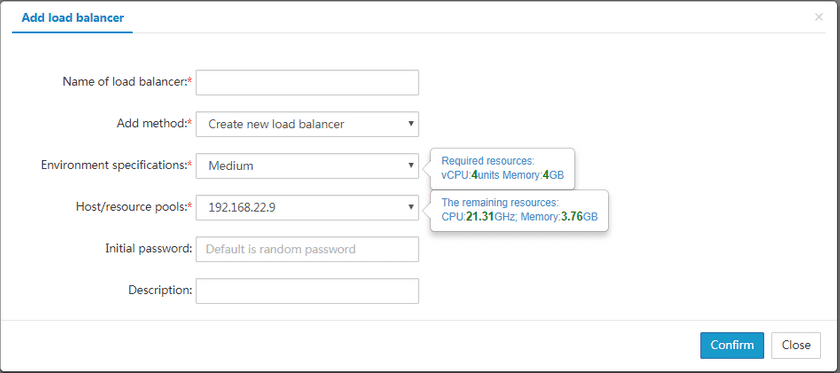
On the Load Balancer Management page, click Add Load Balancer, and the dialog box for adding the load balancer will pop up, and the default method in the dialog box is to create a new load balancer.
- Load balancer name (required): Name the newly created load balancer.
- Add method (required): The default Add method is selected, which is to create a new load balancer.
- Environmental specifications (required): Environmental specifications have small, medium-sized, large and other types. The default value is medium. The CPU and memory required for each type is different. When you select a type, the resources required by the type will display in the right prompt box. Log in as an administrator, you can use the new template specification. To know more about the template specifications, please refer to Use iManager > Cloud GIS Infrastructure Management > System Configuration > Environment Type Management.
- Host/resource pool (required): Deploy the target physical host of the GIS virtual machine; This is required for iManager on the vSphere platform. The prompt box to the right will display the left resources of the host/resource pool.
- Tenant name (required): “Tenant name” is also called “Project Name”, which is the name of the project that you filled out in the OpenStack system for iManager to apply for the calculation resources; This item is required by iManager on the OpenStack platform. Please refer to Appendix > OpenStack Additional Configuration for details of creating tenants. The prompt box to the right of the tenant name will display the remaining resources, namely CPU resources and memory resources.
- Initial password (optional): Refers to the login password of the virtual machine where the load balancer was created successfully. The default is a random password, which can be viewed on the Details page by clicking “View Server Password”.
- Description information (optional): A brief overview of the main functions of the newly created load balancer, the reason for creation, and so on.
After filling in the above information, click “OK” and iManager will automatically create the load balancer based on the information you fill out. The progress and log information for the creation of the load balancer can be viewed on the Task management page.
Import an External Load Balancer
If you already have a load balancer available, you can import it directly. Specific steps are as follows:
First, on the Load Balancing Management page, click “Add Load Balancer”, where you need to switch the add method to import an external load balancer.
- Load balancer name (required): Name the newly imported load balancer.
- Add method (required): Select Import an existing load balancer.
- Server IP (required): Please fill in the IP address of the imported load balancer.
- Password (required): This password is the login password for the host/virtual machine where the load balancer is imported. If there is no password, you can leave it blank. If there is a password, you must fill in correctly.
- Executable file directory (required): The default value is the Nginx executable file directory. Please make sure it is correct. A wrong directory will cause the failure of creation of the load balancing group relying on the load balancer.
- Configuration file directory (required): The default value is the configuration file directory. If you have modified the configuration file directory, please fill in the modified directory. Be sure to fill in correctly. An error will cause you not be able to access services of the load balancing group created relying on the load balancer.
- Description information (optional): Fill in the relevant descriptive information of the imported load balancer.
When finished, click OK to import the external load balancer. When you fill in the information about the imported external load balancer, make sure that the server’s IP, password, executable file directory, and the configuration file directory are correct. If not correct, Nginx will not be able to import successfully, and there will be a warning to remind you to check the information about the imported load balancer.
Notes:
The configuration information for the load balancing group is stored in the configuration file directory of the load balancer, so you need to ensure that the primary configuration file contains the configuration file directory when importing the external load balancer. Please refer to Appendix > FAQ Question 4: the considerations for importing an externally available load balancer for details.
Check Load Balancers
You can view the basic information of the load balancer, such as the load balancer name, IP address, status, and supported operation types on the Load Balancer Management page.
- For the built-in load balancer of the system, there is only one state, that is, system built-in load balancer. All users can view the detailed information of the load balancing. Admin users can perform HA Strategy action, which is to configure HA Strategy for the load balancer to avoid single point failure. For details, please refer to Use iManager > General Load Balancing and HA Strategy > HA Strategy.
- For imported load balancers, there will be only one state, that is, external server. Available operations include View and Delete. View allows you to check the details of the load balancer. Delete allows you delete the load balancer.
- For a load balancer created by iManager, its status includes running, starting, stopped, deleting, and so on. Available operations include View, Delete, Stop, Restart, etc.
- You can view the details of the load balancer by clicking the View button or load balancer name.
- For the system built-in load balancer, the load balancer IP address, operating system, load balancer executable file directory, load balancer configuration file directory, description information, and the state of the HA policy are displayed in the details page of the load balancer. The load graph is not on the page. The HA policy is not enabled by default. While logging in as an admin, click on the HA policy on the details page to jump to the page to configure the HA policy.
- For the imported load balancer, the load balancer IP address, operating system, load balancer executable file directory, load balancer configuration file directory, description information, and relevant information will be displayed in the details page of the load balancer. The load graph is not on the page.
- For a load balancer created by iManager, in its details page, you can view the IP address, status, creation time, remaining time, resource specification, load balancer executable FILE directory, load balancer configuration file directory, description information, load graph, and relevant information on the detailed information page.
Notes:
For load balancers created by iManager, if you are using the OpenStack visualized platform, and you have set up a floating IP, there will be a Bind button behind the IP address. You can click the button to automatically bind a floating IP to the GIS environment. If successful, the “unbind” button will appear. Please refer to Appendiox > OpenStack Additional Configuration for details.
Click “View Initial Password” on the details page for the load balancer to view the username/password and IP address of the host on which the load balancer resides.
For a load balancer created by iManager, click the “Modify” button to modify the node name, environment specification (vCPU quantity and memory size), and the description. When you modify a node name, you can click Get virtual platform name to automatically fill in the name of the virtual machine corresponding to the load balancer on the virtual platform. Please make sure the node is in a stop state before modifying the environment specification, that is, the corresponding virtual machine is in a shutdown state; otherwise, it will not be allowed to be modified.
Manage Load Balancers
When you log in as an administrator, you can manage the load balancers, and the normal users only have the permission to view it. For load balancers imported and created, the operations can be different. The following is a description of various load balancers:
System Built-in Load Balancers
For a system-built load balancer, you can view its details, and the Admin user can configure the HA policy. For a system-built load balancer, it cannot be deleted.
Manage Imported Load Balancers
For a load balancer imported from outside, you can view its details or delete it.
On the Load Balancer Management page, select the load balancer you want to delete, or click on the Delete button for the corresponding load balancer to delete the load balancer. When you delete a load balancer, you will be asked if you want to delete it. Click OK.
Manage Created Load Balancers
For a load balancer created by iManager, you can view its details. You can also restart, stop and delete it.
- On the Load Balancer Management page, select the load balancer that needs to be removed, and click the “Remove Load Balancer” button to remove the selected load balancer.
- Move the mouse to the list of status of the created load balancer, the Stop, Restart button will display. Click “Stop” and the load balancer will be turned off, and the load balancer will be restarted by clicking “Restart”.
- The stop or restart operations can also be done on the details page of the load balancer.
Check the Load of Load Balancers
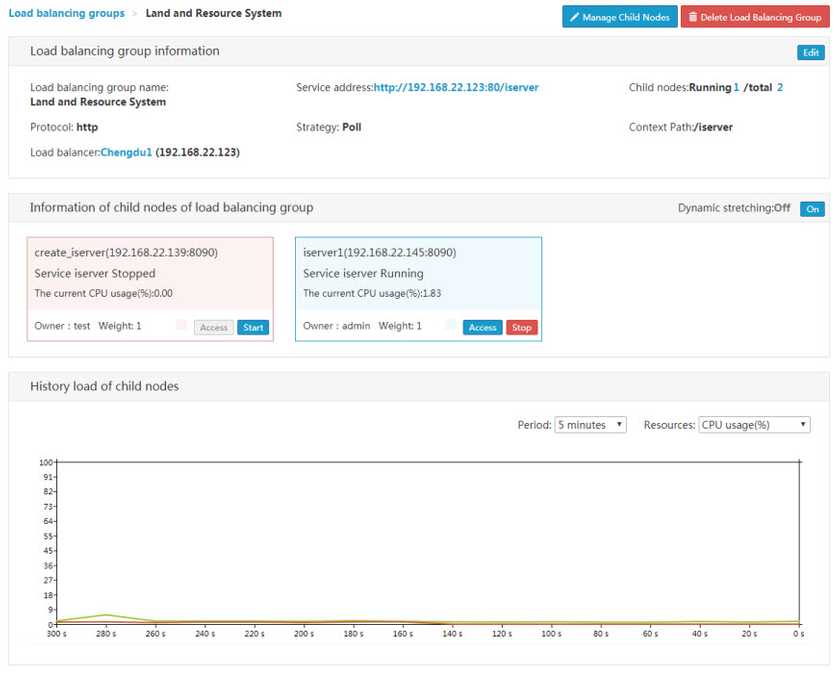
For a load balancer created by iManager, you can view its load condition. For imported load balancers, there are no load graphs. On the Load Balancer Management page, click on the load balancer name link or the corresponding “View” button. You can view the CPU useage, memory occupation, network I/O load graph of the load balancer (load balancer CPU useage load graph by default). If you want to see other types of load graphs, select in Display Resources directly. The display frequency for each type of load graph is 20 seconds, and the display cycle is 5 minutes by default. You can set it to 10 minutes as needed. The following figure is the CPU useage load graph for the GIS server environment in 5 minutes. In the graph, the horizontal axis is the timeline, 0 seconds is the start of time, and the vertical axis is the percentage of resource useage.


