Guides
iManager Deployment Guide-vSphere
Rapid Deployment
System Requirements
- Number of processors: 8 cores+
- Memory: 12 GB+
- Hard Disk: 200 GB+
- vCenter account and password
Please refer to Appendix in the end of the page to see the resource useage for each scenario when creating GIS application.
Installation package preparation
Get Install Package from SuperMap:(* indicates version, any version is ok):
- SuperMap iManager package:
supermap-imanager-*-*-*-vsphere-ovf-ubuntu.zip - iServer template:
supermap_iserver_*_ubuntu14.04_ESXi5.1 - iPortal template:
supermap_iportal_*_ubuntu14.04_ESXi5.1
Deploy iServer/iPortal template
-
Deploy iServer template
-
Deploy Docker OVF template
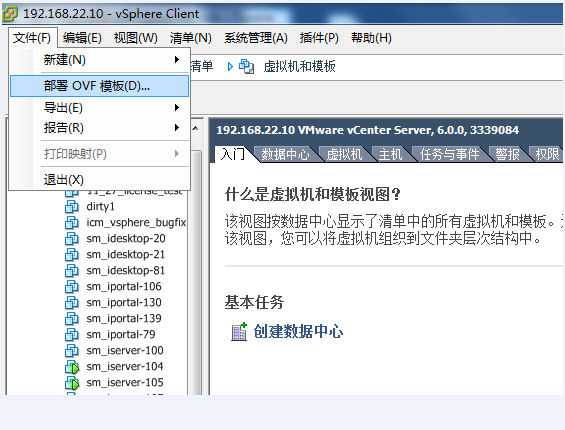
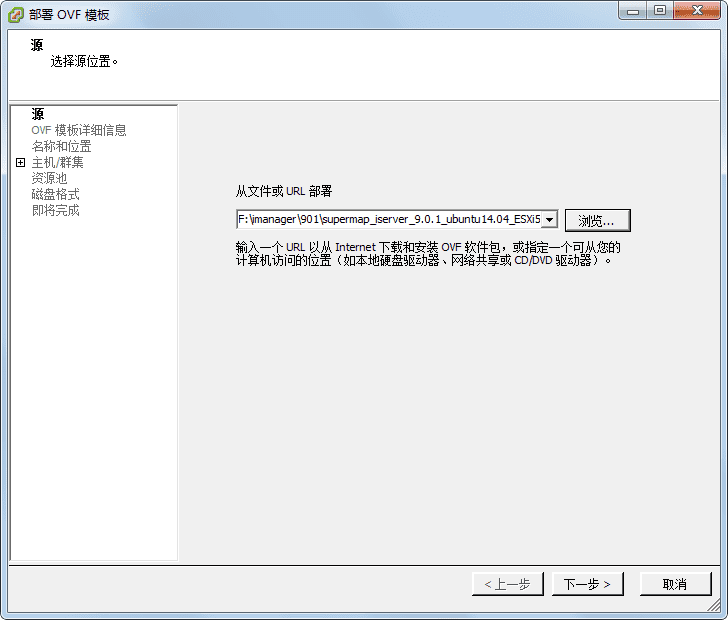
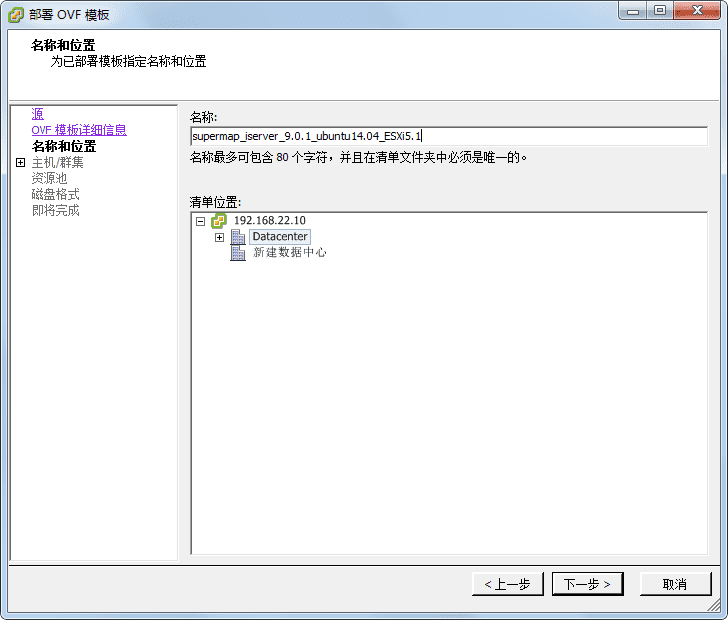
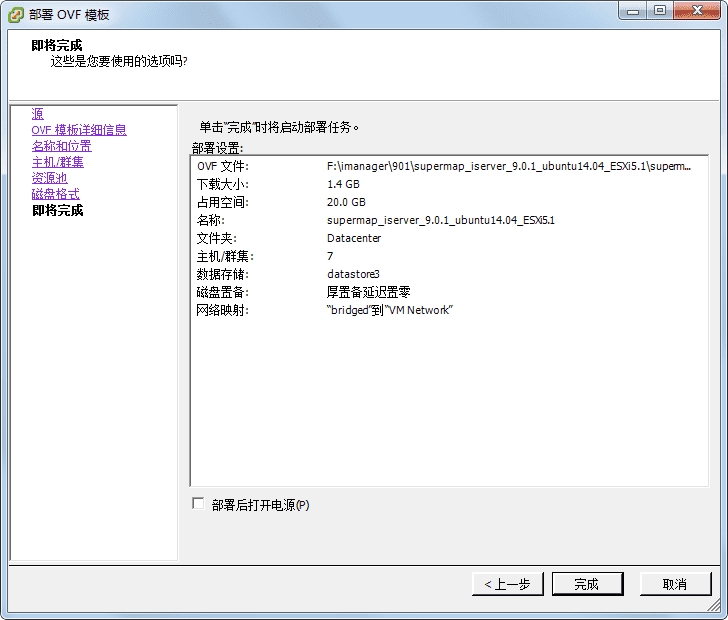
Log into vSphere via vSphere Client and deploy the iServer ovf template: Refer to the following content:
The above is part of the screenshot for deployment. Please fill in the appropriate name, and choose the host/cluster, resource pool, disk format, network, etc. If special settings not required, direct use of the default, and click Next.
-
Convert the imported virtual machine into a template
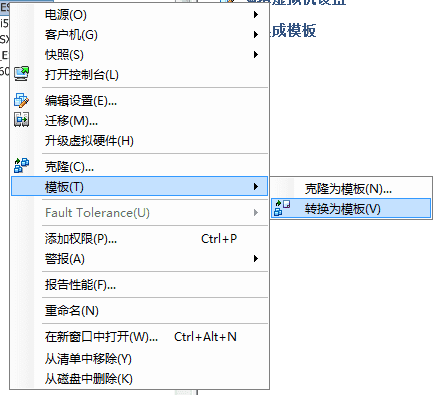
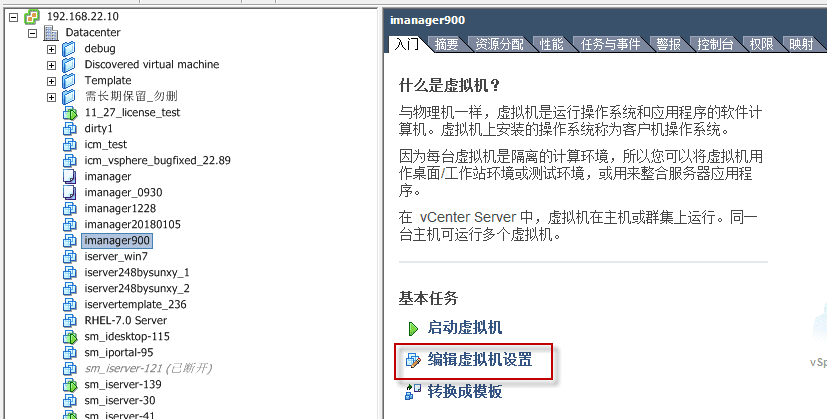
After deploying OVF, it will be a virtual machine. Select the virtual machine right-click > template> convert into a template.
-
-
Deploy iPortal template
Refer to the process of deploying an iServer template, and also deploy the iPortal template.
Deploy iManager
-
Deploy SuperMap iManager OVF template
First decompres the
supermap-imanager-*-*-*-vsphere-ovf-ubuntu.zip, and then refer to the process of deploying iSever ovf template in 3.1.1, and also deploy supermap imanager’s ovf template. -
Adjust the virtual machine specification size
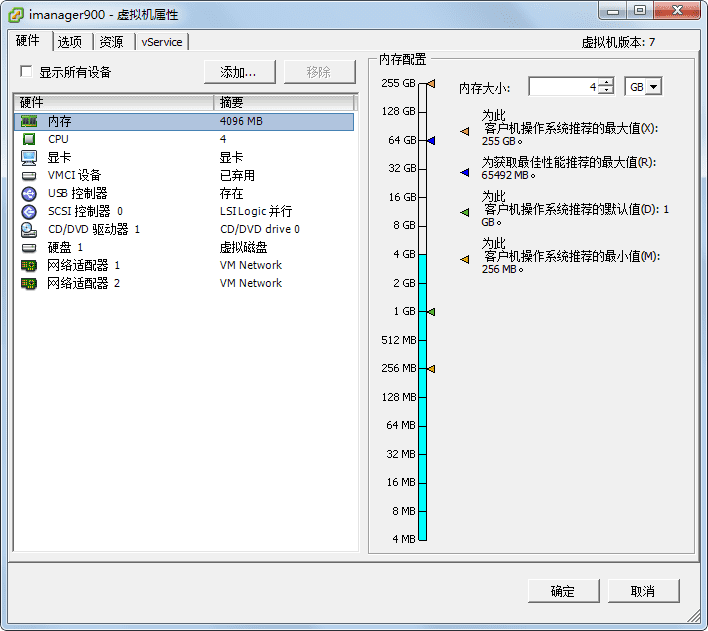
It can be slightly adjusted according to the actual needs. Suggested: Memory 6G+, CPU 4+, hard drive 200G+
- Start virtual machine
-
Set IP
If the network is connected to a DHCP network, you can directly view the virtual machine network card eth0 IP; If the network is not connected to a DHCP network, you need to set static IP following the steps below:
- Log in to the virtual machine with the account root and password is supermap.
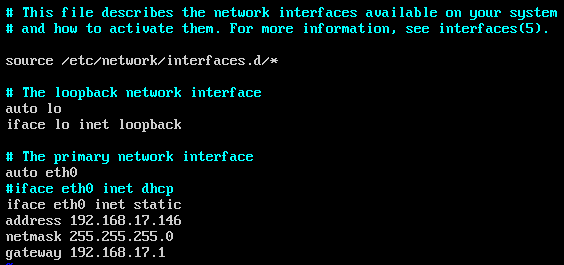
- Refer to the following command for setting the static IP, and then restart the machine(“sudo” command is necessary):
sudo vi /etc/network/interfacesYou can set the IP as shown below
-
Acess iManager service
Access
http://{ip}:8390/imanagerin the browser, where{ip}is the ip of iManager virtual machine. The default account for iManager is admin/admin. -
Configure iManager
Login iManger to configure virtual platform in Advanced Options> System Configuration> Virtual Platform Management:
- “Server IP”: IP address of VMware vCenter Server.
- “Protocol Type”: The default is “https” protocol. If you have modified it, you need to select the modified protocol type;
- “Login User”: The name of the account to log in to VMware vCenter.
- “Login Password”: The password of the account to log in to VMware vCenter.
- “Data Center”: Requried. A virtual data center is a container that includes all the inventory objects that are required for the full functional environment that is used to manipulate the virtual machine By default, the item is not selected and requires you to select a data center.
- Whether to “Configure Resource Pool”: The item is a non-mandatory option. Resource pool is a logical abstraction for VMwarevCenter to flexibly manage resources. If you configure this item, iManager will calculate resources based on the resource pool specified by the user. Resource value for the Home page, administrator approval, and creating the GIS environment all come from the configured resource pool, and you need to select the resource pool to configure.By default, the item is not selected, that is, not configuring the resource pool. The hose where VMwarevCenterServer resides will serve as statistical objects for resource related information.
-
Stop iManager service
Log on to the virtual machine, and execute the following commande to stop the iManager service:
sudo /opt/imanager/shutdown.sh -
Start iManager service
Log on to the virtual machine, and execute the following commande to start the iManager service(“sudo” command is necessary):
sudo /opt/imanager/start.sh
Production Environment Deployment
System Requirements
- Number of processors: 8 cores+
- Memory: 12 GB+
- Hard Disk: 200 GB+
- vCenter account and password
Installation package preparation
Get Install Package from SuperMap:(* indicates version, any version is ok):
- SuperMap iManager installiation package:
supermap-imanager-*-*-*-vsphere-ovf-ubuntu.zip - Docker installiation package:Ubuntu-16.04-docker-ovf.zip
- Docker mirror:supermap-docker-image-*.tar.gz
Deployment Process
-
Environment description
- Two machines need to be prepared, which we call machine A and machine B respectively.
- Machine A deploys the Docker environment to support the compose application of iManager and the big data feature.
- Machine B deploys iManager
-
Deploy machine A
-
Deploy Docker OVF template
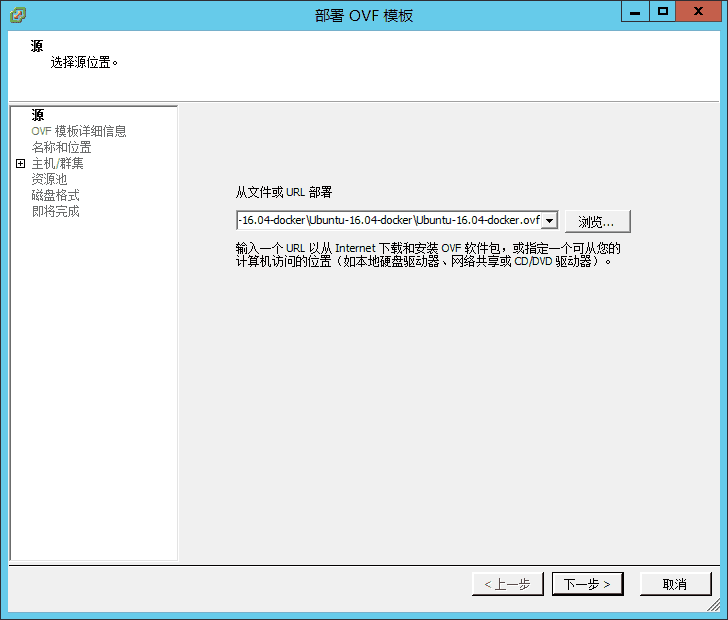
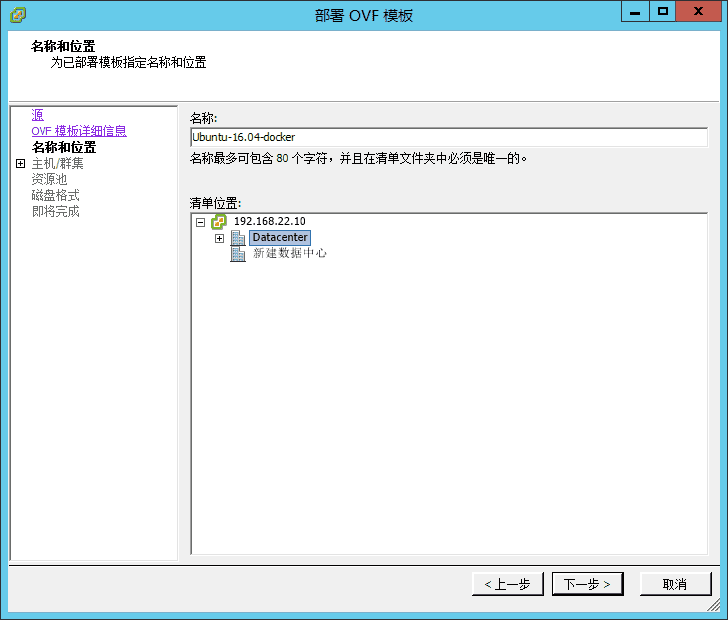
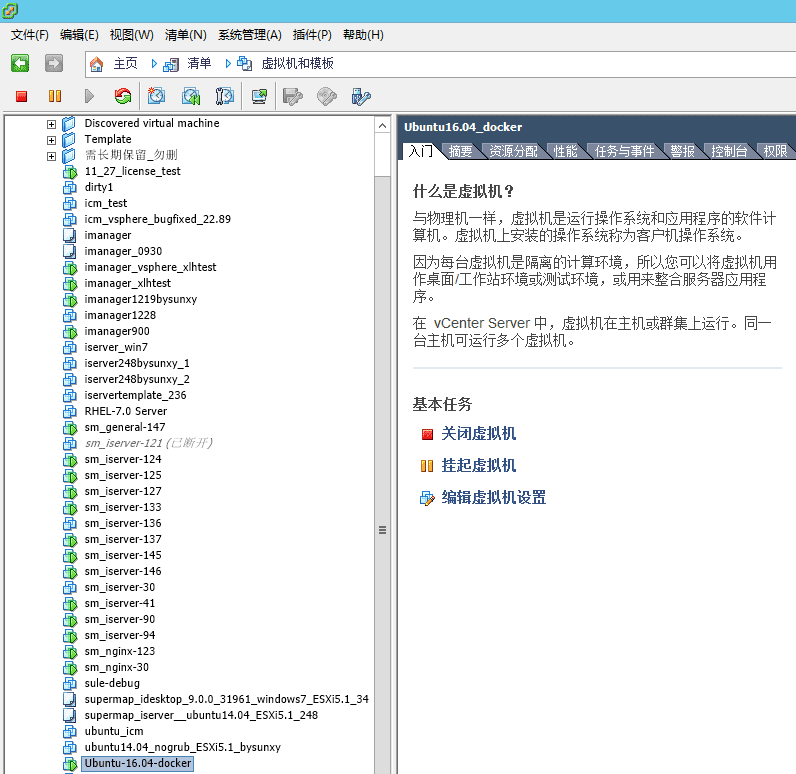
First decompres the Ubuntu-16.04-docker-ovf.zip, and login vSphere via vSphere Client to deploy docker’s ovf template. The reference map is as follows:
The above is part of the screenshot for deployment. Please fill in the appropriate name, and choose the host/cluster, resource pool, disk format, network, etc. If special settings not required, direct use of the default, and click Next.
-
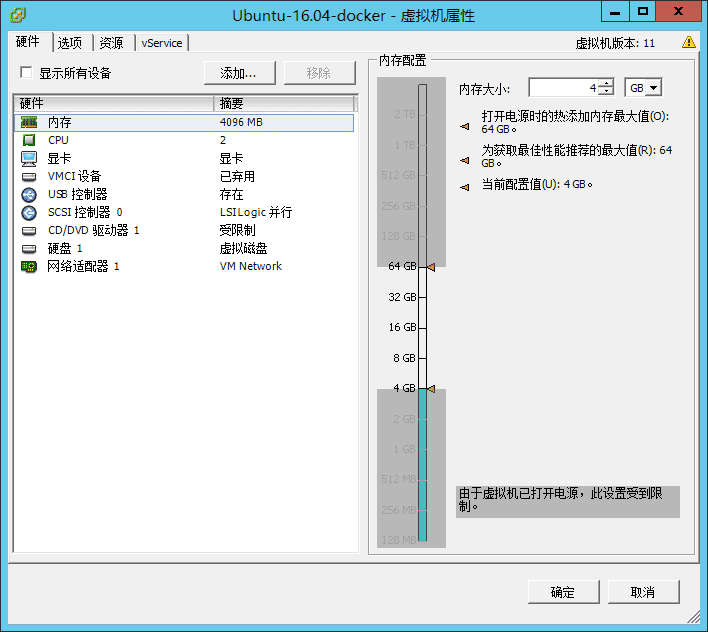
Adjust the virtual machine specification size
Docker recommends adjusting the virtual machine hardware based on an assessment of the number of you are using the compose applications and the GIS big data lab. The minimum setup is 2 cpu, 4096M memory and 100G root disk.
-
Start the virtual machine
-
set IP
The default account of Docker’s virtual machine is supermap, and the password is supermap. Set the IP for the Docker virtual machine(machine A)
sudo vi /etc/network/interfacesYou can set the IP as shown below
Then restart the virtual machine. Ensure that the network can access each other between Docker virtual machine and SuperMap iManager virtual machine.
-
Import the desired Docker image in the Docker virtual machine
Put supermap-docker-image-all-*.tar.gz package into any directory of the machine and perform decompression (change the package name to the actual package name):
tar -zxf supermap-docker-image-*.tar.gzEnter the uncompressed root directory (modify to actual path)
cd supermap-docker-image-*Under the folder supermap-docker-image-all, execute the following commands to import:
sudo chmod +x ./images/pkg-out.sh && sudo ./images/pkg-out.shNotes:
The application image package should import by the previous step according to the requirement.
-
-
Deploy machine B
-
Deploy SuperMap iManager OVF template
First decompres the
supermap-imanager-*-*-*-vsphere-ovf-ubuntu.zip, and then refer to the process of deploying Docker OVF template, and also deploy SuperMap iManager’s ovf template. -
Adjust the virtual machine specification size
It can be slightly adjusted according to the actual needs. Suggested: Memory 6G+, CPU 4+, hard drive 200G+
- Start the virtual machine
-
Set IP
If the network is connected to a DHCP network, you can directly view the virtual machine network card eth0 IP; If the network is not connected to a DHCP network, you need to set static IP following the steps below:
- Log in to the virtual machine with the account root and password is supermap.
- Refer to the following command for setting the static IP, and then restart the machine:
sudo vi /etc/network/interfacesYou can set the IP as shown below
-
Adjust the parameters
Log on to the SuperMap iManager virtual machine and execute the following commands:
sudo vi /opt/imanager/.envModify the following parameter values:
The docker server IP address used in compose application. Fill in the IP of machine A here.
COMPOSE_DOCKER_IP= -
Start iManager service
Log on to the virtual machine of SuperMap iManager and execute the following command to start the iManager service(“sudo” command is necessary).
-
Acess iManager service
Access
http://{ip}:8390/imanagerin the browser, where{ip}is the ip of iManager virtual machine, that is the ip of machine B. The default account for iManager is admin/admin. -
Configure iManager
Login iManger to configure virtual platform in Advanced Options> System Configuration> Virtual Platform Management:
- “Server IP”: IP address of VMware vCenter Server.
- “Protocol Type”: The default is “https” protocol. If you have modified it, you need to select the modified protocol type;
- “Login User”: The name of the account to log in to VMware vCenter.
- “Login Password”: The password of the account to log in to VMware vCenter.
- “Data Center”: Requried. A virtual data center is a container that includes all the inventory objects that are required for the full functional environment that is used to manipulate the virtual machine By default, the item is not selected and requires you to select a data center.
- Whether to “Configure Resource Pool”: The item is a non-mandatory option. Resource pool is a logical abstraction for VMwarevCenter to flexibly manage resources. If you configure this item, iManager will calculate resources based on the resource pool specified by the user. Resource value for the Home page, administrator approval, and creating the GIS environment all come from the configured resource pool, and you need to select the resource pool to configure.By default, the item is not selected, that is, not configuring the resource pool. The hose where VMwarevCenterServer resides will serve as statistical objects for resource related information.
-
Stop iManager service
Login SuperMap iManager virtual machine, execute the following command to stop iManager service:
-
Appendix
Compose application the resource useage for each scenario(To create an environment, for example, CPU needs to deploy the environmental system requirement)
| Compose Application | Memory |
|---|---|
| GIS Site | 2G |
| MySQL Application Set | 500M |
| SGS | 4G |
| SGS(Multi-machine) | 4G |
| SGS(Elastic) | 4G |
| SGS(Elastic)(multi-machine) | 4G |
| GIS Big Data Site | 4G |
| GIS Big Data Site(Multi-machine) | 4G |
