Guides
iManager Deployment Guide-OpenStack
Rapid Deployment
System Requirements
- Number of processors: 8 cores+
- Memory: 10 GB+
- Hard Disk: 100 GB+
Please refer to Appendix in the end of the page to see the resource useage for each scenario when creating GIS application.
Installation package preparation
Get Install Package from SuperMap:(* indicates version, any version is ok)
- iManager mirror (
supermap-imanager-*-*-*-openstack-qcow2-ubuntu.qcow2) - iServer mirror (
supermap_iserver*qcow2.qcow2) - iPorta mirror (
supermap_iportal*qcow2.qcow2)
Deployment Process
-
Import Mirror
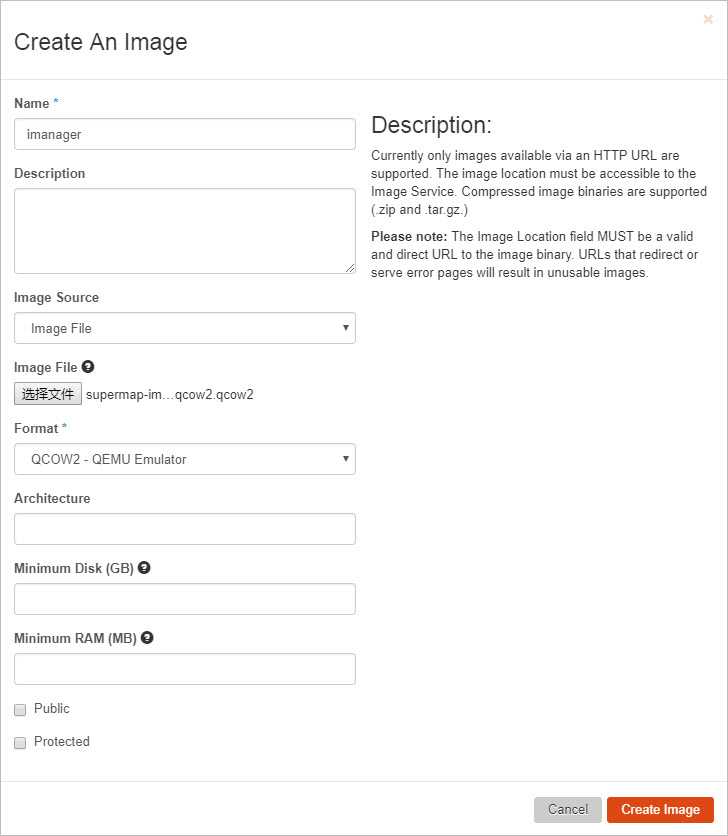
- Import iManager Mirror. In the Project > Compute > Mirror Management page, click Create Mirror button and set up the relevant information in the pop-up dialog box. Note that when you select a mirrored file, select the Qcow2 file, and select QCOW2QEMU emulator for mirror format
- Import iServer Mirror. Refer to import iManager mirror steps above.
- Import iPortal Mirror. Refer to import iManager mirror steps above.
-
Create cloud host type
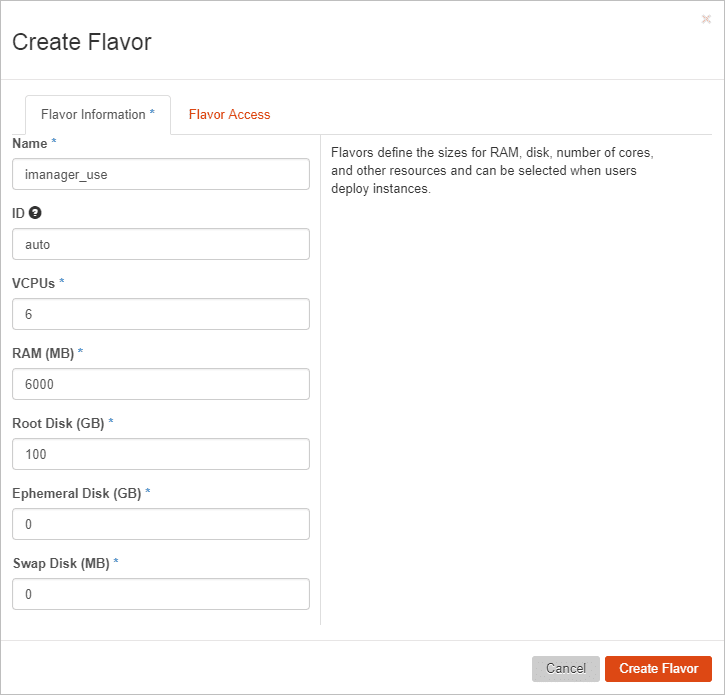
On the Admin > Cloud Host Type Management page, click Create Cloud Host Type. Set the hardware specifications for the cloud host.
The reference map is as follows:
Recommendation: iManager Cloud Host Type, virtual kernel: 6 +, memory8192M+, root disk space 200G+
You can specify different cloud host types for different virtual machines according to actual requirement, and modifying the cloud host type does not affect the virtual machine hardware size once the virtual machine has been created based on the specified cloud host type.
-
Create iManager virtual machine
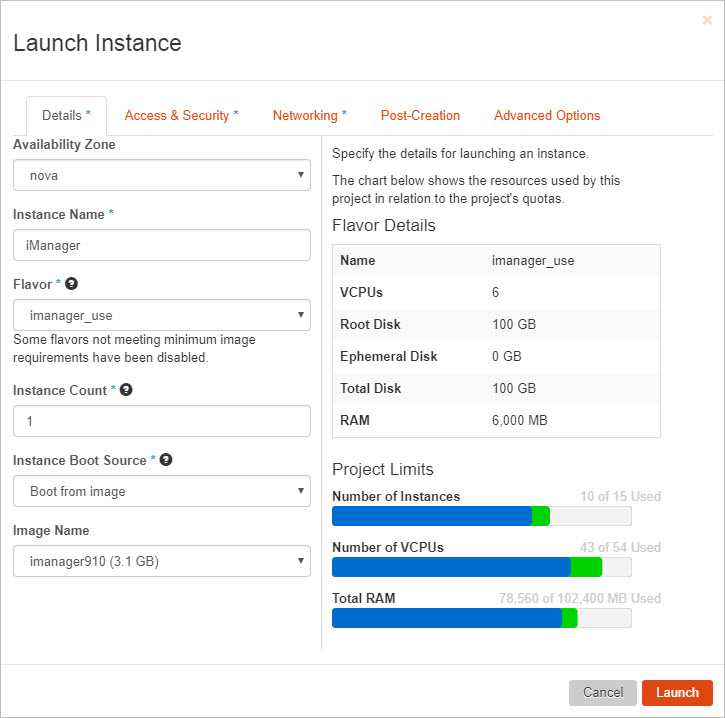
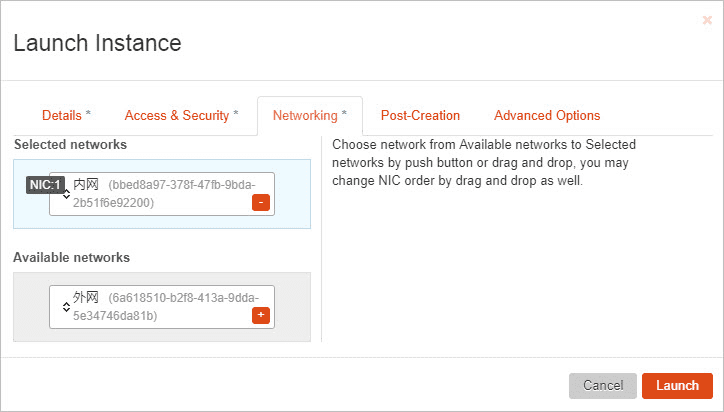
On the Project->Compute->Instance page, click to start the cloud host. On the page for starting cloud host, fill in the appropriate information as follows:
Notes:
The cloud host type here, select the name of the cloud host type in the previous step(that is: imanager_use in the figure above)
-
Start iManager service
- Open the virtual machine, log on to the virtual machine, and the account is root, the password is supermap.
-
Execute the following commandes to start the iManager service (“sudo” command is necessary):
sudo /opt/imanager/start.sh
-
Configure iManager
- On the Project->Compute->Instance page, view Docker virtual machine IP and iManager virtual machine ip
- Access
http://{ip}:8390/imanagerin the browser, where{ip}is the ip of iManager virtual machine. -
Login iManger with The default account for iManager with admin/admin to configure virtual platform in Advanced Options-System Configuration-Virtual Platform Management
If you use OpenStack with Identity API v2.0, the configuration items are as follows:
- “Identity API”: The service endpoint of the Identity service in the “Access&Security->Access API” in the OpenStack system.
- “Tenant name”: “Tenant Name” is also called “Project Name”, refers to the project name you fill in when you apply for the computing resources in the OpenStack system for the GIS cloud management system.
- “Login user”: Refers to the “User” account created in the OpenStack system. Please input the user name which can log on to the OpenStack. Please notice that the user needs to be assigned with a primary project.
- “Login Password”: Fill in the user password that can login to OpenStack.
- “Whether to use floating IP”: Whether to use floating IP, with false by default. When you set floating IP, you need to bind to floating IP if you want to access the GIS environment.
- “Network Name”: The network where the IP resource resides.
If you use OpenStack with Identity API v3.0, the configuration items are as follows:
- “Identity API”: The service endpoint of the Identity service in the “Access&Security->Access API” in the OpenStack system.
- “Domain Name”: You can view your current domain name you specified via Identity Management->Domain of the OpenStack platform.
- “Login user”: Refers to the “User” account created in the OpenStack system. Please input the user name which can log on to the OpenStack.
- “Login Password”: Fill in the user password that can login to OpenStack.
- “Whether to use floating IP”: Whether to use floating IP, with false by default. When you set floating IP, you need to bind to floating IP if you want to access the GIS environment.
- “Network Name”: The network where the IP resource resides.
- Associate with the template: On the left menu of iManager -> advanced options->system configuration->environment type management page, the iserver/iportal mirror imported into GIS server/GIS portal correlation step 3.1
-
Use iManager
- Access
http://{ip}:8390/imanagerin the browser, where{ip}is the ip of iManager virtual machine. - The default account for iManager: admin/admin
- The account of the virtual machine where iManager is located: root/supermap
-
Execute the following commandes to stop the iManager service:
sudo /opt/imanager/shutdown.sh
- Access
Production Environment Deployment
Prerequisite: System Requirements
- Number of processors: 8 cores+
- Memory: 10 GB+
- Hard Disk: 200 GB+
- OpenStack tenant account and password
Prerequisite: Get Install Package from SuperMap
supermap-imanager-*-*-*-openstack-qcow2-ubuntu.qcow2(* indicates version, any version is ok, iManager mirror)Ubuntu-16.04-docker.qcow2(Docker mirror)
Deployment Process
Import Mirror
-
Import iManager Mirror. In the Project >Compute>Mirror Management page, click Create Mirror button and set up the relevant information in the pop-up dialog box. Note that when you select a mirrored file, select the Qcow2 file, and select QCOW2QEMU emulator for mirror format
- Import Docker Mirror. Refer to the steps for importing iManager mirror to import Docker mirror
Create iManager virtual machine
-
Create cloud host type In OpenStack, the resource allocation for each virtual machine is set using the cloud host type. You can define your own specifications according to the requirement. On the Admin > Cloud Host Type Management page, click Create Cloud Host Type. Set the hardware specifications for the cloud host.
The reference map is as follows:
You can specify different cloud host types for different virtual machines according to actual requirement, and modifying the cloud host type does not affect the virtual machine hardware size once the virtual machine has been created based on the specified cloud host type.
Recommendation: iManager Cloud Host Type virtual kernel: 6 +, memory 8192M+, root disk space 200G+
-
Create iManager virtual machine
On the Project > Compute > Instance page, click to start the cloud host. On the page for starting cloud host, fill in the appropriate information as follows:
Create Docker virtual machine
Refer to Creating iManager Virtual Machine. The Docker cloud host type can be estimated based on subsequent use of Compose applications and data from big data labs. At least: Virtual kernel 2, memory 4096M, root disk space 100G
Start iManager service
- Open the virtual machine, log on to the virtual machine, and the account is root, the password is supermap.
-
Execute the following commandes to start the iManager service(“sudo” command is necessary):
sudo /opt/imanager/start.sh
Configure Docker and virtual platform
- On the Project->Compute->Instance page, view Docker virtual machine IP and iManager virtual machine ip
- Log into iManager virtual machine with the default user name root and password supermap as administrator to modify the value of /opt/imanager/.env COMPOSE_DOCKER_IP of the Allin package to Docker virtual machine ip
- Log into the virtual machine created by the Allin package, and execute ” sudo /opt/imanager/start.sh” command to update services
- Access
http://{ip}:8390/imanagerin the browser, where{ip}is the ip of iManager virtual machine. The default account for iManager is admin/admin. - If you need to use the virtual platform, login iManger for virtual platform configuration in Advanced Options-System Configuration-Virtual Platform Management
If you use OpenStack with Identity API v2.0, the configuration items are as follows:
- “Identity API”: The service endpoint of the Identity service in the “Access&Security->Access API” in the OpenStack system.
- “Tenant name”: “Tenant Name” is also called “Project Name”, refers to the project name you fill in when you apply for the computing resources in the OpenStack system for the GIS cloud management system.
- “Login user”: Refers to the “User” account created in the OpenStack system. Please input the user name which can log on to the OpenStack. Please notice that the user needs to be assigned with a primary project.
- “Login Password”: Fill in the user password that can login to OpenStack.
- “Whether to use floating IP”: Whether to use floating IP, with false by default. When you set floating IP, you need to bind to floating IP if you want to access the GIS environment.
- “Network Name”: The network where the IP resource resides.
If you use OpenStack with Identity API v3.0, the configuration items are as follows:
- “Identity API”: The service endpoint of the Identity service in the “Access&Security->Access API” in the OpenStack system.
- “Domain Name”: You can view your current domain name you specified via Identity Management->Domain of the OpenStack platform.
- “Login user”: Refers to the “User” account created in the OpenStack system. Please input the user name which can log on to the OpenStack.
- “Login Password”: Fill in the user password that can login to OpenStack.
- “Whether to use floating IP”: Whether to use floating IP, with false by default. When you set floating IP, you need to bind to floating IP if you want to access the GIS environment.
- “Network Name”: The network where the IP resource resides.
Stop iManager service
Execute the following commandes to stop the iManager service:
sudo /opt/imanager/shutdown.shAdditional Information
-
The basic configuration information of the ovf template of the Allin package:
Environment User name Password Adress ({ip} is Allin package ip) Ubuntu (system) supermap supermap -- iManager admin admin http://{ip}:8390/imanager -
Compose application the resource useage for each scenario(To create an environment, for example, CPU needs to deploy the environmental system requirement)
Compose Application Memory GIS Site 2G MySQL Application Set 500M SGS 4G SGS(Multi-machine) 4G SGS(Elastic) 4G SGS(Elastic)(multi-machine) 4G GIS Big Data Site 4G GIS Big Data Site(Multi-machine) 4G


