



Querying and Modifying Object Properties
This article will introduce how to query and modify the attributes of objects. The operation steps are as follows:
- Function entry: Select one or more geometries/text in the map.
- Map context menu: Right-click and select the Properties command.
- Tab button: Map tab -> Select -> Recognize button, or the Object Manipulation tab -> Select -> Recognize button.
- The Properties panel pops up.
- The upper part of the panel displays the selected objects list:
- The list displays the display field attribute values of the selected objects. The display field can be modified through layer properties settings. By default, the name field is used; if there is no name field, the text field is used; if there is no text field, the SmID field is used. If an invalid expression field is set as the display field, it will be displayed as an invalid value "Null" in the object properties panel.
- Supports the following operations on selected objects via the context menu: Zoom To, Delete, Copy/Paste Properties, Deselect, Select Only This, and Browse Associated Table.
- Hold down the Shift/Ctrl key in the object list to select multiple objects for batch operations (the copy properties function does not support multi-selection).
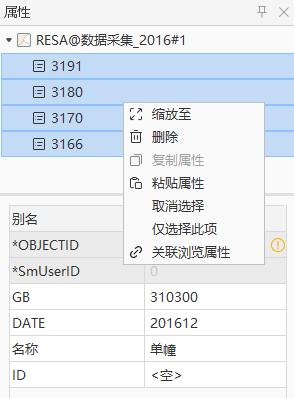
- If multiple objects are selected, the attribute value is displayed when the attribute values of the same field are the same; the field value is displayed as empty when the attribute values are different.
- The lower part of the panel displays the details of the selected objects, including Object Properties, Geo, Node, and Enclosure; if the selected object is text, the properties panel will also have Text. The contents of these five options are introduced below:
 Note:
Note:- In the object properties panel, you can modify the properties of objects with a unique value thematic map through the dropdown options, without manual input, improving mapping and editing efficiency.
- When a parent node is selected, its child nodes will not be highlighted.
- Object Properties: Object properties displays all the property field attributes of the object, i.e., the selected fields of the record in the corresponding attribute table, including the field, field alias, field type, field value, and whether the field is a required field.
- Batch Assign Object Properties: When the root node or multiple objects of the same layer are selected in the properties panel, you can enter a field value in the field list to assign that value to all selected objects in batch.
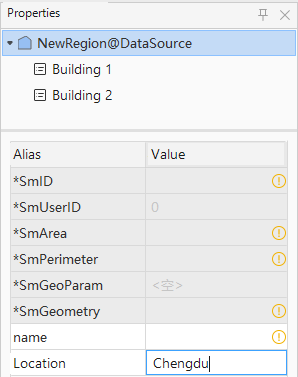
- Hide System Fields: This checkbox is used to set whether to display or hide the attributes of system fields in the geometry properties window. When checked, the attributes of all system fields are hidden, preventing the attributes of non-system fields from being obscured when there are too many system fields.
- Hide Details: This checkbox is used to set whether to display or hide the details fields in the geometry properties window. The details fields include information such as field and type. When checked, the attributes of other fields are hidden, and only the field alias and field value fields are displayed.
- Geo: Used to display the geometry of the selected objects, including type, length, bounds, and other information.
- Object Type: Displays the type information of the object, i.e., whether it is a point, line, region, or other type of object.
- Length: Displays the geodesic length of the line object.
- Perimeter: Displays the geodesic perimeter of the region object.
- Area: Displays the ellipsoidal area of the region object.
- Bounds: Top, Bottom, Left, and Right are used to display the spatial bounds information of the object. The Top and Bottom values are the two boundaries along the Y-axis (i.e., 'Y='), and the Left and Right values are the two boundaries along the X-axis (i.e., 'X='). The unit of these values is the same as the unit of the dataset to which the selected objects belong.
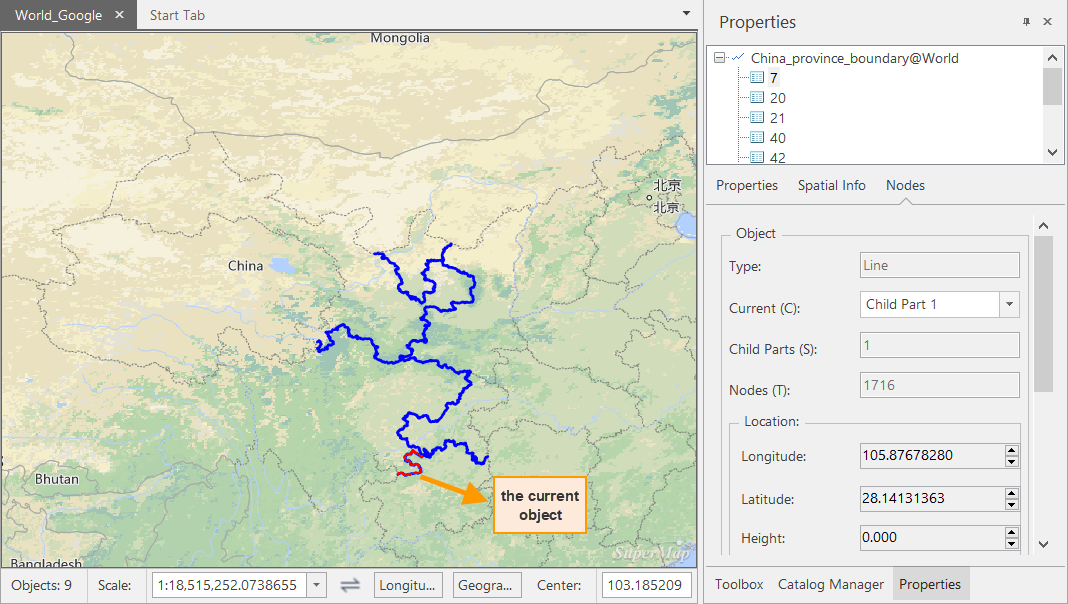
- Node: Used to display the nodes of the selected objects, i.e., information related to the nodes that constitute the object, mainly displayed in a table format.
- Object:
- Object Type: Displays the type information of the object, i.e., whether it is a point, line, region, or other type of object.
- Total Subobjects: Displays the number of subobjects that constitute the selected object. A simple object has 1 subobject, while a compound object may contain 2 or more subobjects.
- Current Subobject: The dropdown list in the combo box to its right lists all subobjects that constitute the selected object. Selecting any item from the dropdown list will display the node information (coordinate information) of the selected subobject in the table below.
- Total Nodes: The total number of all nodes that constitute the selected object (including all subobjects).
- Node: This table area displays the nodes of the current subobject. Each record corresponds to a node of the subobject, and the information content is the coordinate information of the node. The unit is the same as the unit of the dataset to which the selected objects belong.
- Add Node: Adds a new node after the last node of the current subobject. The default X and Y coordinates are (0, 0). This button is only available when the selected object layer is an editable layer.
- Insert Node: Inserts a new node at the currently selected node (the row marked with a cross). The X and Y coordinate values of the new node can be entered in the text boxes below the list box. This button is only available when the selected object layer is an editable layer and a node is selected in the list box.
- Delete Node: Deletes the selected node in the list box. This button is only available when the selected object layer is an editable layer and a node is selected in the list box. This button is unavailable when the number of unselected nodes in the list box is less than the object's control point count (i.e., fewer than 2 unselected nodes for a line object, or fewer than 3 unselected nodes for a region object).
- Export Node: Exports all nodes in the list to a .csv format. By default, all nodes are exported, and it is not possible to select one or several nodes for export.
- Object:
- Enclosure: The attachment feature provides a method to associate non-geographic data with geographic information. Files such as photos, videos, tables, and documents can be added one by one or in batch to the attachments of the selected objects, and they can be displayed and viewed. For example, photos and videos collected during field surveys, or files related to real estate data such as floor plan images and real estate certificates, can be added to the corresponding objects for real-time query and management of related data. Currently, attachments can only be added to datasets from UDBX data sources and PostGIS database data sources.
- Add Attachments: Click the Add Attachments button to open the Add Attachments dialog box. Select the files to be added to the object (supports batch selection by holding Ctrl or Shift), and then click the Add button. The maximum file size for supported attachments is 100M; files exceeding this limit will fail to be added. The added files will be displayed in the attachment list, including the attachment name and size, as shown in the figure below. Adding files with the same name is not supported. If a file with the same name already exists, it will be filtered out upon subsequent attempts, and a prompt will appear in the Output window: "Attachment [Attachment Name] already exists".

- Delete the Attachment: If there are attachments to be removed, select them in the attachment list and click the Delete button. Supports batch selection by holding Ctrl or Shift and then deleting.
- Download the Attachment: Select an attachment in the attachment list and click the Download the Attachment button to save the selected attachment locally.
- View Attachment: Double-click an attachment in the attachment list to open it for viewing using the corresponding local program.
Note:
- After successfully adding attachments, a a Relation Dataset and a table containing attachment files and relationship classes will be generated under the data source where the dataset resides, to establish associations between objects and attachment files. If records in the relationship table are deleted, the corresponding attachment files will also be deleted.
- When performing a merge operation on objects with attachments, if the Save Geometry parameter is set, only the attachments of the selected object are retained; if Weighted Mean or Sum is selected, all attachments of the selected objects will be merged.
- When performing a explode operation on objects with attachments, the attachments in the compound object will be randomly assigned to one of the resulting objects.
- If the dataset has attachments, copying the dataset will not replicate the attachments.
- If the dataset has attachments, using the Manage Replica function does not support copying the attachments in the dataset to another data source.
- Add Attachments: Click the Add Attachments button to open the Add Attachments dialog box. Select the files to be added to the object (supports batch selection by holding Ctrl or Shift), and then click the Add button. The maximum file size for supported attachments is 100M; files exceeding this limit will fail to be added. The added files will be displayed in the attachment list, including the attachment name and size, as shown in the figure below. Adding files with the same name is not supported. If a file with the same name already exists, it will be filtered out upon subsequent attempts, and a prompt will appear in the Output window: "Attachment [Attachment Name] already exists".
- Text: If a text object is selected in the map, the Text option will be displayed in the properties panel. It is mainly used to display and set the text style of the text. After setting the text style, it can be previewed in the map in real-time.
- Text: Sets the text for which the text style needs to be applied;
- Subobject: Used to set the subobject within the currently displayed text.
- Text Content: Displays and sets the text content of the current text subobject.
- Rotation Angle: Used to set the rotation angle of the text. If the Apply to Subobject checkbox is checked, the set angle will be applied to all subobjects of the current text.
- Apply to All: When checked, all text styles set on this page will be applied to all text objects in the dataset.
- Select a Text Template...: Used to apply an existing text template to the current text. Click this button, select a text template in the Select Style Template window that pops up, and click OK to apply it. The template is applied using a parameter copy method. After application, you can continue to modify the font, font size, color, and font effects.
- Font: Displays the font. Used to set the font used for the text. The combo box dropdown list to the right of this label control provides a rich set of fonts for the user to choose from. It supports adding '@' before the font name in the combo box to achieve vertical display effects. It also provides a "Recent Fonts" group for easy selection of recently used font names. The system supports quick keyboard positioning to a font by its first letter. For example, clicking the letter "T" on the keyboard will display fonts starting with the letter "T" in the dropdown list. Click the dropdown list of the combo box to the right of this label control to select a font.
- Font Size: Displays and sets the font size of the text. Users can either input the font size value or select an appropriate font size from the dropdown list of the combo box on the right.
- Font Height: Displays and sets the height of the text font.
- Text Color: Used to set the text color of the text. Click the color button on the right. Users can select and set an appropriate color in the pop-up color panel, or click the "More Colors..." button at the bottom of the color panel to customize the required text color in the "Color" dialog box.
- Background: Used to set the background or outline color of the text. Click the color button on the right. Users can select and set an appropriate color in the pop-up color panel, or click the "More Colors..." button at the bottom of the color panel to customize the required color in the "Color" dialog box.
- Font Effects: Check the corresponding font effects checkboxes to apply these font effects.
- Bold: Used to control whether the text font is bold.
- Strikethrough: Used to control whether the text has a strikethrough decoration.
- Shadow: Used to control whether the text has a shadow decoration.
- Underline: Used to control whether the text has an underline decoration.
- Outline: Used to control whether the text has an outline decoration.
- Transparent BG: Used to control whether the text background is transparent.
- Left Oblique/Right Oblique: Used to control whether the text font is slanted to the left or right.
- Fixed Size: Used to control whether the text size is fixed. If this checkbox is checked, the text size does not change with the map zoom; if unchecked, the text size scales with the map zoom.
- Alignment: Displays and sets the alignment of the text within the text object. The system provides 4 text alignments: Left Align, Right Align, Center Align, and Justify.
- Add to Text Template...: Used to save the current text effects as a text template. Click this button, enter the template name in the Add to Text Template window that pops up, and set the target template library. When selecting an existing template library, the new template is added to that selected library. After both the template name and the template library are fully filled in and validated, click OK to complete the addition. If you need to generate a local copy of the template simultaneously, check Export a local copy at the same time and set the save location.
- Text: Sets the text for which the text style needs to be applied;